How to Create a Viewport in AutoCAD: A Comprehensive Guide
Introduction
AutoCAD is a powerful software used in various industries for designing and drafting purposes. One essential feature of AutoCAD is the ability to create viewports, allowing you to display different views of your drawing simultaneously. Also, this article will explore how to create a viewport in AutoCAD. Whether you are a beginner or an experienced user, this guide will provide you with the knowledge and expertise to effectively utilize viewports in your AutoCAD projects.
Table of Contents
1. What is a Viewport?
A viewport in AutoCAD is a window into your drawing that displays a specific view of your model space or layout. It acts as a frame that allows you to focus on different areas of your drawing without affecting the overall view. Creating multiple viewports lets you present various views simultaneously, making it easier to compare and analyze different parts of your design.
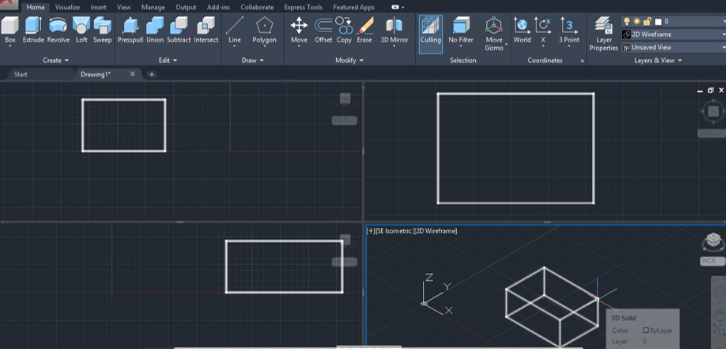
Viewport
2. Why are Viewports Important in AutoCAD?
Viewports play a crucial role in AutoCAD for several reasons. Firstly, they enable you to showcase different views of your drawing within a single layout, eliminating the need for multiple sheets. Also, this not only saves time but also enhances the presentation of your design. Also, secondly, viewports allow you to control each view’s scale, orientation, and visibility, giving you the flexibility to emphasize specific details or dimensions. Lastly, viewports enable efficient collaboration by clearly and concisely representing your design to clients, colleagues, or stakeholders.
3. Understanding Layouts in AutoCAD
Before we dive into creating viewports, let’s understand the concept of layouts in AutoCAD. A layout is a virtual sheet that represents the final output of your drawing. It contains one or more viewports, annotations, and other graphical elements. Also, by working within layouts, you can organize and present your drawing professionally and structure.
To create a new layout, follow these steps:
- Click on the “Layout” tab at the bottom of the AutoCAD window.
- Right-click on an existing layout tab and select “From Template” or “New Layout.”
- Specify the layout name and choose a template for the page setup.
- Click “OK” to create the new layout.
4. Creating a New Layout
To create a new layout in AutoCAD, you can follow these steps:
- Open your AutoCAD drawing.
- Switch to the “Layout” tab at the bottom of the application window.
- Right-click on an existing layout tab and select “From Template” or “New Layout.”
- In the “Create Layout” dialog box, enter a name for your new layout.
- Choose a layout template from the available options or create a custom template.
- Click “OK” to create the new layout.
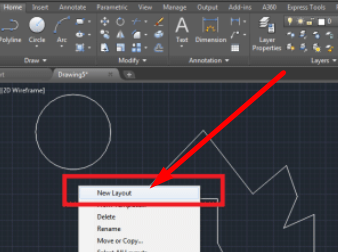
Creating a New Layout
5. Modifying the Layout Tab
Once you have created a new layout, you may want to modify its properties to suit your specific requirements. Also, here’s how you can do it:
- Right-click on the layout tab and select “Page Setup Manager.”
- Select the layout you want to modify in the “Page Setup Manager” dialog box.
- Click on the “Modify” button.
- In the “Page Setup” dialog box, you can adjust settings such as paper size, plot style, plot scale, and plot area.
- Make the necessary changes and click “OK” to save the modifications.

Modifying the Layout Tab
6. Adding Viewports to a Layout
To add viewports to a layout, follow these steps:
- Double-click on the layout tab to activate the layout.
- Type “MVIEW” in the command line and press Enter.
- Specify the first corner of the viewport by clicking on a point in the layout.
- Specify the opposite corner of the viewport by clicking on another point.
- Repeat steps 3 and 4 to create additional viewports as needed.
- To adjust the size and position of a viewport, click inside the viewport and drag the edges or corners.
- To remove a viewport, select it and press the “Delete” key.
7. Adjusting the Viewport Scale
The scale of a viewport determines the relationship between the size of the objects in the model space and their representation in the layout. To adjust the viewport scale, follow these steps:
- Double-click inside the viewport to activate it.
- Type “ZOOM” in the command line and press Enter.
- Choose the desired zoom option, such as “Extents” or “Scale.”
- Enter the appropriate value for the zoom option.
- Press Enter to apply the zoom.
8. Setting the Viewport Display
AutoCAD allows you to control the display settings of each viewport individually. This gives you the flexibility to show or hide specific layers, annotations, or dimensions within a viewport. To adjust the viewport display, follow these steps:
- Double-click inside the viewport to activate it.
- Type “VPLAYER” in the command line and press Enter.
- In the “Layer Properties” dialog box, select the layers you want to display or hide in the viewport.
- Click “OK” to apply the changes.
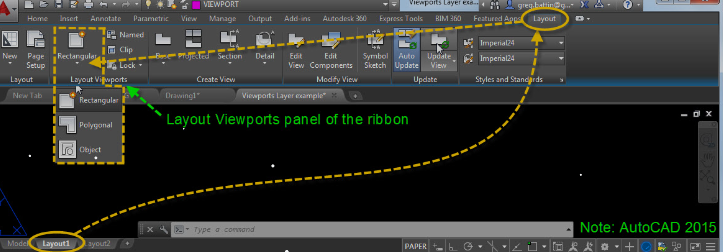
Setting the Viewport Display
9. Controlling Viewport Layers
In addition to setting the viewport display, you can also control the visibility of individual layers within a viewport. Also, this allows you to focus on specific layers while working on a particular view. To control viewport layers, follow these steps:
- Double-click inside the viewport to activate it.
- Type “LAYER” in the command line and press Enter.
- In the “Layer Properties” dialog box, toggle the visibility of each layer as needed.
- Click “OK” to apply the changes.
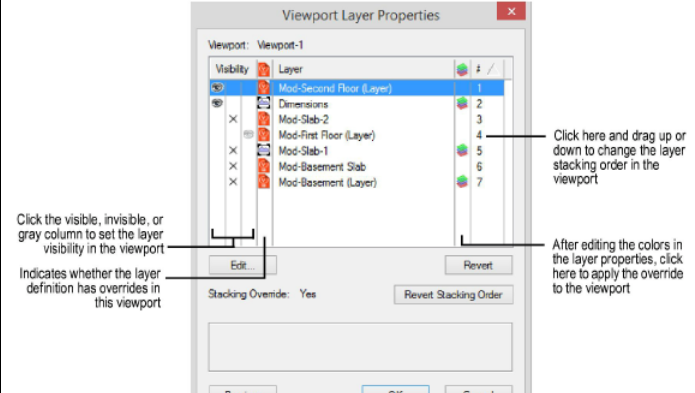
Controlling Viewport Layers
10. Arranging and Organizing Viewports
AutoCAD provides several options for arranging and organizing viewports within a layout.1. Also, to move a viewport, click inside it and drag it to the desired position. 2. To resize a viewport, click on its edges or corners and drag to adjust the size.
- To align multiple viewports, select them and use the “Align” command to align them horizontally or vertically.
- To evenly distribute multiple viewports, select them and use the “Distribute” command to distribute them evenly along the layout.
- To organize viewports in a grid pattern, use the “Create Viewport Array” command to create a grid of viewports.
11. Applying Viewport Overrides
Viewport overrides allow you to apply specific properties to individual viewports, overriding the layer settings of the model space. This is useful when emphasizing certain elements or applying different line types or colors within a viewport. Also, here’s how you can apply viewport overrides:
- Double-click inside the viewport to activate it.
- Type “VPDISPLAY” in the command line and press Enter.
- In the “Viewport Overrides” dialog box, enable the desired properties, such as line type, color, or plot style.
- Click “OK” to apply the overrides.
12. Locking and Unlocking Viewports
Locking a viewport prevents accidental modifications to its position or size. This is particularly useful when you have finalized the layout and want to avoid any unintentional changes. To lock or unlock a viewport, follow these steps:
- Double-click inside the viewport to activate it.
- Type “VPLOCK” in the command line and press Enter.
- Select “1” to lock the viewport or “0” to unlock it.
- Press Enter to apply the changes.
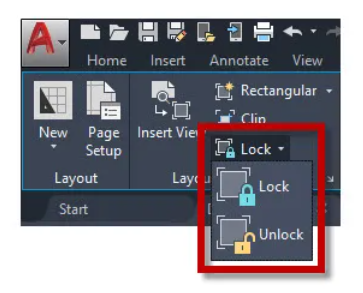
Locking and Unlocking Viewports
13. Clipping Viewports
Viewport clipping allows you to define a specific boundary for a viewport, limiting the displayed area to only what is necessary. This is beneficial when you want to focus on a particular section of your drawing. Also, to clip a viewport, follow these steps:
- Double-click inside the viewport to activate it.
- Type “CLIP” in the command line and press Enter.
- Specify the clipping boundary by selecting points within the viewport.
- Press Enter to apply the clipping.
14. Working with Multiple Viewports
AutoCAD allows you to work with multiple viewports simultaneously, making it easier to compare different views or work on separate parts of your drawing. Also, here are some tips for working with multiple viewports:
- To switch between viewports, double-click inside the desired viewport or use the “MS” (Model/Sheet) button in the status bar to toggle between model space and layout tabs.
- To copy viewports from one layout to another, use the “COPYBASE” command to copy the base point of the viewport and then use the “MVIEW” command to create a new viewport in the desired layout using the copied base point.
- To synchronize the zoom and pan settings of multiple viewports, select them and use the “SYNC” command to synchronize their viewports.
15. Managing Viewport Properties
AutoCAD provides various options for managing viewport properties efficiently. Also, here are some key features:
- Use the “Properties” palette to view and modify viewport-specific properties such as scale, annotation scale, viewport layer, and viewport type.
- Customize viewport properties by right-clicking inside the viewport and selecting “Viewport Properties.”
- Use the “VPSCALE” system variable to set the default scale for new viewports.
- Use the “VPLAYEROVERRIDE” system variable to control whether viewport overrides are retained or reset when switching layouts.
16. Using Annotative Scale in Viewports
Annotative scaling allows you to control the size and visibility of annotations within viewports based on the scale of the viewport. This ensures that your annotations are always legible and appropriately sized. Also, here’s how you can use annotative scaling in viewports:
- Double-click inside the viewport to activate it.
- Type “ANNOTATIVE” in the command line and press Enter.
- In the “Annotation Scale” dialog box, select the desired annotative scale or create a new one.
- Apply the annotative scale to the desired annotations or annotation objects.
- The annotations will automatically adjust their size based on the scale of the viewport.
17. Creating Viewport Templates
Viewport templates allow you to save and reuse viewport configurations across different layouts or drawings. Also, this saves time and ensures consistency in your viewport settings. Also, to create a viewport template, follow these steps:
- Set up the desired viewport configuration in a layout.
- Type “MVIEW” in the command line and press Enter.
- Right-click inside the viewport and select “Viewport Configuration” > “Save Current As Template.”
- Specify a name for the template and click “Save.”
- To apply the template to other viewports, right-click inside the viewport, select “Viewport Configuration,” and choose the desired template from the list.
18. Exporting and Importing Viewport Configurations
AutoCAD allows you to export and import viewport configurations, making it convenient to share your viewport setups with others or transfer them between projects. Also, here’s how you can export and import viewport configurations:
- To export viewport configurations, type “EXPORTLAYOUT” in the command line and press Enter.
- Select the desired layouts containing the viewports you want to export.
- Choose a file location and name for the exported configuration file.
- To import viewport configurations, type “IMPORTLAYOUT” in the command line and press Enter.
- Specify the file location and name of the configuration file you want to import.
- Select the layouts where you want to apply the imported viewport configurations.
19. Printing and Plotting Viewports
Once you have set up your viewports and layout, you may need to print or plot them for documentation or presentation. Also, to print or plot viewports, follow these steps:
- Type “PLOT” in the command line and press Enter.
- In the “Plot” dialog box, select the desired plotter/printer and paper size.
- Choose the plot style table, plot area, and plot scale.
- Under the “Plot Options” section, select “Layout” and choose the desired layout containing the viewports.
- Specify other printing parameters such as plot viewports, plot transparency, and plot stamp.
- Click “OK” to start the printing or plotting process.
20. Troubleshooting Viewport Issues
Sometimes, you may encounter issues or unexpected behavior when working with viewports in AutoCAD. Also, here are some common troubleshooting tips:
- If a viewport is not displaying correctly, make sure it is not clipped or locked.
- Check the layer visibility and overrides within the viewport to ensure the desired elements are visible.
- If a viewport is not updating or reflecting changes in the model space, type “REGEN” in the command line to regenerate the drawing.
- Verify that the viewport scale is set correctly to ensure accurate representation.
- If viewports are not printing or plotting correctly, check the plot settings, paper size, and plot scale.
21. Tips and Tricks for Efficient Viewport Workflow
To enhance your workflow and optimize your use of viewports in AutoCAD, consider the following tips and tricks:
- Use the “VPVISCROP” system variable to control the visibility of objects outside the viewport boundary. 2.Utilize the “MVIEW” command options such as “V” for viewport scaling, “O” for viewport object display, and “L” for viewport layer control.
- Create viewport templates for commonly used viewport configurations to save time and ensure consistency.
- Use the “SYNC” command to synchronize zoom and pan settings between multiple viewports.
- Experiment with different viewport arrangements and layouts to find the most efficient and visually appealing setup for your projects.
- Explore advanced viewport features such as annotative scaling and viewport overrides to enhance the presentation and readability of your drawings.
- Regularly save your viewport configurations and layouts to avoid losing your work in case of unexpected software crashes or power outages.
- Stay updated with the latest AutoCAD versions and releases to take advantage of new features and improvements related to viewports.
22. Frequently Asked Questions (FAQs)
How do I create a new layout in AutoCAD?
To create a new layout in AutoCAD, follow these steps:
- Switch to the “Layout” tab at the bottom of the application window.
- Right-click on an existing layout tab and select “From Template” or “New Layout.”
- Enter a name for the new layout and choose a template or create a custom template.
- Click “OK” to create the new layout.
Can I have multiple viewports in a layout?
Yes, you can have multiple viewports in a layout. Also, AutoCAD allows you to create and manage multiple viewports within a single layout, allowing you to simultaneously display different views of your drawing.
How can I change the scale of a viewport?
To change the scale of a viewport, follow these steps:
- Double-click inside the viewport to activate it.
- Type “ZOOM” in the command line and press Enter.
- Choose the desired zoom option, such as “Extents” or “Scale.”
- Enter the appropriate value for the zoom option.
- Press Enter to apply the zoom.
What is the purpose of viewport clipping?
Viewport clipping allows you to define a specific boundary for a viewport, limiting the displayed area to only what is necessary. Also, this is beneficial when you want to focus on a particular section of your drawing and exclude unnecessary elements outside the clipping boundary.
How do I print or plot a specific viewport?
To print or plot a specific viewport, follow these steps:
- Type “PLOT” in the command line and press Enter.
- In the “Plot” dialog box, select the desired plotter/printer and paper size.
- Choose the plot style table, plot area, and plot scale.
- Under the “Plot Options” section, select “Layout” and choose the layout containing the desired viewport.
- Specify other printing parameters such as plot viewports, plot transparency, and plot stamp.
- Click “OK” to start the printing or plotting process.
What should I do if my viewports are not displaying correctly?
If your viewports are not displaying correctly, also, you can try the following troubleshooting steps:
- Check if the viewport is clipped or locked. Unlock or adjust the clipping boundaries if necessary.
- Verify the layer visibility and overrides within the viewport to ensure the desired elements are visible.
- Type “REGEN” in the command line to regenerate the drawing and update the viewport display.
- Make sure the viewport scale is set correctly to ensure accurate representation.
- Check the plot settings if the viewports are not printing or plotting correctly.
23. Conclusion
In conclusion, knowing how to create and effectively use viewports in AutoCAD is essential for efficient drafting and design. Following the step-by-step instructions and implementing the tips and tricks in this guide can enhance your AutoCAD workflow and create professional and visually appealing drawings. Also, viewports allow you to present different views of your design, control scale and visibility, and optimize collaboration with clients and colleagues. Remember to experiment with different viewport configurations, utilize viewport templates, and stay updated with the latest AutoCAD features to make the most out of this powerful tool. Happy crafting!
Projectcubicle Recommend
- “Human Resources Dashboard Create in Excel: Streamline Your HR Processes”
- Learn how to create a human resources dashboard in Excel to streamline HR processes.
- “Export Excel into PDF: Simplify Your Data Sharing Process”
- Discover how to export Excel files into PDF format to simplify data sharing.
- “Exponents in Excel: Powering Up Your Formulas”
- A comprehensive guide on using exponents in Excel to enhance your formulas.
- “Exponential Smoothing in Excel: A Comprehensive Guide to Forecasting Techniques”
- Learn about exponential smoothing in Excel and explore forecasting techniques.
Hello, I’m Cansu, a professional dedicated to creating Excel tutorials, specifically catering to the needs of B2B professionals. With a passion for data analysis and a deep understanding of Microsoft Excel, I have built a reputation for providing comprehensive and user-friendly tutorials that empower businesses to harness the full potential of this powerful software.
I have always been fascinated by the intricate world of numbers and the ability of Excel to transform raw data into meaningful insights. Throughout my career, I have honed my data manipulation, visualization, and automation skills, enabling me to streamline complex processes and drive efficiency in various industries.
As a B2B specialist, I recognize the unique challenges that professionals face when managing and analyzing large volumes of data. With this understanding, I create tutorials tailored to businesses’ specific needs, offering practical solutions to enhance productivity, improve decision-making, and optimize workflows.
My tutorials cover various topics, including advanced formulas and functions, data modeling, pivot tables, macros, and data visualization techniques. I strive to explain complex concepts in a clear and accessible manner, ensuring that even those with limited Excel experience can grasp the concepts and apply them effectively in their work.
In addition to my tutorial work, I actively engage with the Excel community through workshops, webinars, and online forums. I believe in the power of knowledge sharing and collaborative learning, and I am committed to helping professionals unlock their full potential by mastering Excel.
With a strong track record of success and a growing community of satisfied learners, I continue to expand my repertoire of Excel tutorials, keeping up with the latest advancements and features in the software. I aim to empower businesses with the skills and tools they need to thrive in today’s data-driven world.
Suppose you are a B2B professional looking to enhance your Excel skills or a business seeking to improve data management practices. In that case, I invite you to join me on this journey of exploration and mastery. Let’s unlock the true potential of Excel together!
https://www.linkedin.com/in/cansuaydinim/


