How to Create and Assign a Calendar in Primavera P6?
Two weeks ago, one of our readers asked: What is a Primavera P6 Calendar and how can I create, assign (Primavera P6 assign Calendar) and modify a calendar in Primavera p6? Therefore, in this article, we will demonstrate how to create a default 10-hour per day, 6-day work week with holidays calendar in Primavera P6. Before preparing a project schedule in Primavera P6, it is important to understand the functions of Calendars in Primavera P6. For a serviceable work schedule, the calendar must represent the real site conditions, weather conditions, non-work days, public holidays, etc.
Table of Contents
Working days and daily working hours are defined in P6 default calendars. It is possible to modify these default calendars for your project’s conditions.
Types of Calendars in Primavera P6
1. Standard Calendars
Standard calendars in Primavera P6 serve as the foundation upon which project scheduling is built. They delineate the standard working hours, usually spanning from Monday to Friday, from 8:00 AM to 5:00 PM. Furthermore, they encompass standard holidays and non-working periods, providing a baseline for project scheduling.
2. Resource Calendars
Resource calendars in Primavera P6 cater to the individualized needs of resources involved in the project. Whether it’s accommodating varying working hours, shifts, or days off, these calendars ensure that resource allocation is optimized for maximum efficiency.
3. Project Calendars
Project calendars are tailored to the unique requirements of each project. They define project-specific working hours, holidays, and non-working periods. By aligning project timelines with organizational or contractual obligations, project calendars ensure smooth project execution.
Importance of Calendars in Primavera P6
The significance of Primavera P6 calendars cannot be overstated. They are the cornerstone upon which project scheduling, resource management, and adherence to project constraints are built. These calendars dictate activity duration, ensure resource availability, and enforce project constraints to maintain project integrity.
Creating Calendars in Primavera P6
Step 1: Accessing the Calendars
To create calendars in Primavera P6, navigate to the “Enterprise” menu and select “Calendars.”
Step 2: Defining Calendar Properties
In this step, it’s crucial to meticulously define calendar properties. This includes assigning a descriptive name, specifying working hours, delineating non-working days, and accounting for exceptions.
Step 3: Applying Calendars
Once created, calendars need to be applied judiciously within Primavera P6. They can be assigned at various levels, including global calendars that apply across multiple projects, project calendars specific to individual projects, or resource calendars tailored to individual resources.
Primavera P6 Modified Calendar: How To Use It?
Step 1: Accessing Calendars
To initiate the modification process, project managers must first access the Calendars section within Primavera P6. Also, this can be accomplished by navigating to the “Enterprise” menu and selecting the “Calendars” option. Once within the Calendars section, project managers gain access to a comprehensive list of calendars associated with various projects.
Step 2: Selecting the Calendar to Modify
With the Calendars section at their disposal, project managers must identify the specific calendar they intend to modify (Primavera P6 modify Calendar). By selecting the relevant calendar from the list of available options, project managers set the stage for making targeted adjustments to meet project-specific requirements and constraints.
Step 3: Modifying Calendar Properties
Working Hours Adjustment
One of the primary aspects project managers may need to modify (Primavera P6 modify Calendar) is the working hours within a calendar. To enact changes in this area, project managers can initiate a double-click action on the calendar of choice. This action prompts the opening of the calendar’s properties window, wherein project managers can navigate to the Working Hours tab. Here, they possess the ability to make nuanced adjustments, such as modifying start and end times, incorporating breaks, or altering working days to better align with project needs.
Adding or Removing Holidays
Another critical aspect of calendar modification involves the management of holidays. By navigating to the Holidays tab within the calendar properties window, project managers can seamlessly add or remove holidays as necessary. This process entails clicking the “Add” button to introduce a new holiday, specifying the date and providing a descriptive explanation. Conversely, to remove a holiday, project managers need only select the target holiday from the list and execute the “Remove” action.
Incorporating Exceptions
To accommodate unique circumstances or deviations from standard scheduling parameters, project managers can utilize the Exceptions feature within Primavera P6 calendars. By accessing the Exceptions tab within the calendar properties window, project managers can add exceptions to the calendar. These exceptions may encompass non-working days, modified working hours, or other irregularities. Through the “Add” function, project managers can delineate the type of exception, specify the date or period affected, and provide pertinent details to ensure clarity and precision.
Step 4: Applying Modifications
Having meticulously adjusted calendar properties to align with project requirements, project managers proceed to apply their modifications. By clicking the “OK” button within the calendar properties window, project managers confirm their changes and initiate the process of applying these modifications to the calendar.
Step 5: Verifying Modifications
Upon applying modifications, project managers undertake a critical verification step to ensure the accuracy and efficacy of their adjustments. This meticulous verification process serves as a safeguard against discrepancies and reinforces the integrity of project scheduling within Primavera P6.
Creating and Assigning, and Modifying Calendars in Primavera P6
We will select Enterprise | Calendars from the main top drop-down menu, Figure 1.
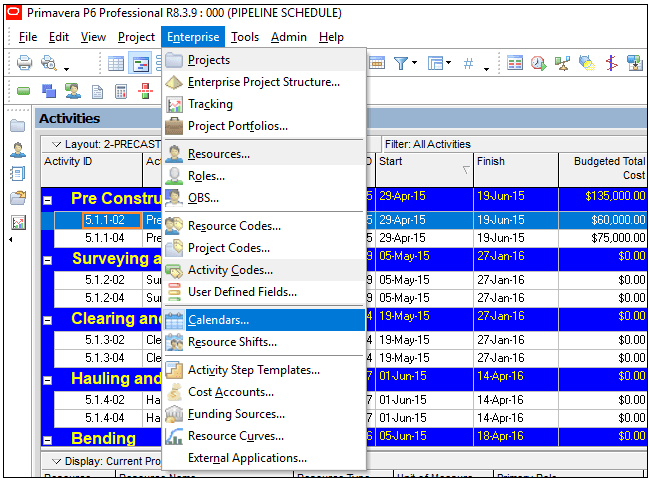
Primavera P6 Calendars Figure 1
In the “Calendars” window, we will select the + Add button, Figure 2.
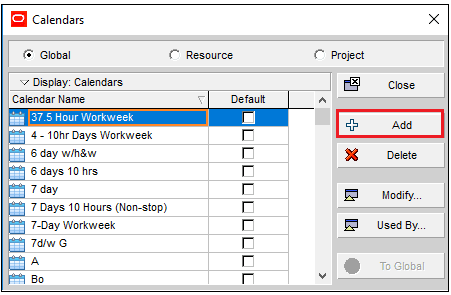
Add Calendar Figure 2
Now we will copy a default calendar of P6 and modify it. “In the Select Calendar to Copy From” window, we will select the 7 Days 10 Hours calendar, Figure 3.
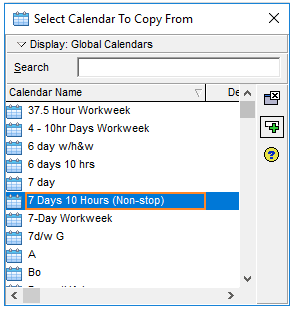
Select Calendar to Copy From – Figure 3
We will type the name of our calendar as 6×10, Figure 4.
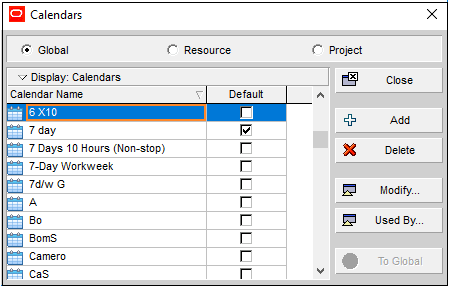
Name Calendar Figure 4
We will select “Modify” and open the “Global Calendar: 6×10” window , Figure 5.
Make sure that “Total work hours/day” option is marked.
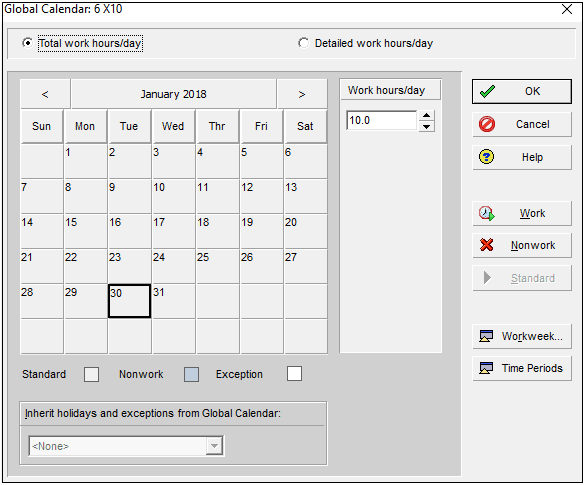
Primavera P6 Calendars – Global Calendar Figure 5
We will select “Workweek” in order to mark the nonwork days. Let’ s assume that Sundays are the nonwork days. We will type “0” work hour for Sunday, Figure 6.
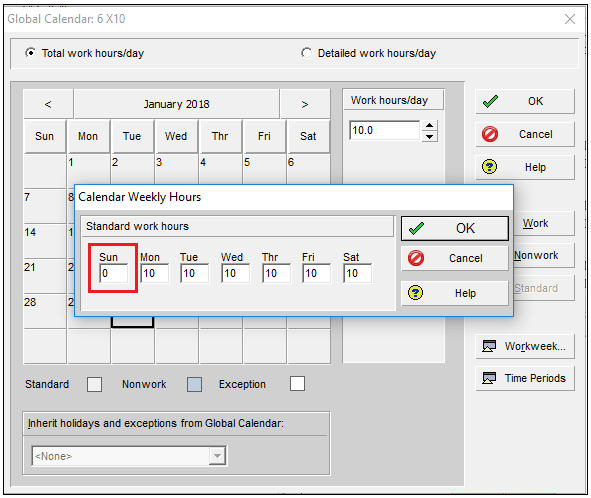
Figure 6
We will have a 6-day work week calendar, Figure 7.
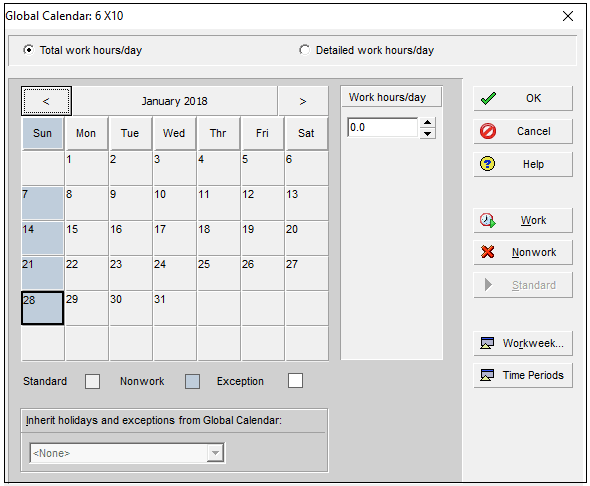
6 day work week calendar Figure 7
Using Primavera P6 Calendars to Highlight Holidays
Now we will mark the holidays. Let’ s assume that December 13th, January 20th, and April 7th is a holiday in our project. We will highlight them and select the “Nonwork” button, Figure 8.

Primavera P6 Calendars – Holidays Figure 8
Time Periods
Make sure that the Hours/Day cell is set to 10.0 to match our 6-day 10-hrs/day work week, Figure 9.
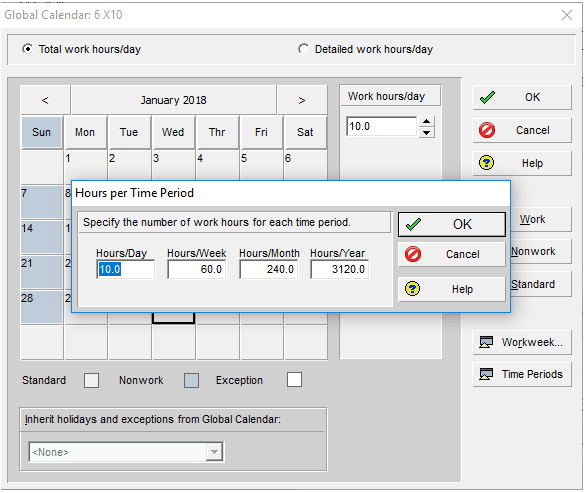
Hours Per Time Period Figure 9
If we leave it as 8-hrs/day then Primavera P6 will consider each 8-hour period of our 10-hour day as one day for the Original Duration calculation. This means, if it remains 8-hrs/day and we insert an activity original duration 3 days, it will calculate 3×8 = 24 hours. Then if we change 8-hrs/day to 10-hrs/day, original duration of the activity will be 24/10 = 2 days. So it is important to set the working hours before to add activities in primavera p6.
Set Default Calendar
Now we will set our newly created 6×10 work week calendar to the default. We will select Enterprise | Projects from the main top drop-down menu and select our newly created 6×10 work week calendar, Figure 10.

Primavera P6 Calendars Figure 10
Summary
It is possible to create and modify different types of calendars in P6 and assign them to different activities. Different working types can use different calendars. For example, site calendar may be 10-hours per day, a 6-day workweek calendar, an office calendar may be 8-hour per day, 5-day work week calendar. Creating and assigning a calendar in Primavera P6 is an important process. Because the assigned calendar must represent the real conditions of the project.
See Also
External References
FAQs
-
How do I change the calendar in Primavera P6?
- To change the calendar in Primavera P6, follow these steps:
- Go to the “Enterprise” menu.
- Select “Calendars.”
- Choose the calendar you want to change.
- Modify the working hours, non-working days, or other parameters as needed.
- To change the calendar in Primavera P6, follow these steps:
-
Why is the calendar important in Primavera P6?
- The calendar is important in Primavera P6 as it defines the working and non-working hours/days for activities and resources. It helps in accurately scheduling project activities and managing resources’ availability.
-
What are the different types of calendars in Primavera P6?
- Primavera P6 offers various types of calendars including:
- Standard calendar
- Resource calendar
- Project calendar
- Global calendar
- Primavera P6 offers various types of calendars including:
Primavera P6 allows you to create an unlimited number of calendars to cater to different project requirements.
-
How do I change calendar options?
- To change calendar options in Primavera P6, navigate to the “Enterprise” menu, select “Calendars,” then choose the calendar you want to modify. From there, you can adjust working hours, non-working days, and other settings.
-
How do I change calendar layout?
- The specific steps may vary depending on the version of Primavera P6 you are using. Check the user manual or help documentation for detailed instructions.
-
How many different calendars do you need?
- The number of calendars needed depends on the complexity of your project and the variations in working hours and non-working days for different activities and resources. It’s common to have multiple calendars to accommodate various scenarios.
-
Can you make multiple calendars?
- Yes, you can create multiple agendas to suit different project needs and resource schedules. Each calendar can have its own working hours, non-working days, and other parameters.

motivation

Irma Gilda is chief executive of Sonic Training and Consultancy Co., the training platform offers project planning and scheduling More than 60 k learners have used the platform to attain professional success. Irma is a professional Primavera P6 Trainer.





If hours per month is 240 then hours per year is 2880 pls explain how it is 3120
Dear Amarendra
The calculation is as follows
60 Hours / Week
60 x 4 = 240 Hours /Month
60 x 52 = 3120 Hours/Year
Business training can assist you get a far better job.