Creating Four Week Look Ahead Schedule in P6 Figure 1

Four Week Look Ahead Schedule in Primavera P6: How to Build a Lookahead Filter in Primavera P6

How to Build a Lookahead Filter in Primavera P6? This blog post will unravel the intricacies of creating a four-week look ahead schedule in Primavera P6. Starting with a dive into the importance of look ahead schedules for project management, we’ll explore how to effectively use the 4 week look ahead template excel, the advantages of a 90 days look ahead schedule, the implementation of a P6 2 week look ahead filter, and more.

You’ll discover how to optimize your project planning and execution with a tailored look ahead (90 days look ahead schedule) schedule template excel, learn the nuances of Primavera lookahead filters, and understand how to apply a 3 week look ahead strategy using a bespoke excel template. By the end of this guide, you’ll be equipped with the knowledge to enhance your project management practices in Primavera P6, ensuring you stay ahead of the curve and deliver projects with unparalleled efficiency.

Crafting a Four Week Look Ahead Schedule in Primavera P6

Why a Look Ahead Schedule is Crucial for Your Project’s Success

The heartbeat of any project lies in its planning and execution. A Four Week Look Ahead Schedule in Primavera P6 isn’t just a piece of document; it’s your roadmap to navigating through the complexities of project management with agility and foresight. This scheduling technique allows project managers to preview short-term tasks and milestones, enabling dynamic adjustments based on real-time progress and unforeseen challenges. Whether you’re juggling resources or racing against time, a 4 week look ahead template excel becomes your best ally in ensuring no task falls through the cracks.

Four Week Look Ahead Schedule in Primavera P6:

Four Week Look Ahead Schedule in Primavera P6:

Interesting Facts

  • Did You Know? Primavera was originally a company name, not just software. Founded in 1983, Primavera Systems Inc. developed project management software that became synonymous with high-level planning and execution capabilities.
  • Global Impact: Primavera P6 is used on some of the world’s most challenging projects, from constructing skyscrapers to implementing nationwide IT networks. Its versatility and power make it a go-to solution for managing complexity and scale.
  • Beyond Construction: While often associated with construction and engineering, Primavera P6’s applications extend to sectors like manufacturing, IT, and event planning. Its ability to handle diverse projects underscores the software’s flexibility.
  • Continuous Evolution: Oracle’s acquisition of Primavera in 2008 has only accelerated its development, integrating cloud computing, AI, and other cutting-edge technologies to make project management more efficient and insightful.

Leveraging Excel Templates for Enhanced Efficiency

In the realm of project management, efficiency and precision are paramount. The 4 week look ahead template excel and the 3 week look ahead excel template stand out as invaluable tools for project managers aiming to streamline their scheduling process. These templates offer a structured and customizable framework, making it easier to plot out tasks, allocate resources, and track progress. They not only save time but also enhance accuracy, ensuring that your look ahead schedules reflect the current status and future trajectory of your project with crystal clarity.

Navigating Through Primavera P6: The Lookahead Filter Magic

Primavera P6 takes project scheduling to a whole new level with its advanced lookahead filter features, including the P6 2 week look ahead filter and the Primavera lookahead filter. These powerful tools allow you to sift through your project schedule, highlighting tasks and activities that demand immediate attention.

The Strategic Advantage of a 90 Days Look Ahead Schedule

While the focus of this guide is on mastering the four-week look ahead, the concept of a 90 days look ahead schedule (90 days look ahead schedule) cannot be overlooked. This broader perspective is essential for long-term project health, allowing managers to anticipate and prepare for future phases of the project lifecycle. By integrating both short-term and long-term planning horizons, you can achieve a balance between immediate execution requirements and strategic goals, ensuring that your project remains on track for success.

Four Week Look Ahead Schedule

For better understanding, let’s review a sample construction work schedule.

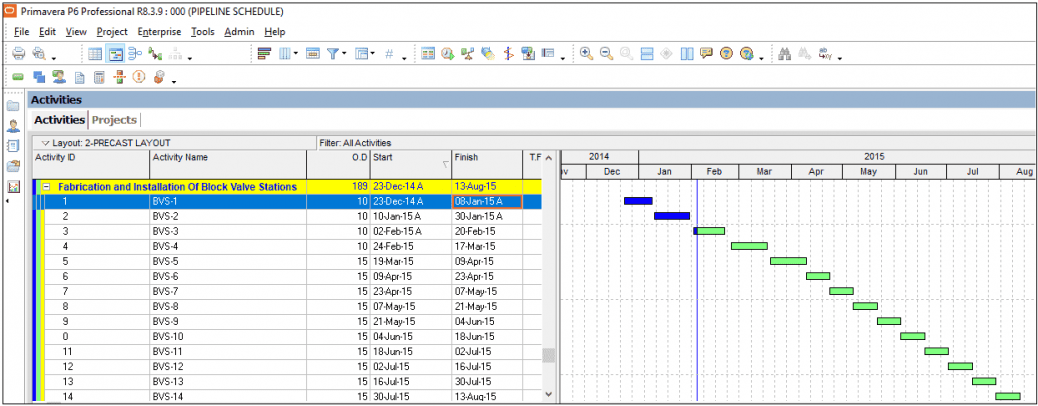
Figure 1 below shows a sample project of building 14 Block Valve Stations.
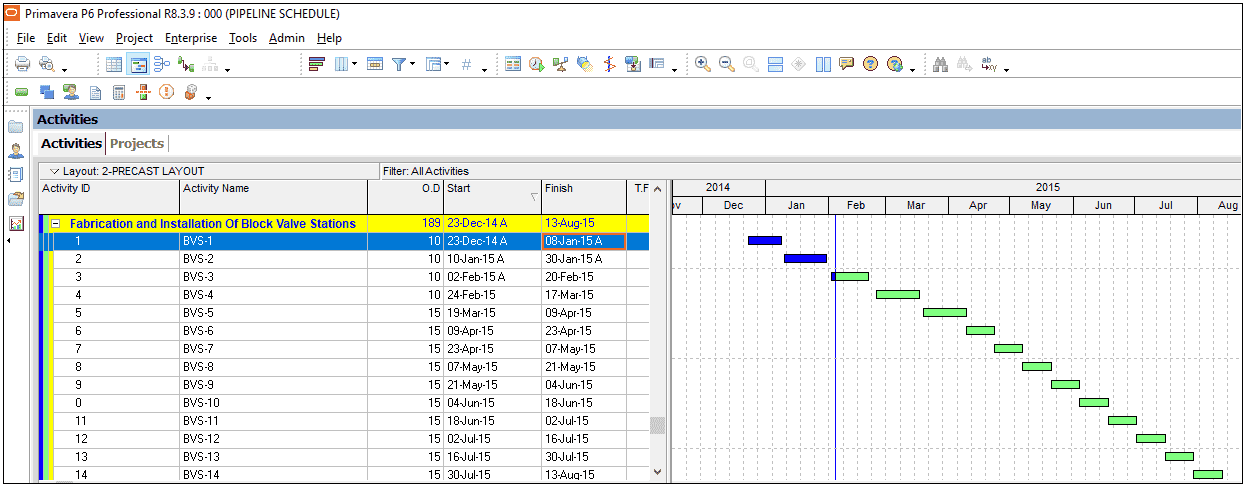
Figure 1 – Creating Four Week Look Ahead Schedule in P6

As shown in Figure 1, Data Date (Blue Line) 04 Feb 2015 and there is no actual in the project. To create a filter Select View | Filter By from the main drop-down menu, Figure 2.
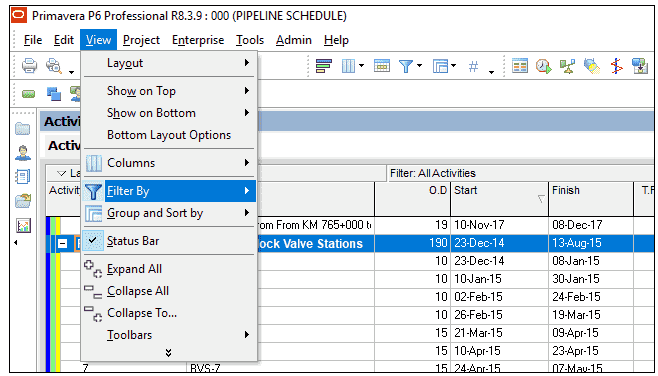
Creating Four Week Look Ahead Schedule in P6 Figure 2

Figure 2 – Creating Four Week Look Ahead Schedule in P6

This brings up the filter window, Figure 3.
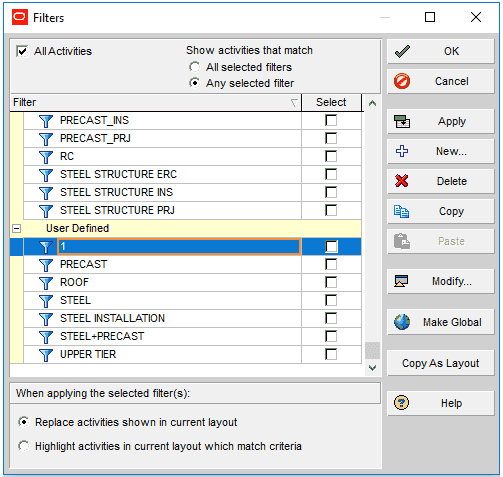
Figure 3 – Creating Four Week Look Ahead Schedule in P6

In the filter window, “Default” filters comes standard with P6. Global filters created by the system administrator. User Defined filters are created by the users. Now we will create a user defined filter, so in the User Defined section, select + New. (Figure 4)
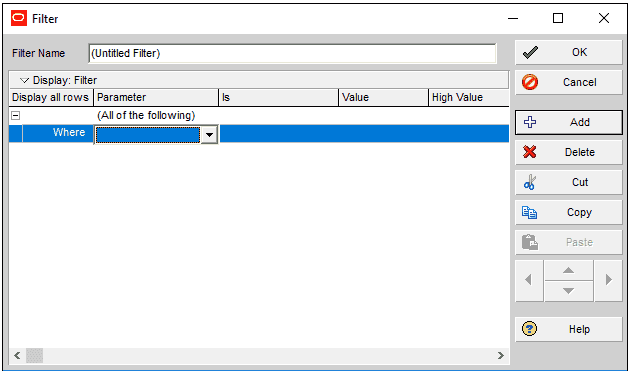
Creating Four Week Look Ahead Schedule in P6 Figure 4

Figure 4 – Creating Four Week Look Ahead Schedule in P6

Now we want to demonstrate all activities that start in the next four weeks, so the first line is “Start is within range of DD DD+4W” (DD is Data Date).
We also want to demonstrate the activities which started before the data date and in progress. Therefore the second line will be  “Activity Status equals In Progress” as shown in the Figure 5.
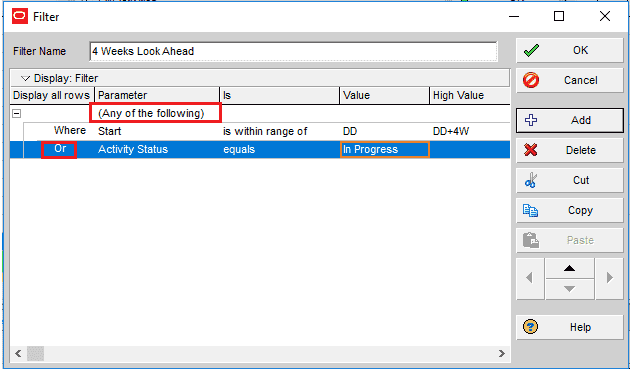
Creating Four Week Look Ahead Schedule in P6 Figure 5

Figure 5 – Creating Four Week Look Ahead Schedule in P6

When the parameter is “Any of the following,” an ‘Or’ is placed between the first and second lines of the code. Conversely, if the parameter is “All of the following,” an ‘And’ is used. This implies that both lines of code must be true for the activity to be displayed.

Now, our code showcases all activities that either commence within the next four weeks or are currently in progress (Figure 6).

Figure 6 – Creating Four Week Look Ahead Schedule in P6

As shown in the Figure 6, BVS -4 will start in the next four weeks and BVS-3 is in progress.

What is a 4-week look-ahead construction schedule?

A 4-week look-ahead construction schedule is a strategic tool used in project management to outline tasks and activities expected to commence or conclude within the upcoming four weeks. This look ahead schedule template excel serves as a focused lens, highlighting immediate priorities and helping managers to effectively allocate resources, adjust schedules in response to delays, and ensure the project remains on track. For example, using a 4 week look ahead template excel, a project manager can quickly identify which subcontractors need to be on-site in the forthcoming weeks, ensuring materials are ordered and delivered in a timely manner.

How to do a 6-week look-ahead in P6?

To perform a 6-week look-ahead in Primavera P6, you essentially need to utilize the P6 lookahead filter to focus on upcoming activities. Here’s a step-by-step example:

  1. Open your project in Primavera P6 and navigate to the “Activities” view.
  2. Access the “Filters” toolbar or the “View” menu and select “Filters.”
  3. Create a new filter and name it, e.g., “6 Week Look Ahead.” In the filter criteria, select “Start” under “Dates” and set the parameter to “is within the next” 6 weeks.
  4. Apply this filter, and the activities scheduled to start within the next six weeks will be highlighted, allowing for focused planning and resource allocation.

What is a look-ahead schedule in Primavera?

A look-ahead schedule in Primavera is a focused planning tool that filters the project schedule to only display activities that are due to start or finish within a specified short-term period, like the next 3, 4, or 6 weeks. This functionality is particularly useful for identifying immediate tasks that require attention, thus enabling better decision-making and resource management. For instance, by applying a Primavera lookahead filter, project managers can isolate tasks that are critical for the upcoming phase, ensuring that efforts are concentrated where they are most needed.

How do I schedule check in Primavera P6?

Scheduling checks in Primavera P6 are essential for validating the accuracy and feasibility of your project timeline. Also, here’s how you can perform a schedule check with detailed steps:

  1. Within Primavera P6, select your project and go to the “Activities” tab.
  2. Click on the “Tools” menu and select “Schedule.”
  3. In the scheduling dialog, you can adjust parameters such as the data date to reflect the current review date.
  4. Upon running the schedule check, P6 will update the project timeline based on the set parameters and constraints, highlighting any discrepancies or scheduling conflicts that need addressing.

What is a 4-week project timeline?

A 4-week project timeline is a detailed chart or spreadsheet that maps out specific tasks, milestones, and deliverables that must be accomplished within a four-week timeframe. It’s a condensed snapshot of the project’s short-term goals and progress markers, providing teams with a clear understanding of what needs to be achieved in the near term. Using a 4 week look ahead template excel, for example, can help project managers to visualize this timeline, ensuring that every task is accounted for and scheduled appropriately.

What is a 3-week look ahead schedule?

A 3-week look ahead schedule is akin to its 4-week counterpart but focuses on the immediate three-week window of the project schedule. Also, implementing a 3 week look ahead excel template can significantly aid in this process, offering a structured and clear view of what lies directly ahead.

How do I create a look ahead filter in Primavera P6?

Creating a look-ahead filter in Primavera P6 enables project managers to concentrate on forthcoming tasks, facilitating proactive management. Also, here’s an example process:

  1. In the “Activities” window, click on the “Filter” icon to access filters.
  2. Choose to create a new filter, naming it appropriately, such as “3 Week Look Ahead.”
  3. For the filter criteria, select “Start Date” and configure it to show activities starting “is within the next” 3 weeks.
  4. Save and apply this filter.

What is a look-ahead schedule (90 days look ahead schedule)?

A look-ahead schedule is a strategic planning tool that focuses specifically on short-term project activities, usually spanning a 2 to 6-week period. It is designed to help project teams identify critical tasks that need immediate attention, ensuring that resources are allocated effectively, and the project stays on course. Also, whether through a 90 days look ahead schedule for broader planning or a more immediate 3 week look ahead, these schedules are vital for maintaining project momentum and adaptability.

How do I organize my Primavera activities?

Organizing activities in Primavera P6 requires a systematic approach to ensure clarity and efficiency. Utilize the Work Breakdown Structure (WBS) for hierarchical organization, apply activity codes for categorizing tasks based on specific criteria (e.g., phase or discipline), and leverage the “Group and Sort” feature to arrange activities in a logical order.

How to Build a Lookahead Filter in Primavera P6

1: Open Your Project

First thing’s first, launch Primavera P6 and open the project you want to work on. Also, make sure you have all the necessary access permissions to modify the project’s filters.

2: Navigate to the Filters Section

  • Once your project is open, head to the “Activities” tab where you’ll see all your project activities listed.
  • Look for the “Filters” icon or option, typically located in the toolbar at the top or under the “View” menu, depending on your version of P6.

3: Create a New Filter

  • Click on “Filters” and then select “Manage Filters…” to bring up the Filters window.
  • Hit the “Add” button to create a new filter. This is where the magic begins!

4: Define Your Filter Criteria

  • Name your filter something intuitive, like “4 Week Look Ahead” or “3 Week Look Ahead”, depending on your preference.
  • Now, you’ll set up the criteria that define your lookahead period. Also, you can use a combination of criteria, but the most common approach is to filter based on the “Start” or “Finish” dates of activities.
  • For a lookahead filter, select “Start” or “Finish” under the “Parameter” column, then choose “is within range” from the “Operator” dropdown.
  • In the “Value” field, you’ll define the lookahead time frame. For a 4 week look ahead, you might set it to “DD/Mon/YYYY” and “DD+28/Mon/YYYY” to cover the next four weeks. Adjust this according to your specific lookahead needs, like “DD+21” for a 3 week look ahead.

5: Refine Your Filter (Optional)

  • You might want to add more criteria to refine your filter further. For example, you could add a criterion to exclude completed tasks by setting “Status” to “not Equal to” and “Completed”.
  • Use the “And/Or” column to specify how multiple criteria should work together (all conditions met vs. any condition met).

6: Save and Apply Your Filter

  • Once you’ve set up your criteria, click “OK” to save your filter.
  • Back in the Activities view, apply your newly created filter by selecting it from the Filters dropdown menu. Also, you’ll now see only the activities that meet your lookahead criteria.

7: Adjust and Update as Needed

Remember, project schedules are dynamic. You’ll likely need to revisit and possibly adjust your lookahead filter as your project progresses. Also, regularly updating your filter to reflect the current project date or making refinements based on project changes ensures your lookahead schedule remains a reliable tool for short-term planning.

By following these steps, you’ve created a powerful tool to focus your project management efforts on the immediate future, ensuring that critical tasks receive the attention they need for successful project execution. Also, a well-crafted lookahead filter in Primavera P6 is invaluable for keeping your project on track and managing your team’s workload efficiently.

Summary

Primavera P6 filters is a practical tool for the schedulers. It enables the use all kinds of filters for reporting and scheduling purposes. Also, it is important to know the functions of “All of the following” and “Any of the following” parameters while creating a four-week lookahead schedule. Another key point is to understand the function of a look-ahead schedule. Also, typically, the purpose of a look-ahead schedule is to plan activities and goals for the coming weeks.

Ready to Elevate Your Project Management Game?

Navigating through the complexities of modern projects requires more than just dedication; it demands smart planning, foresight, and the right tools at your disposal.

Embrace the future of project planning. Also, start by exploring Primavera P6 and experimenting with creating your own lookahead filters. Whether you’re aiming to refine your current project’s strategy with a 4-week look ahead or planning ahead with a 90 days look ahead schedule, the perfect moment to enhance your project management skills is now.

Don’t let project complexities overwhelm you. With Primavera P6, you’re not just managing tasks; you’re mastering them. Also, Download a lookahead schedule template, dive into Primavera P6 tutorials, or join a webinar today to unlock the full potential of your projects. The path to project success is clear, and it begins with a click.

In this article, we discussed the four-week look-ahead filter in Primavera P6. Also, you can use the comments box below to add or share anything related to this tool.

External References

See Also

Primavera Project Planner

Primavera P6 Download

Tags:
1 Comment
  1. Avatar for Calator prin Romania
    Calator prin Romania 5 years ago

    This post will assist the internet people

Leave a reply

Your email address will not be published. Required fields are marked *

*

ALL TOPICS

Log in with your credentials

Forgot your details?