Excel Worksheet Tab: Guide to Organizing Your Data
Introduction
In the vast realm of Microsoft Excel, the Excel Worksheet Tab stands as a fundamental tool for organizing and managing data. Whether you’re an Excel novice or a seasoned professional, mastering the intricacies of the Worksheet Tab is crucial for efficient data manipulation. In this comprehensive guide, we will delve into the depths of the Excel Worksheet Tab, exploring its features, functionalities, and practical applications. From basic navigation to advanced techniques, this article will equip you with the knowledge and expertise to optimize your data organization. So, let’s embark on this Excel journey and unlock the full potential of the Worksheet Tab!
Table of Contents
Excel Worksheet Tab: An Overview
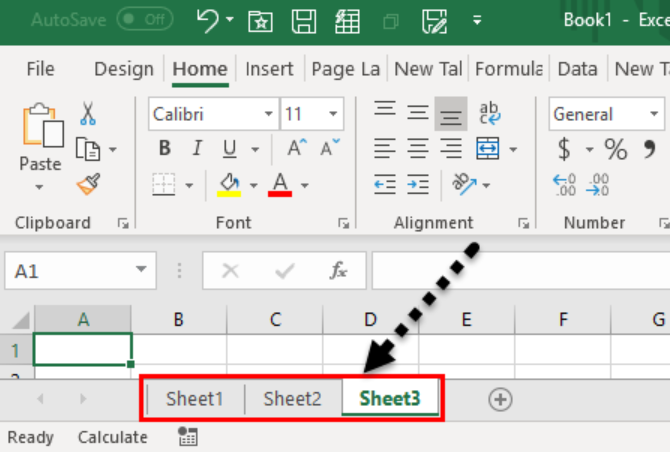
The Excel Worksheet Tab, also known as a worksheet or a sheet, serves as a container for data within an Excel workbook. Each workbook can have multiple worksheets, enabling you to categorize and organize your data effectively. The Worksheet Tab appears as a horizontal tab at the bottom of the Excel window, allowing easy navigation between different sheets. By default, a new workbook starts with three worksheets, conveniently labeled as Sheet1, Sheet2, and Sheet3. However, you can add, delete, rename, and rearrange these tabs according to your specific needs.
Navigating Through Worksheets
When working with multiple worksheets, efficiently navigating between them becomes paramount. Excel provides several methods to swiftly switch between sheets:
- Clicking on Worksheet Tabs: Simply click on the desired Worksheet Tab at the bottom of the Excel window to activate that particular sheet.
- Using Keyboard Shortcuts: Pressing
Ctrl + Page UporCtrl + Page Downallows you to cycle through worksheets in ascending or descending order. - Navigating with Hyperlinks: Hyperlinks within worksheets can be utilized to jump to a different sheet instantly. You can create hyperlinks by right-clicking on a cell, selecting “Hyperlink,” and choosing the desired worksheet.
- Worksheet Navigation Buttons: Excel provides navigation buttons (arrows) adjacent to the Worksheet Tabs, enabling you to scroll through sheets when there are more tabs than can fit on the screen.

Excel Worksheet Tab
Renaming Worksheets
To enhance clarity and organization, renaming worksheets with descriptive names can be immensely helpful. Excel allows you to rename worksheets in a few simple steps:
- Right-click on Worksheet Tab: Right-click on the Worksheet Tab you wish to rename.
- Select “Rename”: From the context menu that appears, choose the “Rename” option.
- Enter New Name: Type the desired name for the worksheet and press
Enterto finalize the change.
Renaming worksheets to reflect their content or purpose provides a quick visual reference, especially when dealing with complex workbooks.
Excel Worksheet Tab: Formatting and Customization
In addition to basic navigation and organization, the Excel Worksheet Tab offers various formatting and customization options to optimize your data management experience. Let’s explore some of these features:
Changing Tab Color
Assigning different colors to Worksheet Tabs can aid in visual differentiation, making it easier to locate specific sheets at a glance. To change the tab color:
- Right-click on Worksheet Tab: Right-click on the desired Worksheet Tab.
- Select “Tab Color”: From the context menu, choose the “Tab Color” option.
- Choose Color: Pick a color from the available palette or select “More Colors” for a broader range of options.
By utilizing distinctive colors for different categories or themes, you can enhance the overall organization and aesthetics of your Excel workbook.
Grouping Worksheets
When dealing with a substantial number of worksheets, grouping them can streamline your workflow and allow for simultaneous changes across multiple sheets. Follow these steps to create a worksheet group:
- Click on the First Worksheet Tab: Click on the first Worksheet Tab you want to include in the group.
- Hold Shift or Ctrl: Hold down the
Shiftkey to select a consecutive group of worksheets or theCtrlkey to choose non-consecutive sheets. - Right-click on Selected Tabs: Right-click on one of the selected Worksheet Tabs.
- Select “Group Sheets”: From the context menu, click on the “Group Sheets” option.
Grouping worksheets enables you to perform actions like formatting, data entry, or formula editing simultaneously across the selected sheets.
Hiding Worksheets
In certain scenarios, you may need to temporarily hide specific worksheets to declutter your workspace or conceal confidential information. Follow these steps to hide a worksheet:
- Right-click on Worksheet Tab: Right-click on the Worksheet Tab you want to hide.
- Select “Hide”: From the context menu, choose the “Hide” option.
To unhide a hidden worksheet, right-click on any visible Worksheet Tab, select “Unhide,” and then choose the desired sheet from the list.
FAQs about Excel Worksheet Tab
Q1: Can I change the default number of worksheets in a new Excel workbook?
Yes, you can modify the default number of worksheets created when you open a new Excel workbook. To do this, follow these steps:
- Click on the File tab in the Excel ribbon.
- Select Options from the menu.
- In the General tab of the Excel Options window, locate the “Include this many sheets” option under the “When creating new workbooks” section.
- Enter the desired number of sheets.
- Click OK to save the changes.
Q2: Is it possible to move a worksheet to a different workbook?
Yes, you can move a worksheet from one workbook to another by following these steps:
- Open both the source workbook (containing the worksheet you want to move) and the target workbook (where you want to move the worksheet to).
- In the source workbook, right-click on the Worksheet Tab you want to move.
- Select Move or Copy from the context menu.
- In the Move or Copy dialog box, choose the target workbook from the “To book” dropdown list.
- Specify the “Before sheet” or “Create a copy” options if desired.
- Click OK to complete the move operation.
Q3: Can I change the order of Worksheet Tabs within a workbook?
Yes, you can rearrange the order of Worksheet Tabs within a workbook by simply dragging and dropping them. To do this, follow these steps:
- Click and hold the Worksheet Tab you want to move.
- Drag the tab to the desired position within the tab bar.
- Release the mouse button to drop the tab in its new position.
- The other tabs will automatically adjust to reflect the new order.
Q4: Is there a limit to the number of worksheets I can have in an Excel workbook?
In Excel, you can have a maximum of 1,048,576 worksheets within a single workbook. While this limit provides an abundance of space for most users, it’s essential to consider factors like system resources and performance when dealing with an extensive number of sheets.
Q5: Can I apply formatting changes to multiple worksheets simultaneously?
Yes, you can apply formatting changes to multiple worksheets simultaneously by grouping them. Once you’ve grouped the worksheets, any formatting changes you make will apply to all the sheets in the group. Remember to ungroup the sheets when you’re done to avoid unintentional changes.
Q6: How can I protect a worksheet from being modified or deleted?
To protect a worksheet from modifications or deletion, you can apply worksheet protection in Excel. Follow these steps to protect a worksheet:
- Right-click on the Worksheet Tab you want to protect.
- Select Protect Sheet from the context menu.
- In the Protect Sheet dialog box, specify the desired protection options, such as allowing specific actions or password-protecting the sheet.
- Click OK to apply for the protection.
Conclusion
The Excel Worksheet Tab serves as the cornerstone of efficient data organization within Excel workbooks. You can optimize your workflow and enhance productivity by understanding its various features, customization options, and navigation techniques. From renaming and coloring Worksheet Tabs to grouping and hiding sheets, the Excel Worksheet Tab empowers you to tailor your data management experience to suit your specific needs. So, embrace the power of the Worksheet Tab and unlock the full potential of Excel’s data organization capabilities!
Project Cubicle Recommends
- If you’re looking to create impressive 3D plots in Excel, check out the article “How to Create a 3D Plot in Excel?” for a step-by-step guide and unleash your data visualization skills.
- Get back to the basics and master essential Excel formulas with the article “6 Classics! Basic Excel Formulas.” Also, discover the fundamental formulas that will empower you to perform calculations and analyses with ease.
Hello, I’m Cansu, a professional dedicated to creating Excel tutorials, specifically catering to the needs of B2B professionals. With a passion for data analysis and a deep understanding of Microsoft Excel, I have built a reputation for providing comprehensive and user-friendly tutorials that empower businesses to harness the full potential of this powerful software.
I have always been fascinated by the intricate world of numbers and the ability of Excel to transform raw data into meaningful insights. Throughout my career, I have honed my data manipulation, visualization, and automation skills, enabling me to streamline complex processes and drive efficiency in various industries.
As a B2B specialist, I recognize the unique challenges that professionals face when managing and analyzing large volumes of data. With this understanding, I create tutorials tailored to businesses’ specific needs, offering practical solutions to enhance productivity, improve decision-making, and optimize workflows.
My tutorials cover various topics, including advanced formulas and functions, data modeling, pivot tables, macros, and data visualization techniques. I strive to explain complex concepts in a clear and accessible manner, ensuring that even those with limited Excel experience can grasp the concepts and apply them effectively in their work.
In addition to my tutorial work, I actively engage with the Excel community through workshops, webinars, and online forums. I believe in the power of knowledge sharing and collaborative learning, and I am committed to helping professionals unlock their full potential by mastering Excel.
With a strong track record of success and a growing community of satisfied learners, I continue to expand my repertoire of Excel tutorials, keeping up with the latest advancements and features in the software. I aim to empower businesses with the skills and tools they need to thrive in today’s data-driven world.
Suppose you are a B2B professional looking to enhance your Excel skills or a business seeking to improve data management practices. In that case, I invite you to join me on this journey of exploration and mastery. Let’s unlock the true potential of Excel together!
https://www.linkedin.com/in/cansuaydinim/


