

A work schedule is required for any type of project regardless of whether it is small or large to estimate the completion date of the project and the project tasks. Therefore, it is a good decision to create a schedule before the beginning of a project. Oracle Primavera P6 and Microsoft Project are scheduling tools that are used to create schedules to demonstrate what needs to be done, by which resources, and when. In this tutorial, we will learn how to create a sample construction project schedule in Primavera P6 with the help of an example.
Table of Contents
We shall be using the schedule as shown in the table below for the purpose of this tutorial.
| Activity ID | Activities | Duration | Predecessor |
| Phase 1 | Foundation | ||
| A1000 | Clearing | 2 Days | |
| A1010 | Digging | 5 Days | A1000 |
| A1020 | Blinding | 3 Days | A1010 |
| A1030 | Block Work | 4 Days | A1000 & A1010 |
| A1040 | Slab | 2 Days | A1030 |
| Phase 2 | Super Structure | ||
| A1050 | Block Work | 5 Days | A1040 |
| A1060 | Pillars | 5 Days | A1040 |
| A1070 | Form Work | 4 Days | A1060 |
| A1080 | Lintel | 2 Days | A1070 |
| Phase 3 | Finishing | ||
| A1090 | Plastering | 3 Days | A1050, A1060 & A1070 |
| A1100 | Plumbing | 4 Days | A1050, A1060 & A1070 |
| A1110 | Electricals | 2 Days | A1090 |
| A1120 | Painting | 5 Days | A1090 |
| A1130 | Decoration | 3 Days | A1090 & A1120 |
Creating the Sample Construction Schedule in Primavera P6 Step By Step
Here we will demonstrate how to create a sample construction project schedule step by step by using Primavera P6. Note that, assigning resources and costs is an extensive concept. Therefore, we include only the following steps in this tutorial;
- Creating a Project
- Creating WBS
- Adding Activities
- Inserting Relationships
- Demonstrating Gantt Chart
Set Up
To create a new project in Primavera P6, you begin by first logging into the primavera P6 Software. Once you have logged in, you should have an interface like this below.
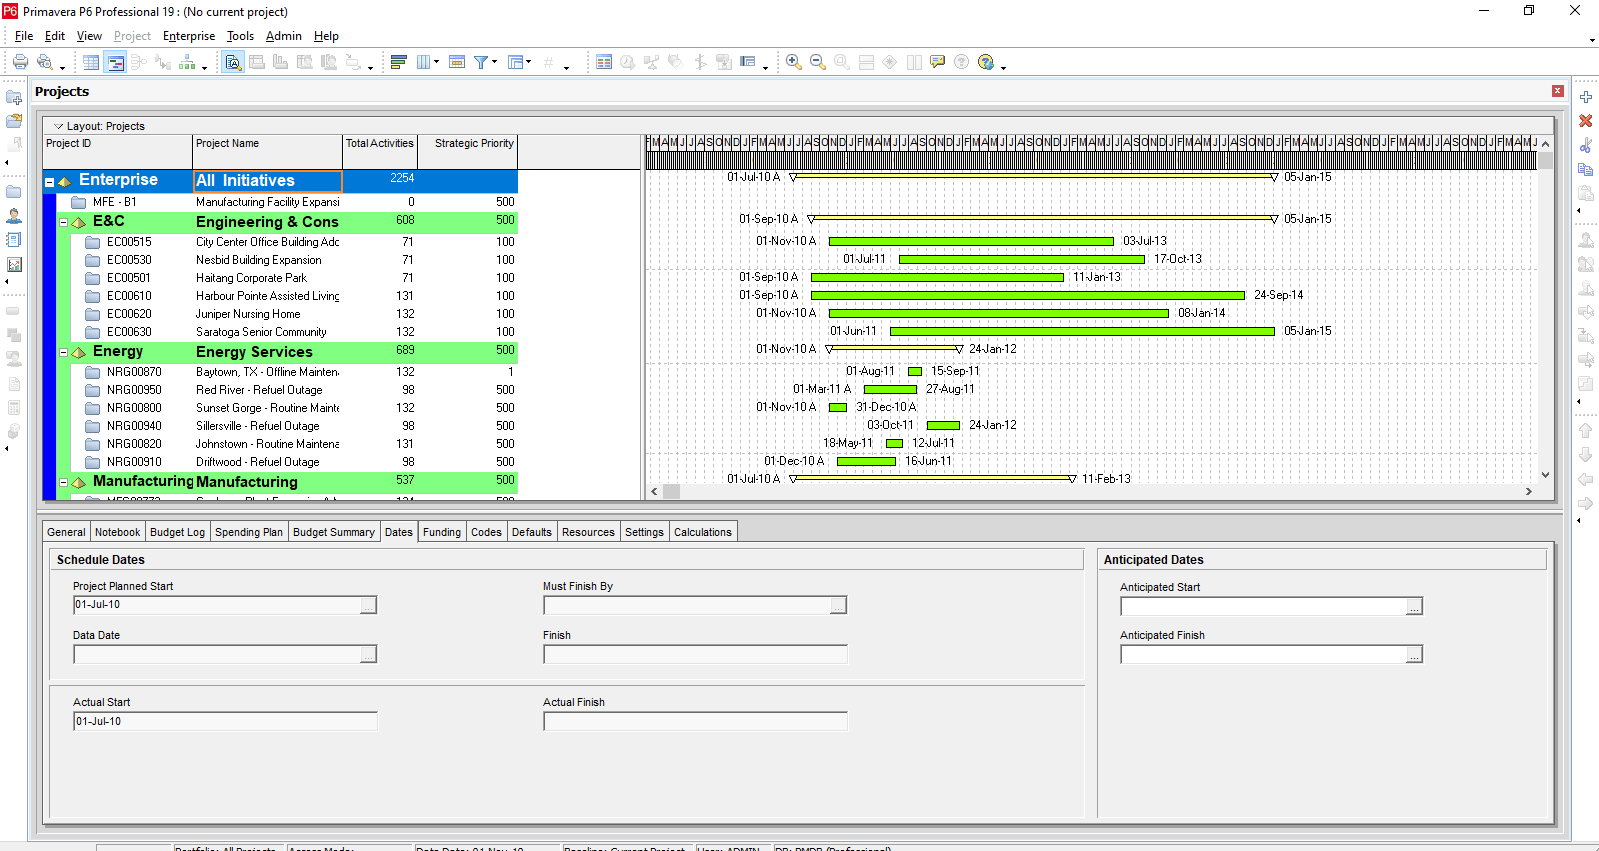
Once you are logged in there are different ways to create a new project. In this tutorial, we shall be looking on at one of the different ways to create a new project. But first, let us understand the interface.
The bar by the left-hand side of your screen is known as the Directory Bar. The bar by the right is known as the Command Bar. The Bar at the top is known as the Tools Bar. Right above the tools bar is the tabs or menu. Within the P6 interface, there are 3 major interfaces. The timeline or table by the left, the Gantt by the right, and the detail view below. Within the table, you have different columns.

One Way to Create a New Project
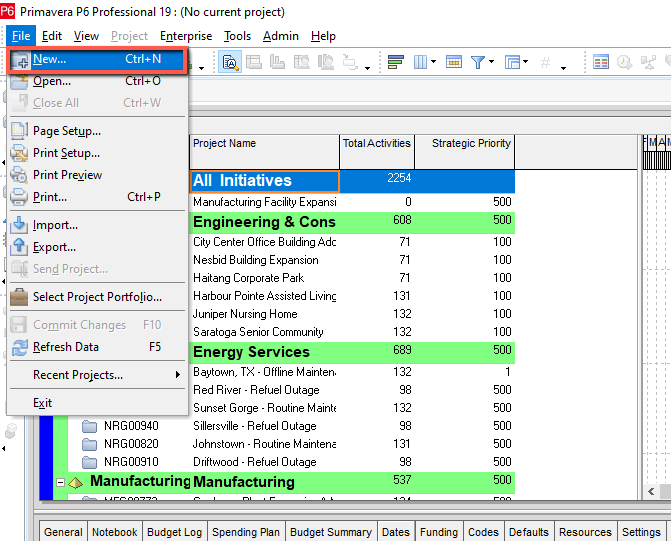
Begin by clicking on file the click on new.
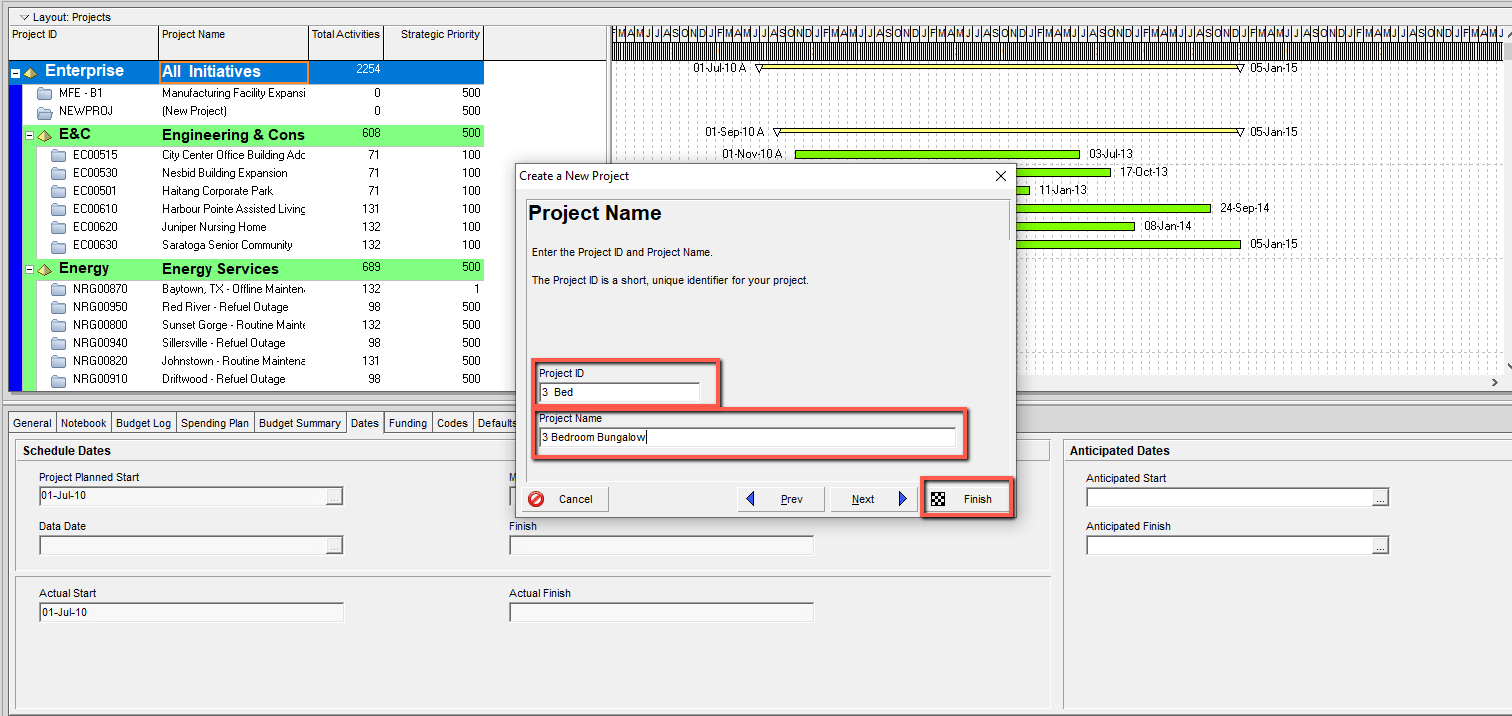
The Create a project Wizard will appear. In the create a project wizard click next in the Project ID enter 3 bed. In the Project Name enter 3 Bedroom Bungalow and click on finish.
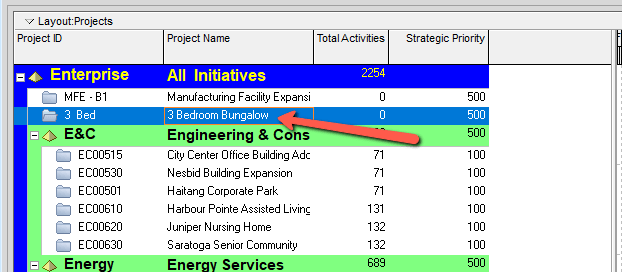
Once we have created the new project it will appear in our Table under the project view.
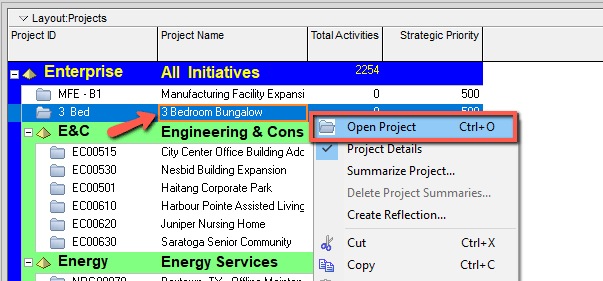
Next, we shall open the new project.
Open our project – Right-click on the newly created project (3 Bedroom Bungalow) and click open project.
Work Breakdown Structure
Next, we shall create the WBS.
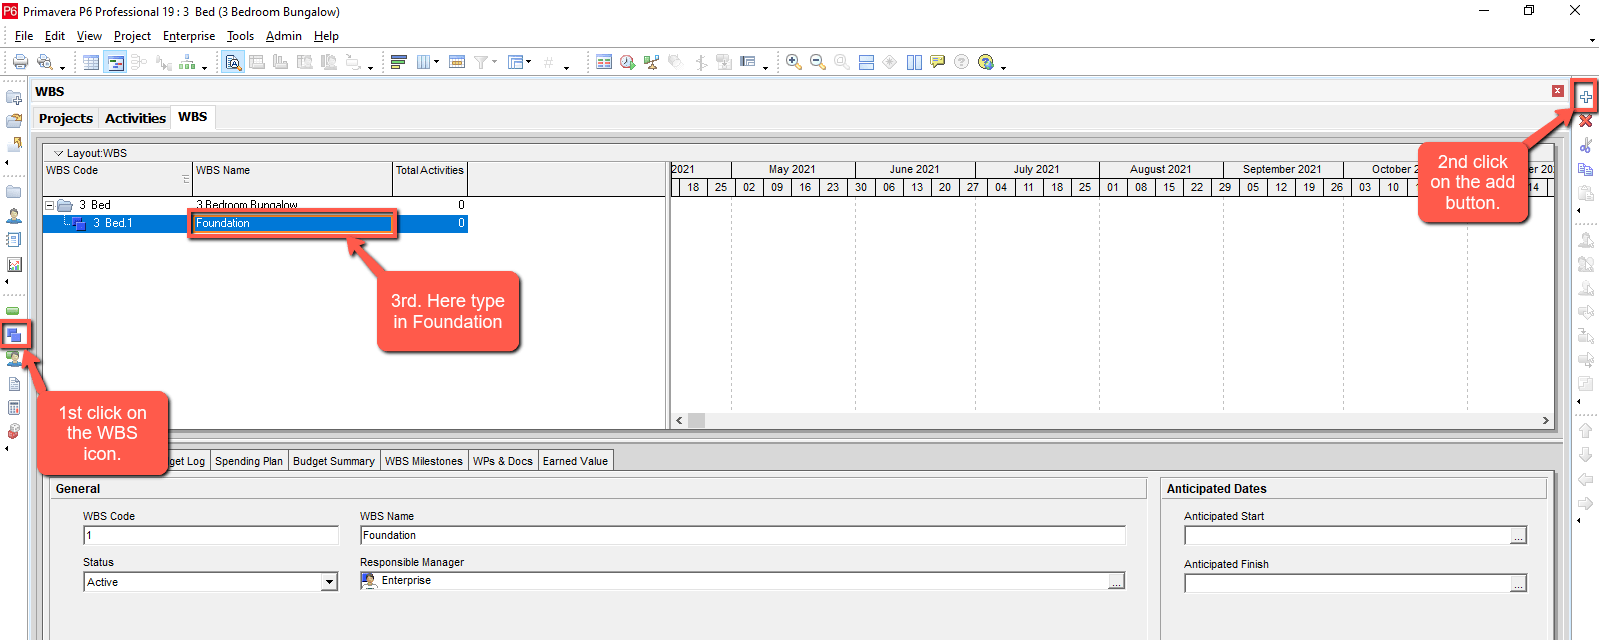
Before to start inserting activities and activity relationships in this sample project for construction, you need to create a Work Breakdown Structure (WBS) in Primavera P6. While creating the WBS, keep in mind the key project deliverables.
Create WBS | Click on WBS in the directory bar, then click Add in the command bar and type in foundation in the new WBS.
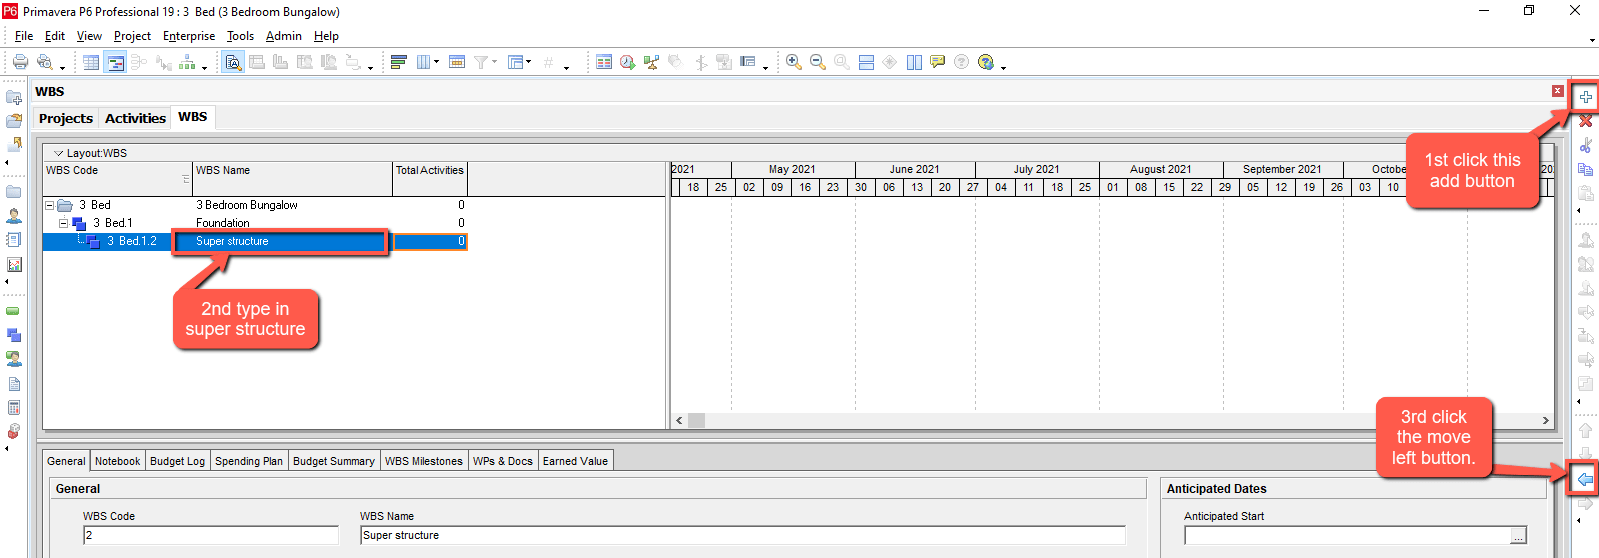
Repeat for superstructure,
Move superstructure left one step. Note the move left button is in the command bar by your right represented by an arrow facing the left direction.
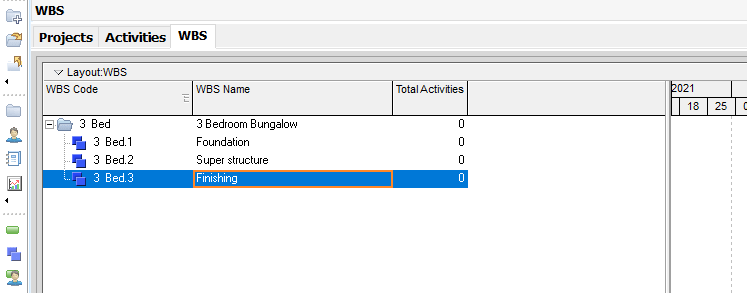
Repeat for finishing.
Your WBS table should appear as below when you are done.
Go back to your activities view by clicking on activities in the directory bar or at the top of your view. Once your activity page opens, hit F5 on your keyboard to refresh.
Adding Activities
Next step of our example Oracle Primavera P6 schedule is adding activities.
Right-click on foundation and click add
Type in “clearing”. Repeat for the other activities under foundation.
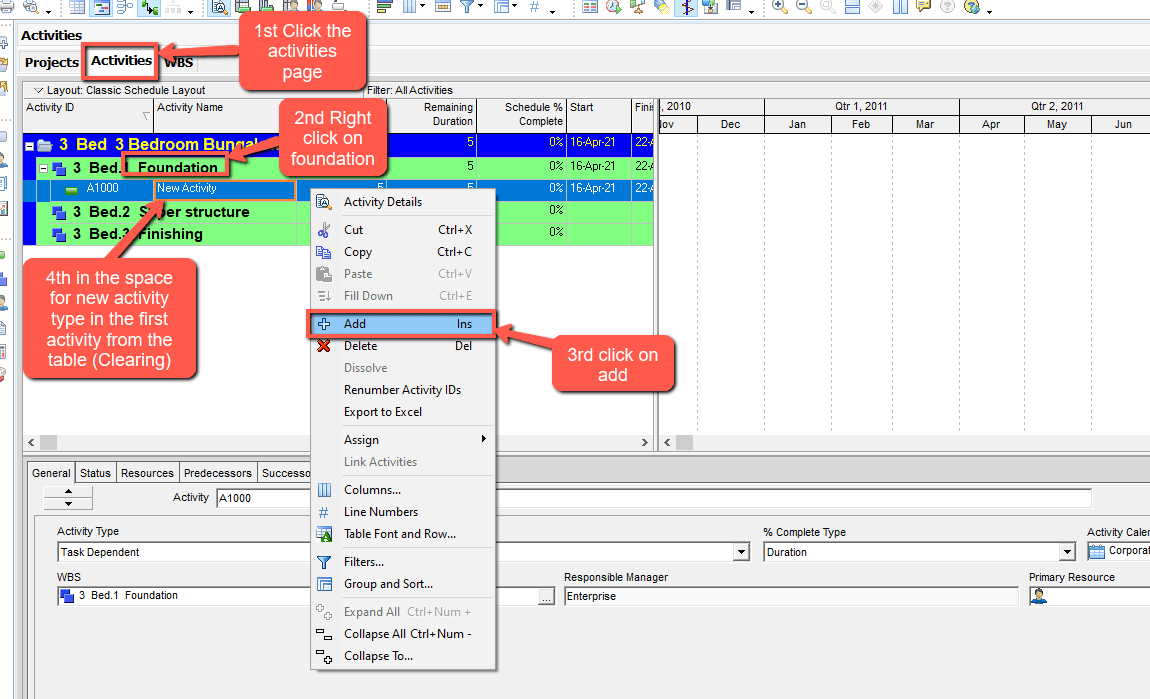
If you have done it correctly, your schedule should appear as below.
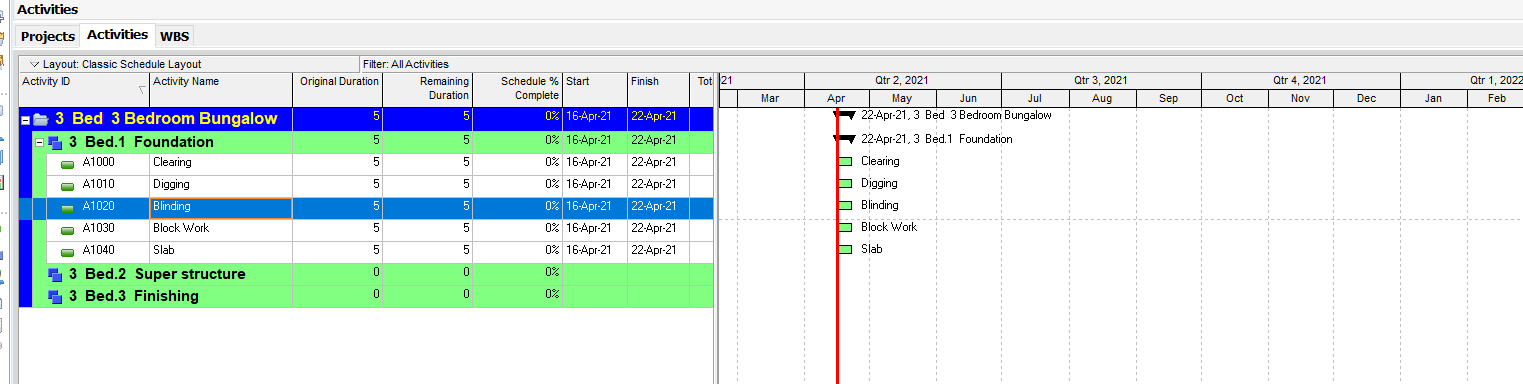
By default, Primavera P6 assigns a 5-day duration to each activity. If your bars are not showing in the Gantt, simply double click on your Gantt view.
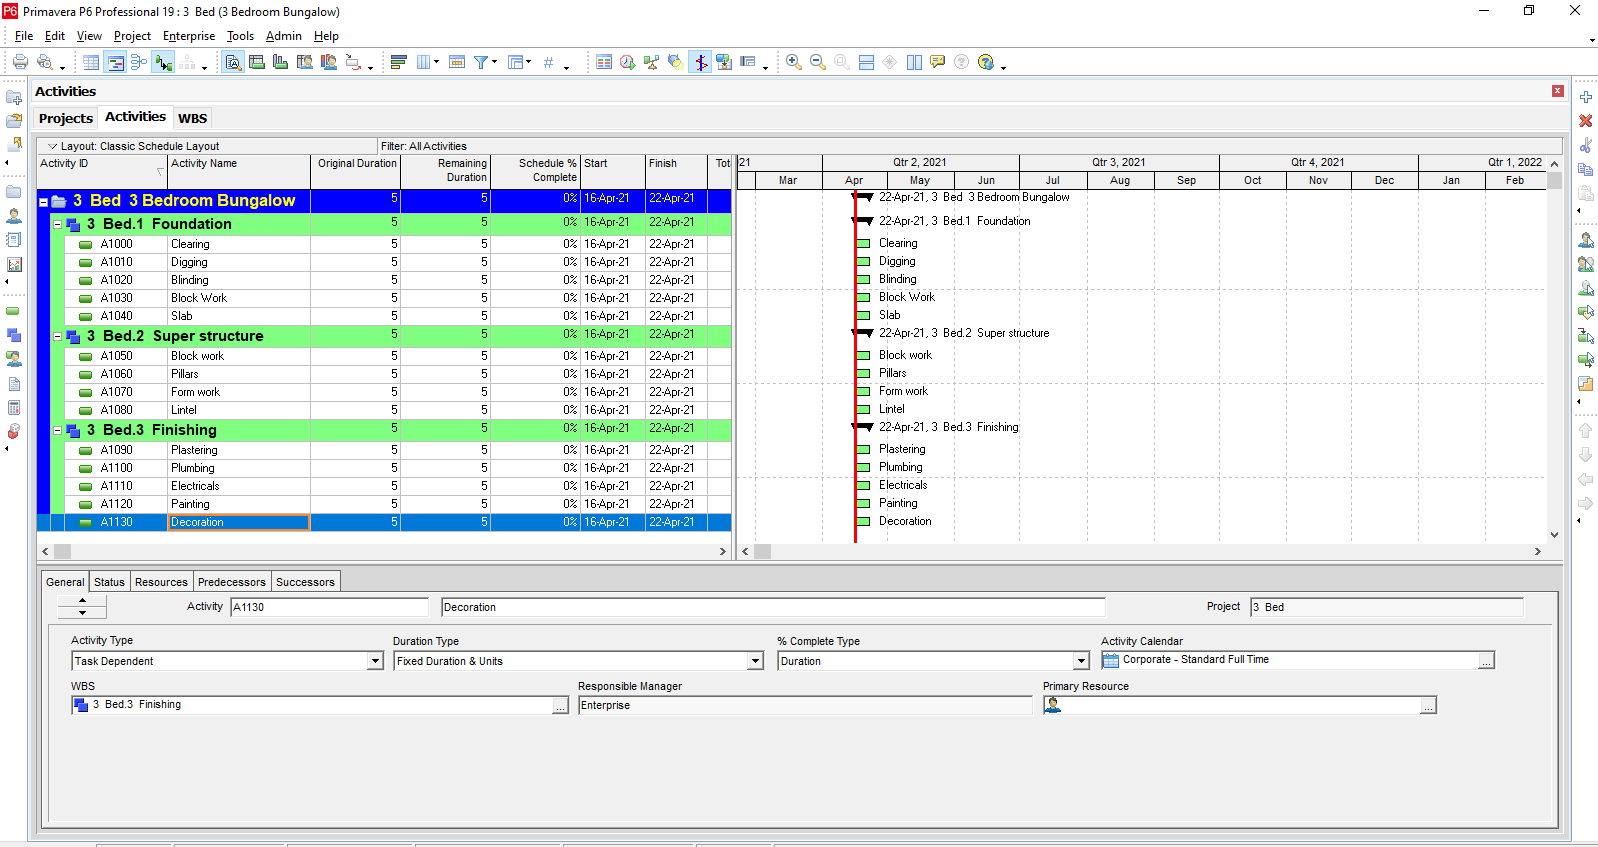
Now repeat the process for activities under Super Structure and Finishing.
By the time you are done your schedule will appear as below.
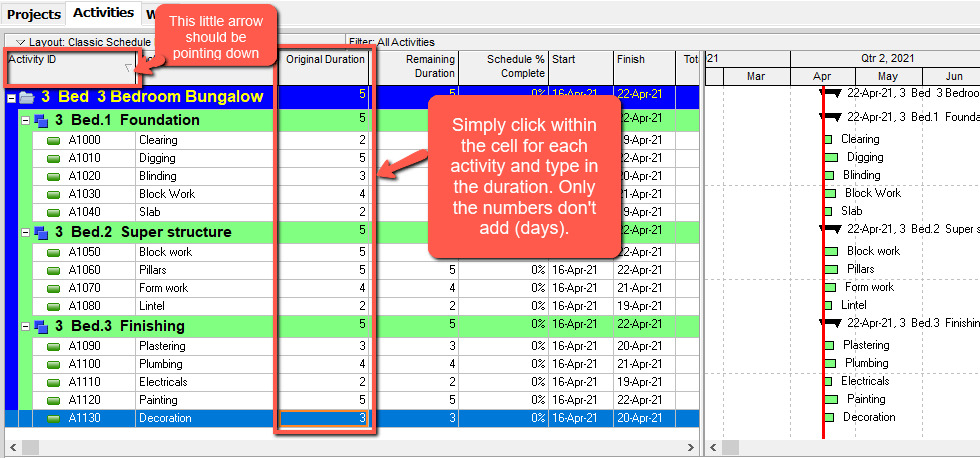
Enter the activity durations as contained in the table. Ensure you sort by activity ID. To do this, click on the Activity ID column make sure the arrow on the column is pointing down.
Working with Columns
At this step of our sample construction schedule in Oracle Primavera P6, we will show how to work with columns.
Now, add the predecessor column.
Right-click on anywhere within your table then click on columns in the window that appears.
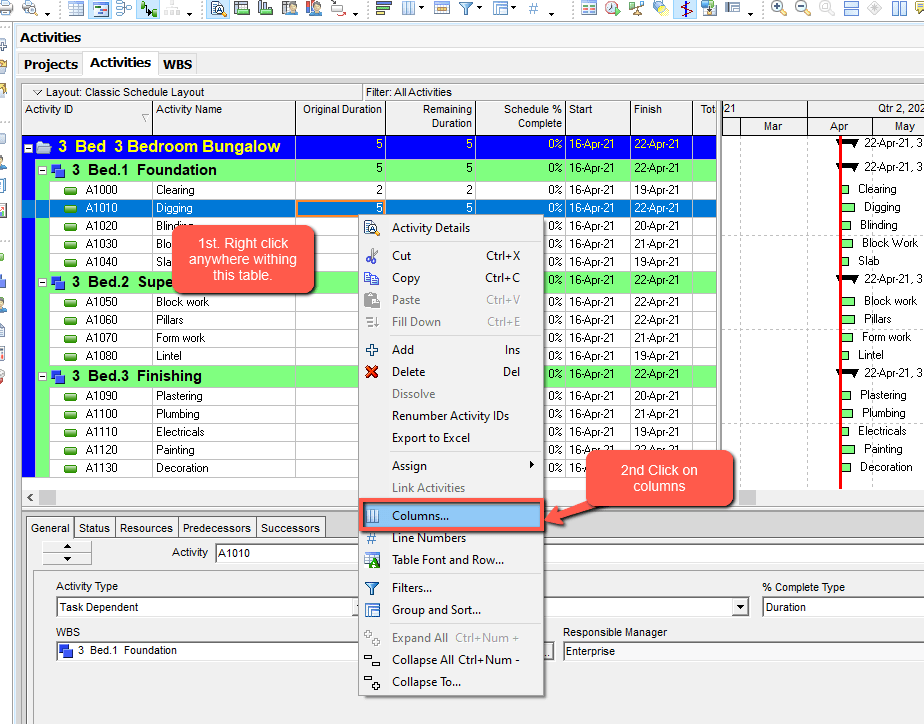
Click available options and select find or simply do CTRL + F. In the find window type in predecessors. Look for and select predecessors and click on add to list or simply double click.
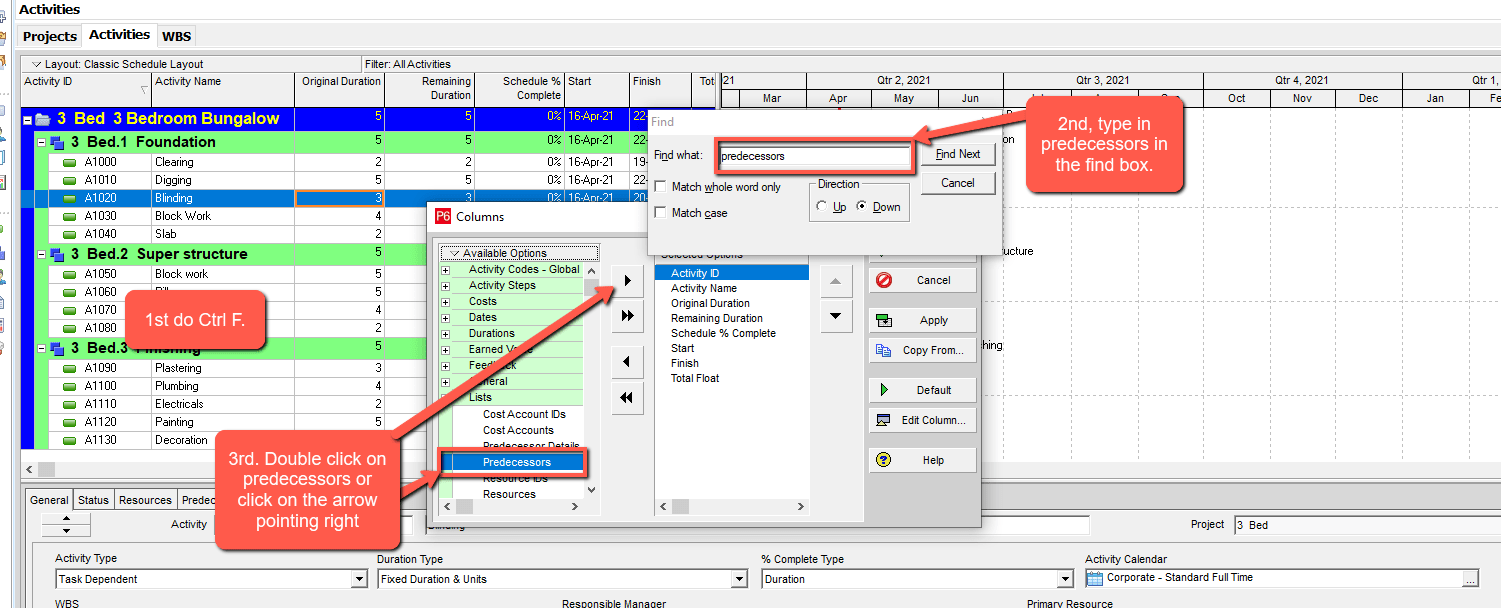
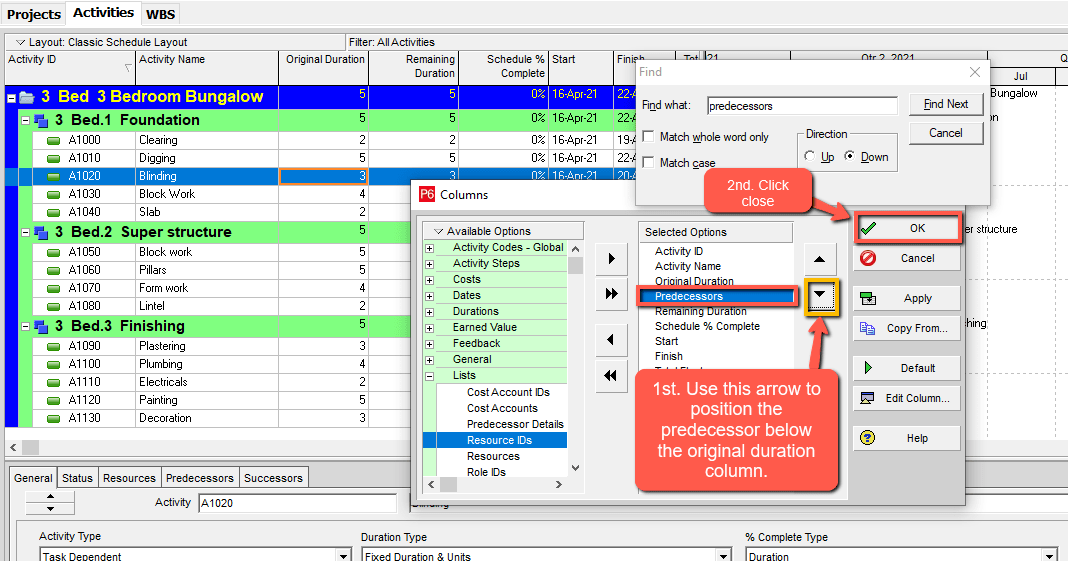
Use the up and down arrow to position it after the remaining duration. Then click on close.
To assign predecessors, double click on digging activity in the predecessor column cell. The assign predecessor’s window appears, select clearing in the window and click assign. Do not close the window as we shall use it for all our assignments before we close it.
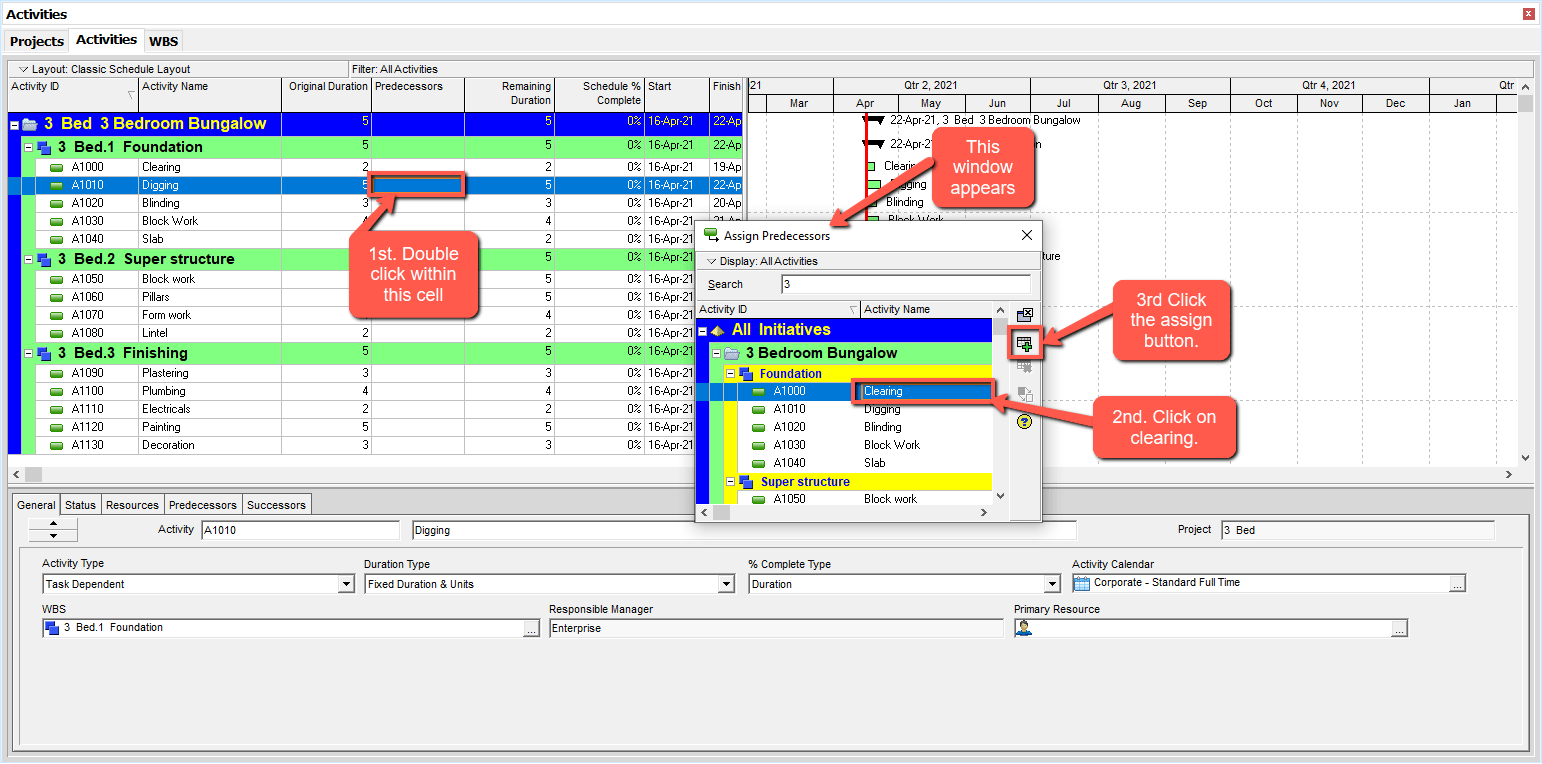
Next click on blinding in the timeline table, in the assign predecessors window click digging then click assign.
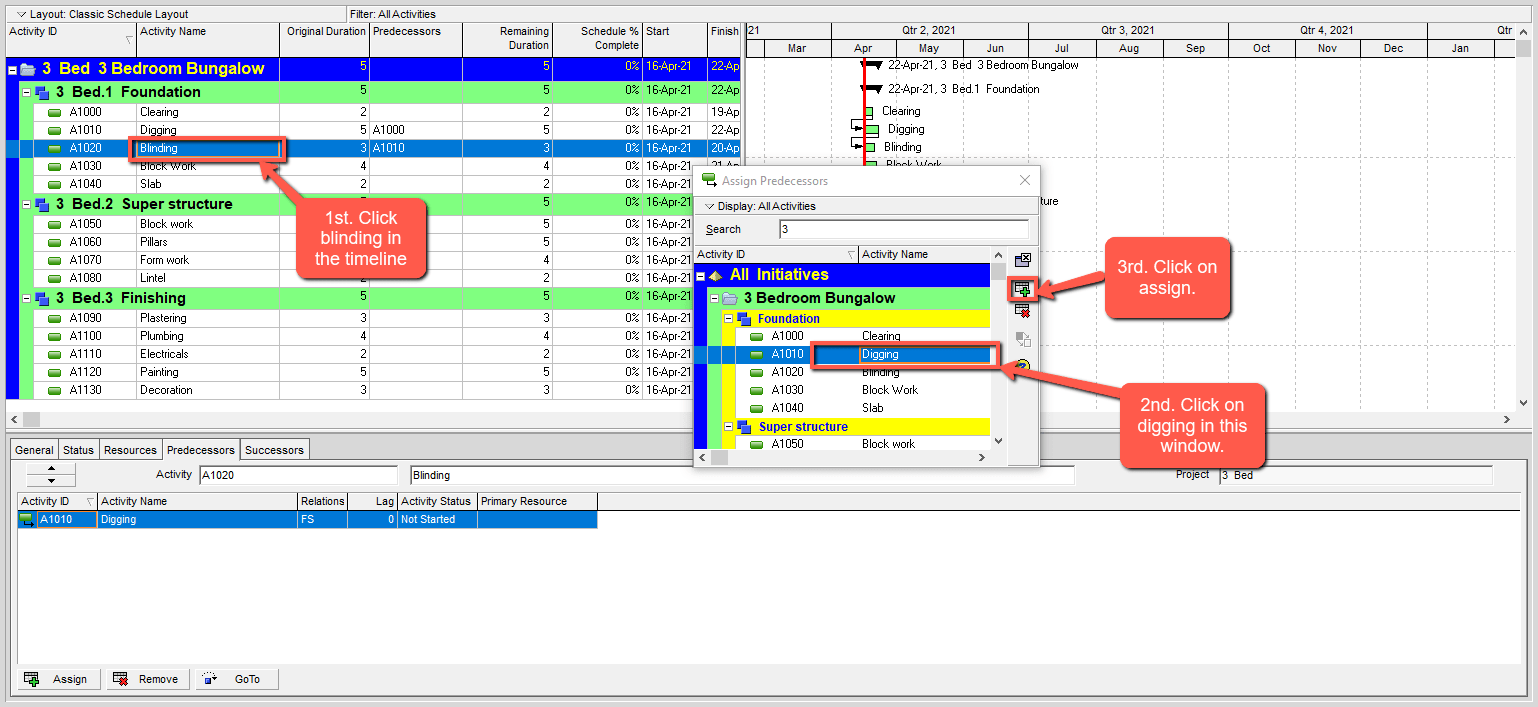
You should be seeing the relationships show up in the predecessors’ column in the table as well as the predecessors tab in the details view and also in the Gantt Chart as below.
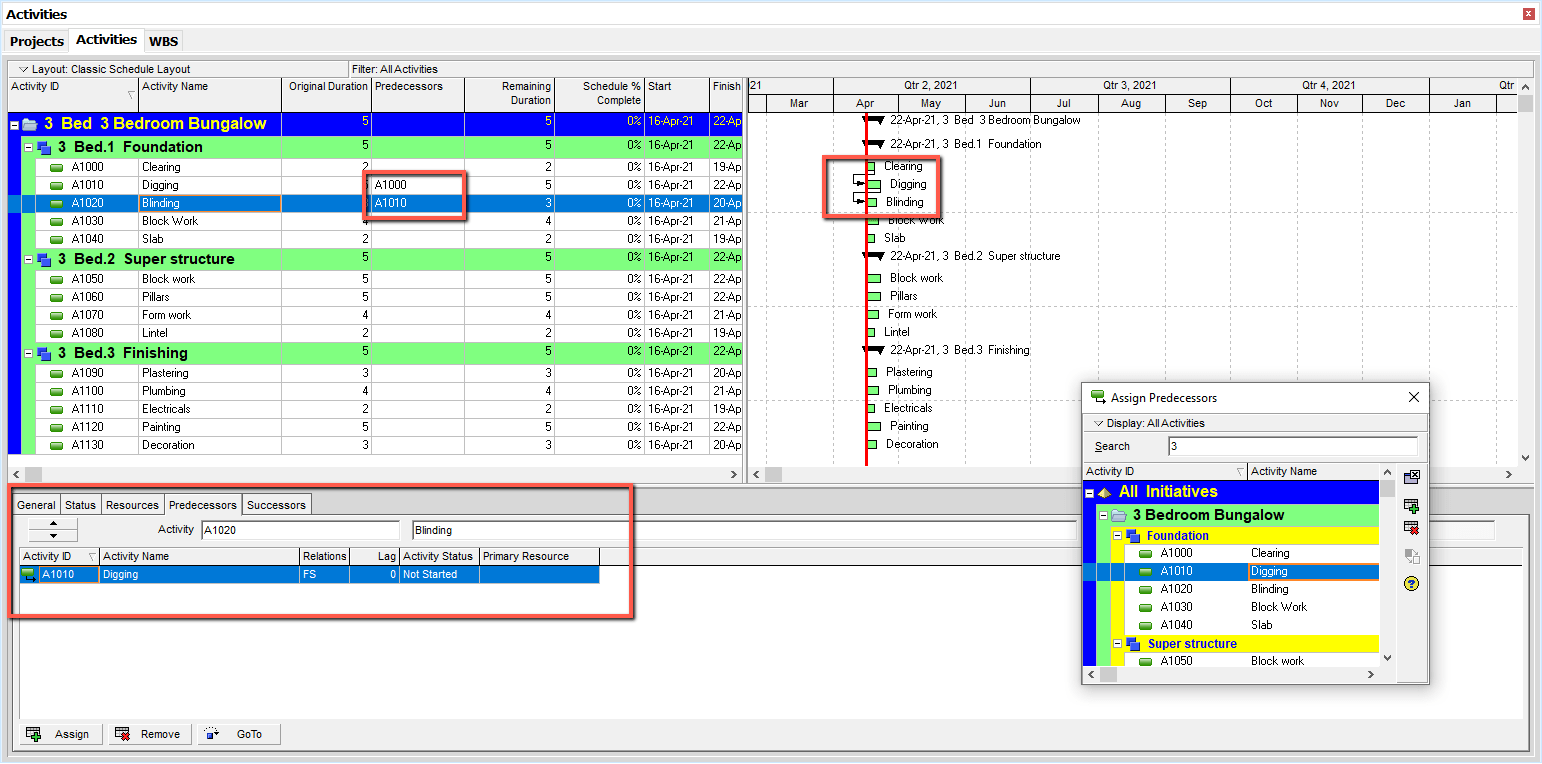
Repeat same for other relationships as captured in the table. For activities that have more than one predecessor simply do it repeatedly. Once you are done click on close, to close the assign predecessor window.
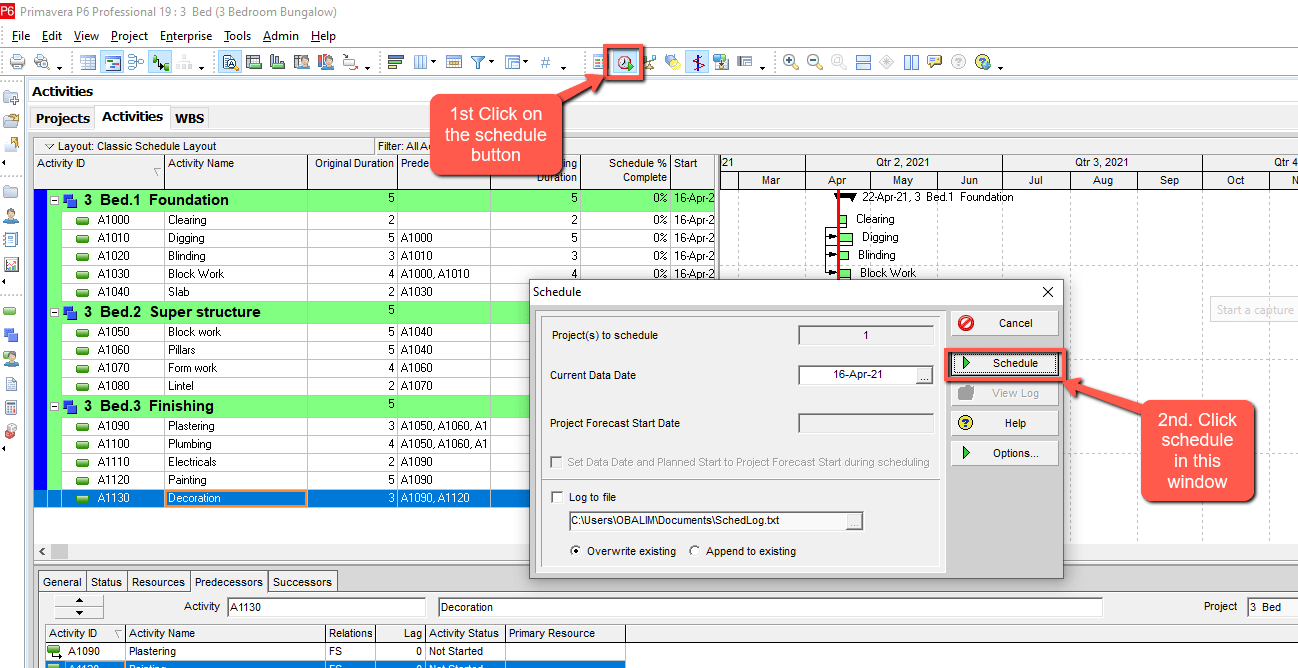
Next is to schedule. Click on the schedule button on the toolbar then click schedule.
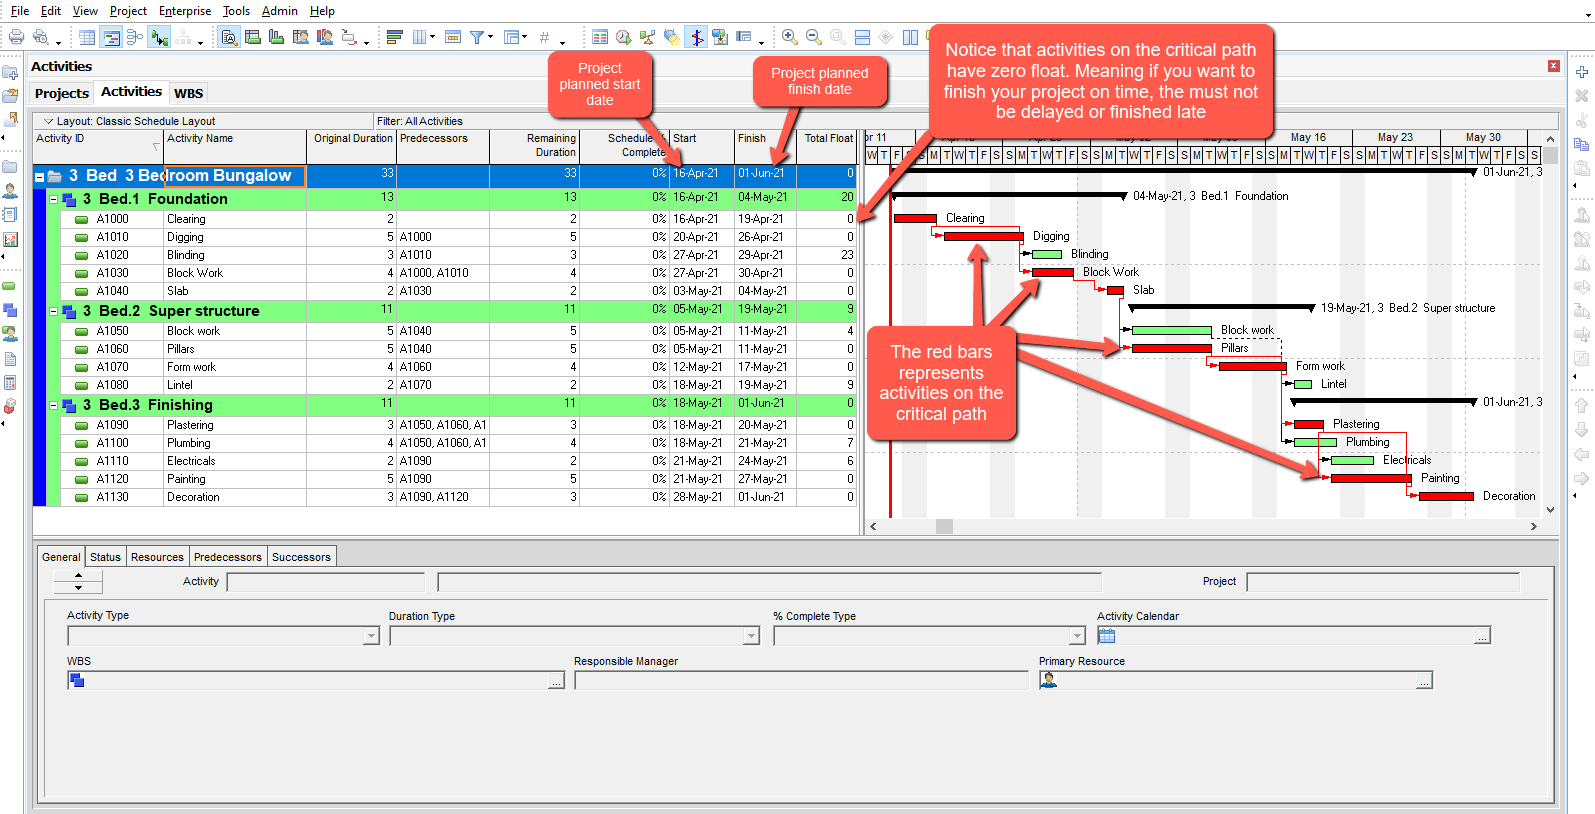
Oracle Primavera P6 Gantt Chart View of the Sample Construction Schedule
Once you have done that, this example Primavera P6 schedule will appear like below.
This tutorial shows how to create a sample construction project schedule by using Oracle Primavera P6. You can check the following articles related to assigning resources and costs in Primavera P6.
Primavera P6 Download and Install Free
I am a Project Management Professional (PMP) and a Certified Business Analysis Professional (CBAP). A Trainer and CEO of Ciel Consulting, a company specializing in the training and development of individuals and organizations.
My goal is to help you achieve your personal and business goals faster and easier than you ever imagined.
I have consulted for major companies and addressed more than 2,000 people in 100’s of talks and seminars throughout Nigeria. As a Trainer and Senior Consultant, I address more than 2,000 people each year.
For more and to get a detailed course kindly visit my Udemy page.


Hello sir. How can I get sample project schedules for practice?
Easy to understand, well simplified
Understanding construction schedule is very important for project managers and owners as well. Quality samples can be a wonderful thing to consider. Thank you very much. Keep sharing this information more and more!
Primavera p6 classes
Thank you for this excellent tutorial.
Good work easy to understand for beginners