

If you deal with large data and your job is analysis, you can use Excel data models. Because creating a data model in Excel is a great alternative for manual work.
Table of Contents
What is a Data Model in Excel? add this data to the data model
With this, you can analyze it more efficiently. It is about tables, relationships and formulas that help filter and display data.
Data to create data model in excel
Here you should identify the tables, fields and relationships. You can also consider the questions you want to answer.
what is data modeling in excel
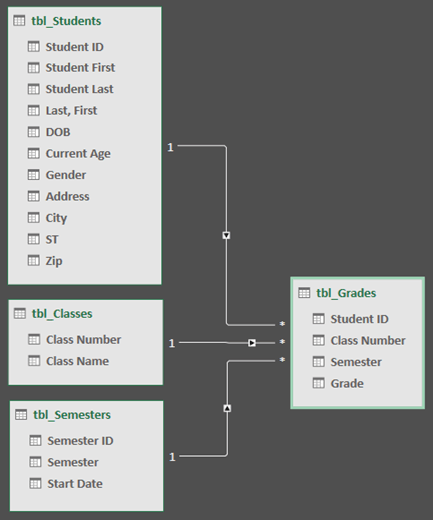
Now you can create tables to store it. Each table should represent a single entity. Such as customers, products or orders. Tables should have unique column headings. And each row should contain a unique record.
manage data model excel Relationships
After creating the tables, you can establish relationships between them. For instance, a customer may have many orders. And they contain multiple products. Relationships between tables is about linking common fields in the tables.
Add Formulas
Formulas help you retrieve and display data from tables in a data model. The most common formulas in data models are the SUM, AVERAGE and COUNT formulas. You can also use more advanced formulas like VLOOKUP, INDEX MATCH and IF statements.
Create Pivot Tables and Charts
So, you can use pivot tables and charts to analyze and visualize the data. Pivot tables summarize data and charts help you visualize trends.
Power Pivot is a free add-in for Excel and available in Excel 2010 and later versions.
Data Model using Power Pivot
- Users click on the Manage button to open the Power Pivot window.
- You can choose From Other Sources button to import data from external sources.
- Also, from Excel button, you can import data from an Excel workbook.
- You will select the data you want to import and click on the Open button.
- Now click on the Close and Load button at the end.
ables and Relationships
After importing data into the data model, you can start creating tables and relationships.
- You should start with clicking on the Design tab.
- Then, you will click on the Create Table button.
- Here, you enter a name for the table.
- Now, you will define the columns for the table.
To create a relationship between tables, you can do it like below.
- After getting to Design tab again, you can now click on the Create Relationship button.
- So, you will select the primary and foreign keys for the tables.
- Also the type of relationship.
Creating Hierarchies
Hierarchies can organize data into levels. For example, you can create a hierarchy for a product category with subcategories and products.
This time you will click on the Create Hierarchy button and define the levels for the hierarchy.
Creating Calculated Columns
Calculated columns can create new columns based on existing columns. It means you can create a calculated column. And it can sum up the total sales for a product.
To create a calculated column in Power Pivot, you should find Calculated Column button in Design tab.
Creating Measures
Measures can calculate data based on aggregation. Such as a sum or average. It is possible to create a measure to calculate total sales for a product category.
Adding Data from External Sources
You can add data from external sources to your data model. Such as as SQL Server, Access and SharePoint. For that, you should click on From Other Sources button in Design tab. Then, you select the type of data source and follow the prompts.
Creating PivotTables and PivotCharts
PivotTables and PivotCharts can analyze and summarize data. To create a PivotTable or PivotChart, basically you go and click on the Insert tab. Then, you will click on PivotTable or PivotChart button and select your range. As well as pivot table type.
Creating Dashboards
Dashboards in Excel can display key performance indicators (KPIs) and other important data. To create a dashboard, you should first create a PivotTable or PivotChart. And then, you can customize the design of the PivotTable or PivotChart. Also it is possible to add slicers and other interactive elements.
Best Practices for Data Modeling in Excel
When creating a data model in Excel, there are several best practices to follow like we listed below.
Naming Conventions
You should use consistent naming conventions for tables, columns and other elements in the data model.
Documentation of data modeling in excel
You should document the purpose, structure and relationships between tables. This helps others understand data model.
Data Security
You should protect the data model by limiting access to sensitive data. For example, customer information or financial data.
Advantages of Using a Data Model in Excel
A data model in Excel offers several advantages, including below things.
- Data models provide good way to organize and manage data.
- Using a data model, you can streamline data analysis and retrieval.
- Also, data models provide insights and trends.
Conclusion on how to create a data model in excel
Creating a data model in Excel can help you in many ways for decision-making. If you can follow steps and tips outlined here, you can create a data model for specific needs. With a good data model, you can turn raw data into functionable table or summary. If you want to learn more about Excel tutorials, please read these articles.

A dedicated Career Coach, Agile Trainer and certified Senior Portfolio and Project Management Professional and writer holding a bachelor’s degree in Structural Engineering and over 20 years of professional experience in Professional Development / Career Coaching, Portfolio/Program/Project Management, Construction Management, and Business Development. She is the Content Manager of ProjectCubicle.


