Autofit Row Height in Excel 2024: How to Change and AutoFit Row Height
How to Change and AutoFit Row Height in Excel? In the world of data management and presentation, Microsoft Excel stands as a cornerstone tool. Mastering its features, such as adjusting and auto-fitting row height, is pivotal for efficient data display and analysis. This comprehensive guide aims to provide you with detailed, step-by-step instructions on how to change and auto-fit row height in Excel, ensuring your spreadsheets are both functional and visually appealing.
Table of Contents

Autofit Row Height in Excel
How to Autofit Row Height in Excel: Understanding Row Height in Excel
How to Change and AutoFit Row Height in Excel? Before delving into the specifics of changing and auto-fitting row heights, it’s important to understand what row height in Excel refers to. The row height is the vertical measurement of each row in an Excel spreadsheet. It dictates the amount of vertical space allocated to the content within each cell of the row. By default, Excel sets a standard row height, but this may not always be conducive to your data presentation needs.
How to Autofit Row Height in Excel: Manual Adjustment of Row Height
Manually adjusting the row height is a straightforward process:
- Click on the Row Header: Select the row whose height you wish to change by clicking on its row number on the left-hand side of the sheet.
- Adjusting the Height: Move your cursor to the bottom border of the row header until it changes to a vertical line with an arrow at both ends. Click and drag to adjust the height.
- Precise Adjustment: For a more precise height, right-click on the row header and select ‘Row Height’. Enter the desired measurement in the dialog box that appears.
This method allows for precise control over the row height, catering to specific requirements of your data presentation.
How to Autofit Row Height in Excel: AutoFit Row Height
How to Change and AutoFit Row Height in Excel? AutoFitting row height is an efficient way to ensure that all content within a row is visible without manual adjustments:
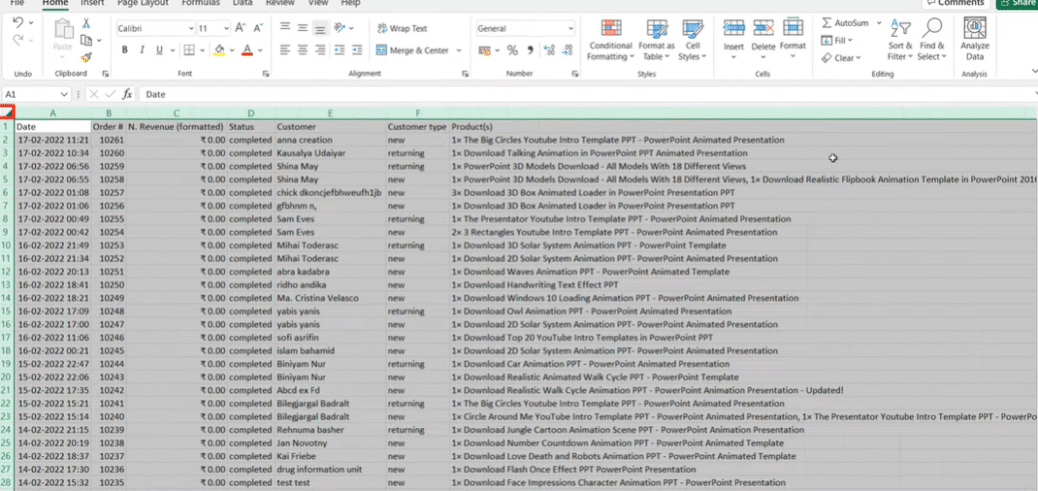
- Select the Rows: Click on the row header(s) you wish to AutoFit. To select multiple rows, drag your cursor over the row numbers or use the Shift key.
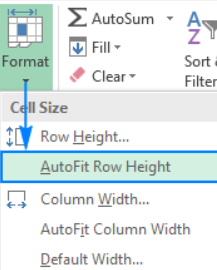
- AutoFit Option: Right-click on the selected row header(s) and choose ‘AutoFit Row Height’ from the context menu. Alternatively, go to the ‘Home’ tab, click on ‘Format’ in the Cells group, and select ‘AutoFit Row Height’.
AutoFit automatically adjusts the row height to accommodate the tallest cell in the row, ensuring that all content is visible without excess space.
How to Autofit Row Height in Excel: Utilizing Keyboard Shortcuts
For efficiency, use keyboard shortcuts. Select the row(s) you want to AutoFit and press ALT + H, O, A. This quick method saves time, especially when working with large datasets.
Best Practices for Row Height Adjustment
- Consistency: Keep row heights consistent across similar data sets for a clean, professional look.
- Visibility: Ensure all text and data are fully visible. Avoid cutting off text, which can lead to misinterpretation of data.
- Spacing: Provide adequate space between lines of text for readability, especially in rows with multiple lines of text.
Advanced Tips
- Wrap Text: Use the ‘Wrap Text’ feature in combination with AutoFit for cells containing multiple lines of text. This ensures that all content is visible and neatly contained within the cell.
- Row Height for Large Cells: For cells with a large amount of content, consider manually adjusting the row height instead of AutoFitting to avoid excessively tall rows.
- Custom Views: If you frequently switch between different row height settings, use the Custom Views feature to save and easily switch between these views.
Conclusion
How to Change and AutoFit Row Height in Excel? Mastering the adjustment and AutoFit of row heights in Excel is key to creating effective and visually appealing spreadsheets. By following the steps and tips outlined in this guide, you can ensure that your Excel data is presented clearly and professionally. Remember, the right row height can significantly enhance the readability and impact of your data.
FAQs (Frequently Asked Questions)
Q1. How do I reset a row’s height to its default in Excel? A1. To reset a row’s height to its default in Excel, simply double-click the row header’s bottom border. Excel will automatically adjust the row height to the default size based on the content.
Q2. Can I AutoFit multiple rows at once? A2. Yes, you can AutoFit multiple rows simultaneously. Select the rows you want to AutoFit, right-click, and choose ‘AutoFit Row Height’ from the context menu, or use the keyboard shortcut ALT + H, O, A.
Q3. What should I do if text is still not fully visible after AutoFitting a row? A3. If text is still not fully visible after AutoFitting a row, consider adjusting the column in Excel width to accommodate the content. Also, check for any merged cells or cell formatting that might affect text visibility.
Q4. Is there a way to AutoFit row height automatically as I type in Excel? A4. Excel doesn’t provide an automatic real-time AutoFit feature while typing. You need to manually apply AutoFit Row Height after entering or editing content in a row.
Q5. Can I AutoFit rows with merged cells? A5. Yes, you can AutoFit rows with merged cells. Excel will adjust the row height to accommodate the merged cell’s content.
Additional Details
In Excel, changing and auto-fitting row heights is a fundamental part of creating well-organized and visually appealing spreadsheets. Here are some additional details and tips:
- Hidden Rows: AutoFit Row Height takes hidden rows into account. If a row is hidden, Excel will not AutoFit it until you unhide it.
- Text Formatting: Different fonts and font sizes can affect row height. If you notice inconsistent row heights, check the formatting of the text within the cells.
- Cell Padding: Excel provides a default padding within cells. If you need to reduce or increase the space between text and cell borders, consider adjusting cell padding through cell formatting options.
- Row Height Limit: Excel has a maximum row height limit of 409 points (about 5.68 inches or 14.4 cm). If you need to display extremely tall content, consider using a text box or splitting the content across multiple rows.
- Print Preview: Always use the Print Preview feature to ensure that your rows and column in Excel are appropriately adjusted for printing. It helps you identify any issues with row heights and layout before printing.
People Also Ask
Q1. How can I AutoFit columns in Excel?
A1. To AutoFit columns in Excel, select the column(s) you want to adjust, then right-click and choose ‘AutoFit Column Width’ from the context menu, or use the keyboard shortcut ALT + H, O, I.
Q2. Are there any shortcuts for adjusting both row height and column width simultaneously?
A2. No, there are no built-in shortcuts for adjusting both row height and column in Excel width simultaneously. You’ll need to adjust them separately.
Q3. What is the default row height in Excel?
A3. The default row height in Excel is 15 points (approximately 0.21 inches or 0.53 cm). However, it can vary depending on the font size and cell formatting.
Q4. How do I make sure my Excel sheet looks consistent when printing?
A4. To ensure consistency when printing an Excel sheet, use Page Layout view to adjust margins, headers, and footers. Additionally, check the row and column in Excel settings for uniformity.
Q5. Can I apply AutoFit to specific columns as well as rows?
A5. Yes, you can apply AutoFit to specific columns in the same way you do for rows. Select the column(s), right-click, and choose ‘AutoFit Column Width’ or use the keyboard shortcut ALT + H, O, I.
If you like this article, you can read our Excel Function And Formulas: Data Analysis article.
Hello, I’m Cansu, a professional dedicated to creating Excel tutorials, specifically catering to the needs of B2B professionals. With a passion for data analysis and a deep understanding of Microsoft Excel, I have built a reputation for providing comprehensive and user-friendly tutorials that empower businesses to harness the full potential of this powerful software.
I have always been fascinated by the intricate world of numbers and the ability of Excel to transform raw data into meaningful insights. Throughout my career, I have honed my data manipulation, visualization, and automation skills, enabling me to streamline complex processes and drive efficiency in various industries.
As a B2B specialist, I recognize the unique challenges that professionals face when managing and analyzing large volumes of data. With this understanding, I create tutorials tailored to businesses’ specific needs, offering practical solutions to enhance productivity, improve decision-making, and optimize workflows.
My tutorials cover various topics, including advanced formulas and functions, data modeling, pivot tables, macros, and data visualization techniques. I strive to explain complex concepts in a clear and accessible manner, ensuring that even those with limited Excel experience can grasp the concepts and apply them effectively in their work.
In addition to my tutorial work, I actively engage with the Excel community through workshops, webinars, and online forums. I believe in the power of knowledge sharing and collaborative learning, and I am committed to helping professionals unlock their full potential by mastering Excel.
With a strong track record of success and a growing community of satisfied learners, I continue to expand my repertoire of Excel tutorials, keeping up with the latest advancements and features in the software. I aim to empower businesses with the skills and tools they need to thrive in today’s data-driven world.
Suppose you are a B2B professional looking to enhance your Excel skills or a business seeking to improve data management practices. In that case, I invite you to join me on this journey of exploration and mastery. Let’s unlock the true potential of Excel together!
https://www.linkedin.com/in/cansuaydinim/


