Save As Shortcut in Excel: Easy Ways, Tips, Tricks [2024]
What is the shortcut key for Save As? How to Save as a CSV File in Excel? In today’s fast-paced digital landscape, Microsoft Excel has evolved from being a simple spreadsheet tool to becoming an indispensable companion for businesses, students, and professionals around the globe. Renowned for its versatility and its ability to handle data efficiently, Excel empowers users to perform intricate calculations, organize vast datasets, and make informed decisions. We’ve all forgotten to save our file many times due to sudden computer shutdowns and other problems. 🙂
Table of Contents
However, among its myriad features, one powerful capability often remains underutilized: the “Save As” function. In this SEO-optimized article, we will not only uncover the world of Save As Shortcut in Excel but also explore their significance, providing you with a comprehensive guide to enhance your productivity.
Unlocking the Future with No-Code AI Course – projectcubicle
Introduction to Excel: The Data Management Powerhouse
What is the shortcut key for Save As? Microsoft Excel, often celebrated as a data management powerhouse, plays a pivotal role in countless tasks spanning diverse sectors. From financial analysts managing budgets to scientists conducting complex experiments, Excel stands as the go-to application for data manipulation and analysis. Despite its ubiquitous use, many users are unaware of the invaluable time-saving features tucked away within Excel, with the “Save As” function being a prime example.
Understanding the “Save As” Function in Excel
The “Save As” function in Excel is a versatile tool that empowers users to create a duplicate of their existing workbook with a new name or in a different file format. Its applications are multifaceted, ranging from maintaining version control to expediting document sharing and optimizing data organization. This function proves invaluable when users need to preserve their work in various iterations or file formats, enhancing data integrity and accessibility.
Mastering Save As Shortcut in Excel: How to Save as a CVS File in Excel
Now, let’s delve into the quick and easy world of Save As Shortcut in Excel that can significantly elevate your efficiency when working with this data-processing juggernaut:
- Keyboard Shortcut – Ctrl + S: While not a direct “Save As” function, Ctrl + S is a fundamental shortcut in Excel for saving your current work. This command ensures that your progress is securely saved, preventing data loss and allowing for quick access to the “Save As” dialog.
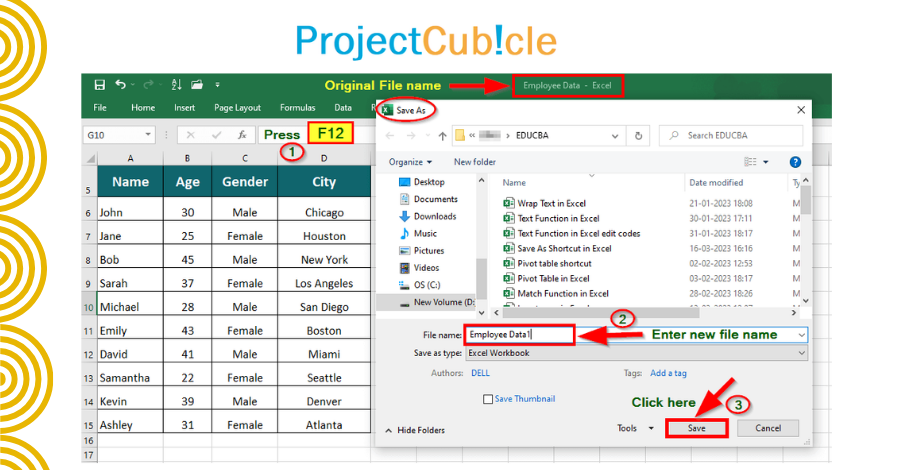
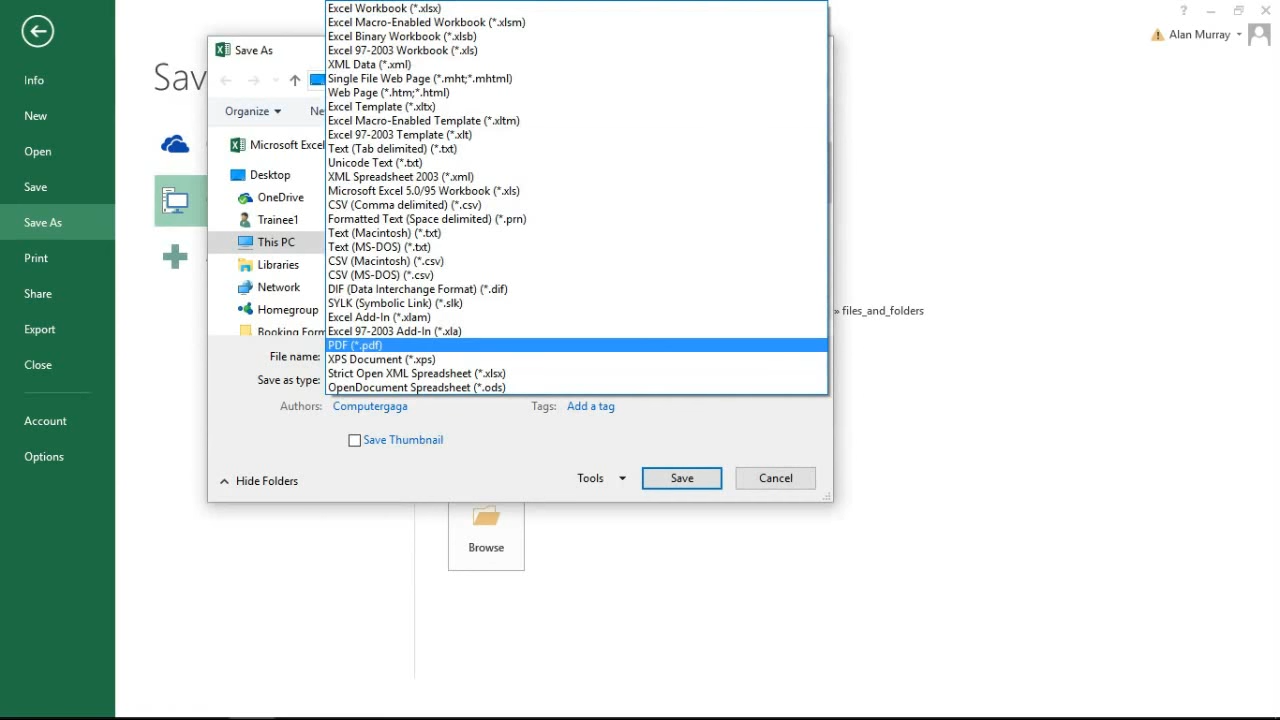
- Keyboard Shortcut – F12: A simple press of the F12 key while in Excel instantly opens the “Save As” dialog box. This particular shortcut is a genuine time-saver, especially when you need to save a file under a different name or in a specific location.
- Alt + F, A: For those who prefer keyboard shortcuts, the combination of Alt + F, followed by A, accomplishes the same task as hitting F12. It’s a handy alternative for individuals who prefer not to reach for the function keys.
- Ctrl + Shift + S: Another efficient shortcut is Ctrl + Shift + S, which directly opens the “Save As” dialog box, allowing you to promptly specify the desired file name and location, emphasizing the significance of Save As Shortcut in Excel.
- Right-Click and Choose “Save As”: Sometimes, simplicity reigns supreme. A straightforward right-click on your Excel file in the taskbar or file explorer, followed by selecting “Save As,” grants you swift access to the save options, underscoring the value of Save As Shortcut in Excel in simplifying daily tasks.
Recommended Article: How to Recover Deleted Excel Files Or Unsaved Excel files in Windows
How to Use the “Save As” Shortcut in Excel
Using the “Save As” shortcut in Excel is easy. Simply follow these steps:
- Open the Excel workbook you want to save.
- Press the “F12” key on your keyboard.
- The “Save As” dialogue box will appear.
- Choose the location where you want to save the file.
- Enter a new name for the file in the “File name” field.
- Choose the desired file format from the “Save as type” dropdown menu.
- Click on the “Save” button.
That’s it! Your file has been saved under a new name or format, without altering the original file.
When to Use the “Save As” Shortcut in Excel
The “Save As” shortcut can be used in various situations, such as:
- Creating backups: It is always a good idea to create backups of your important files in case something goes wrong. By using the “Save As” shortcut, you can easily create a copy of your workbook and save it under a different name or location.
- Sharing files with others: If you need to share a copy of your workbook with others, it is recommended to use the “Save As” function to create a separate copy of the file. This way, you can ensure that the original file remains intact and unchanged.
- Saving multiple versions of the same file: If you are working on a complex project or report, you may need to save multiple versions of the same file. By using the “Save As” shortcut, you can easily create different versions of your workbook without having to manually copy and paste the data.
Some Other Popular Excel Shortcuts
In addition to the “Save As” shortcut, Excel offers a wide range of keyboard shortcuts that can help you work faster and more efficiently. Some other popular Excel shortcuts include:
- Ctrl + C (Copy)
- Ctrl + V (Paste)
- Ctrl + X (Cut)
- Ctrl + Z (Undo)
- Ctrl + Y (Redo)
- Ctrl + A (Select All)
- Ctrl + F (Find)
You can become a more efficient and productive worker by learning these and other Excel shortcuts. In addition to keyboard shortcuts, you can use many other tips and tricks to improve your Excel skills and make your work easier.
For example, you can use Excel templates to create professional-looking spreadsheets quickly or use Excel’s conditional formatting feature to highlight certain cells based on their values. Also, many online resources are available that can help you learn more about Excel and how to use it effectively.
Also, The “Save As” shortcut in Excel is just one of many tools that can help you work more efficiently and productively. By taking the time to learn this and other Excel shortcuts, you can become a master of this powerful program and take your work to the next level.
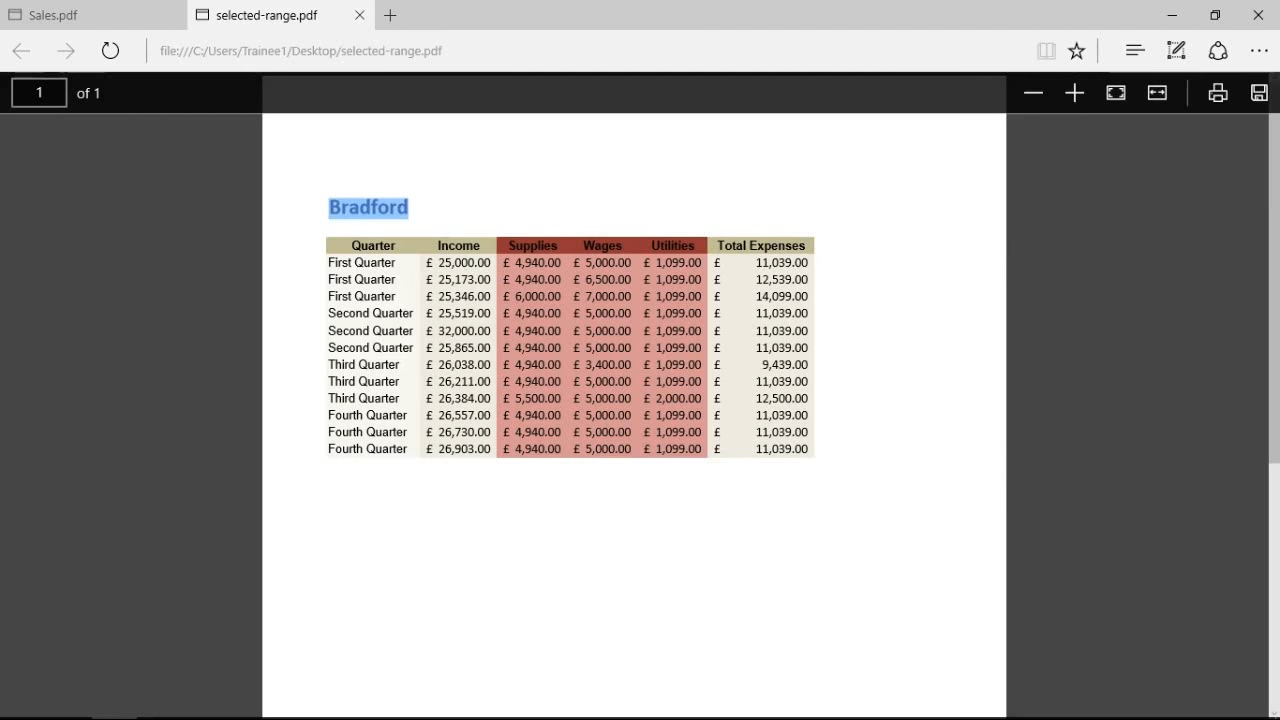
PDF File.
Here are a few more examples of how to use the “Save As” shortcut in Excel:
- To create a backup copy of your Excel spreadsheet quickly, use the “Save As” shortcut by pressing “Ctrl+Shift+S”. This will open the Save As dialog box, where you can choose a new name and location for your backup copy.
- When you want to create a new version of your Excel spreadsheet, you can use the “Save As” shortcut by pressing “F12”. This will open the Save As dialog box, where you can enter a new name and location for your updated spreadsheet.
- If you want to save a copy of your Excel spreadsheet in a different file format, such as a CSV file, use the “Save As” shortcut by pressing “Alt+F+A”. This will open the Save As dialog box, where you can select a different file format from the “Save as type” dropdown menu.
- To save a copy of your Excel spreadsheet with a different name quickly, use the “Save As” shortcut by pressing “F12” and then typing a new name for your file in the “File name” field of the Save As dialog box. This is useful if you need to make copies of your spreadsheet for sharing with colleagues or sending to clients.
Step-by-Step Guide: How to Save as a CSV File in Excel
Now, let’s get into the details of how you can save your Excel spreadsheet as a CSV file. We’ll break down the process into easy-to-follow steps:
Step 1: Open Your Excel Spreadsheet
Begin by launching Microsoft Excel and opening the spreadsheet you want to save as a CSV file. Ensure that your data is correctly formatted and organized in rows and columns.
Step 2: Select the Data
Click and drag your mouse to select the data range you wish to save as a CSV file. It’s essential to choose the correct range to avoid exporting unnecessary data.
Step 3: Go to the “File” Menu
Next, navigate to the “File” menu at the top left corner of the Excel window. Click on it to open a dropdown menu.
Step 4: Choose “Save As”
From the dropdown menu, select “Save As.” This will open a dialog box where you can specify the file name and location.
Step 5: Choose the Save Location
Select the folder or directory where you want to save your CSV file. It’s a good practice to create a dedicated folder for your CSV files to keep your data organized.
Step 6: Choose “CSV (Comma delimited) (*.csv)” as the File Type
In the “Save as type” dropdown menu, choose “CSV (Comma delimited) (*.csv)” as the file type. This option ensures that your data is saved in the CSV format.
Step 7: Click “Save”
After selecting the file type, click the “Save” button to save your Excel spreadsheet as a CSV file. Excel will prompt you with some options; make sure to review and adjust them as needed. For most cases, the default settings work well.
Step 8: Confirm the Encoding
Excel may also ask you to confirm the encoding of the CSV file. UTF-8 is the recommended encoding for maximum compatibility, so choose it if prompted.
Step 9: Done! Your Excel File Is Now a CSV File
Congratulations! You’ve successfully saved your Excel spreadsheet as a CSV file. You can now use this file for various data-related tasks, such as importing it into other software applications, databases, or sharing it with colleagues and partners.
Tips and Best Practices
- Consistency in Data Formatting: Ensure that your data is consistently formatted, with the same type of data in each column. This helps prevent issues when converting to CSV.
- Avoid Special Characters: Be cautious with special characters, especially commas and quotation marks, as they can disrupt the CSV formatting. If your data contains such characters, consider proper escaping or cleaning.
- Test Your CSV File: After saving your Excel file as a CSV, open it in a text editor or spreadsheet application to verify that the data is intact and properly formatted.
- Backup Your Original Excel File: Before making any changes or saving as a CSV, it’s a good practice to create a backup of your original Excel file to avoid accidental data loss.
- Keep Documentation: Maintain documentation about your CSV files, including the date of creation, data source, and any data transformations applied.
Conclusion
After all, the “Save As” shortcut in Excel is a crucial feature that allows you to save time and avoid overwriting your original work. Additionally, using this tool is relatively simple – you can create a new copy of your workbook with a different name or format by following just a few steps. Both beginners and experienced Excel users can benefit from mastering this shortcut, and whether you need to make minor edits or major changes, it can help you get the job done quickly and efficiently.
Furthermore, using the “Save As” shortcut can help you avoid potential mistakes and errors, whether it’s accidental data loss or overwriting important information. Not only can you create backups and new versions of your workbook, but you can also customize the settings to meet your individual needs. Whether you’re working with spreadsheets, charts, or other types of data, this feature is essential for staying organized and productive.
In conclusion, whether you’re working on a personal project or a professional report, using the “Save As” shortcut in Excel is a fundamental tool that can help you achieve your goals. Whether you’re saving files in different formats or creating backups, the “Save As” shortcut is an easy-to-use feature that you can use to your advantage. So, whether you’re an Excel beginner or an experienced user, make sure to utilize this powerful feature to optimize your workflow and achieve success.
Frequently Asked Questions (FAQs) – Excel Save As Shortcuts
1. Is there a shortcut for Save As?
- Yes, there is a keyboard shortcut for Save As in Excel. You can press F12 to open the “Save As” dialog box.
2. How do I save as in Excel?
- To save a file with a different name or in a different location in Excel, you can use the keyboard shortcut F12, or you can go to the “File” menu, select “Save As,” and choose your desired options.
3. What is the shortcut for Save formula in Excel?
- The keyboard shortcut for saving formulas and data in Excel is Ctrl + S. It saves your current work without opening the “Save As” dialog.
4. What is the shortcut for save as in F12?
- The shortcut for “Save As” in Excel is indeed F12. Pressing the F12 key opens the “Save As” dialog box, allowing you to specify the file name and location.
5. What is the shortcut for Save As in Windows 10?
- The keyboard shortcut for “Save As” is not specific to Windows 10 but rather an Excel shortcut. You can use F12 in Excel to access the “Save As” function, regardless of your operating system.
6. What does Ctrl Shift F12 do?
- In Excel, pressing Ctrl + Shift + F12 does not have a predefined function. It may perform various actions depending on the context or any custom macros or add-ins you have configured.
7. What is Ctrl F12 in Excel?
- In Excel, Ctrl + F12 is not a standard keyboard shortcut. It may not have a specific function by default but can be customized based on your preferences or Excel add-ins.
8. What does Ctrl +N do?
- In Excel, pressing Ctrl + N opens a new, blank workbook or worksheet, allowing you to start fresh with a new document.
If you want to convert PDF to Excel you may need the best free PDF to Excel converter.
Hello, I’m Cansu, a professional dedicated to creating Excel tutorials, specifically catering to the needs of B2B professionals. With a passion for data analysis and a deep understanding of Microsoft Excel, I have built a reputation for providing comprehensive and user-friendly tutorials that empower businesses to harness the full potential of this powerful software.
I have always been fascinated by the intricate world of numbers and the ability of Excel to transform raw data into meaningful insights. Throughout my career, I have honed my data manipulation, visualization, and automation skills, enabling me to streamline complex processes and drive efficiency in various industries.
As a B2B specialist, I recognize the unique challenges that professionals face when managing and analyzing large volumes of data. With this understanding, I create tutorials tailored to businesses’ specific needs, offering practical solutions to enhance productivity, improve decision-making, and optimize workflows.
My tutorials cover various topics, including advanced formulas and functions, data modeling, pivot tables, macros, and data visualization techniques. I strive to explain complex concepts in a clear and accessible manner, ensuring that even those with limited Excel experience can grasp the concepts and apply them effectively in their work.
In addition to my tutorial work, I actively engage with the Excel community through workshops, webinars, and online forums. I believe in the power of knowledge sharing and collaborative learning, and I am committed to helping professionals unlock their full potential by mastering Excel.
With a strong track record of success and a growing community of satisfied learners, I continue to expand my repertoire of Excel tutorials, keeping up with the latest advancements and features in the software. I aim to empower businesses with the skills and tools they need to thrive in today’s data-driven world.
Suppose you are a B2B professional looking to enhance your Excel skills or a business seeking to improve data management practices. In that case, I invite you to join me on this journey of exploration and mastery. Let’s unlock the true potential of Excel together!
https://www.linkedin.com/in/cansuaydinim/

