Can you make an Excel cell a checkbox? How to Make a Cell a Checkbox in Excel
Can you make an Excel cell a checkbox? How to Make a Cell a Checkbox in Excel? In our continuous effort to empower you with Excel proficiency, we present an in-depth guide on how to make a cell a checkbox in Excel. This skill is a potent tool to elevate your Excel prowess, enabling the creation of interactive, user-friendly spreadsheets. Whether you are navigating Excel for professional purposes, personal projects, or data management, integrating checkboxes can streamline tasks and amplify data clarity. In this comprehensive article, we’ll escort you through the step-by-step process of introducing checkboxes into your Excel worksheets, replete with invaluable tips, illuminating examples, crucial details, and an important section to highlight key considerations.
Table of Contents
Bonus: Antonio Nieto-Rodriguez!
Why Use Checkboxes in Excel?
Before delving into the technicalities, let’s explore the compelling reasons to incorporate checkboxes in your Excel projects. Checkboxes offer several advantages that can significantly enrich your Excel experience:
1. Data Organization Checkboxes serve as efficient tools for categorizing and organizing data. They prove invaluable for crafting to-do lists, monitoring tasks, or designating items as completed or pending.
2. User-Friendly Interface Checkboxes augment the user-friendliness of your Excel spreadsheets by providing a straightforward means for users to interact with data. Users can effortlessly toggle checkboxes to update information or express preferences.
3. Visual Clarity By incorporating checkboxes, you enhance the visual appeal of your spreadsheets. They furnish a lucid and concise method for presenting choices, simplifying comprehension and engagement with your data.
Now, let’s embark on the meticulous journey of integrating checkboxes into your Excel cells.
Adding a Checkbox to an Excel Cell
Follow these meticulously laid-out steps to infuse a cell a checkbox in Excel:
Step 1: Open Your Excel Worksheet Initiate Microsoft Excel and open the target worksheet where you intend to embed checkboxes. Also, if you’re embarking on a fresh project, create a new worksheet to serve as your canvas.
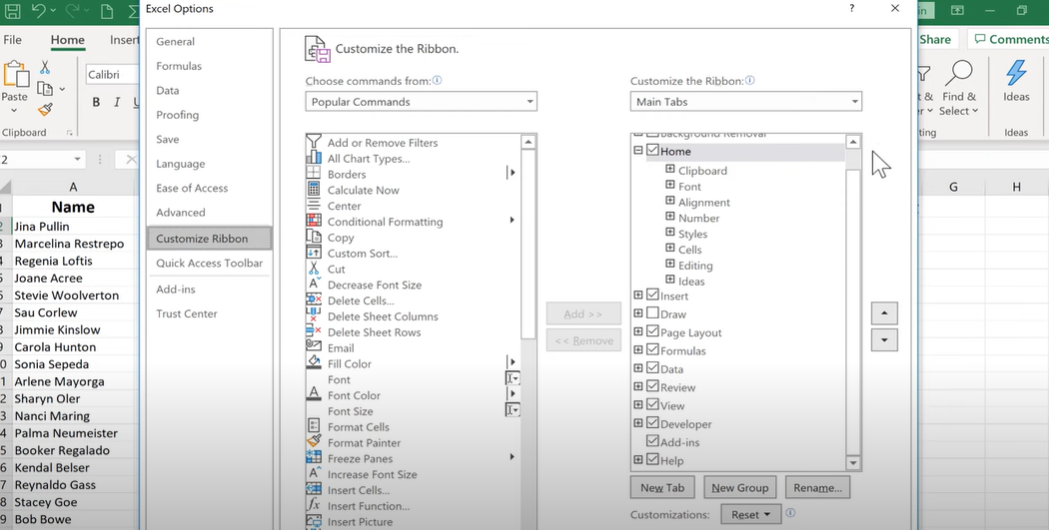
Step 2: Activate the Developer Tab To unlock the essential controls for checkboxes, you must activate the Developer tab, concealed within Excel’s ribbon. Here’s your roadmap:
- Commence by clicking on “File” nestled in the top-left corner.
- Proceed to select “Options,” thoughtfully situated at the bottom of the menu.
- Within the Excel Options window, navigate to “Customize Ribbon,” tucked away on the left sidebar.
- Engage the transformational process by checking the box adjacent to “Developer” under the Main Tabs section.
- Seal the deal by clicking “OK” to execute the changes.
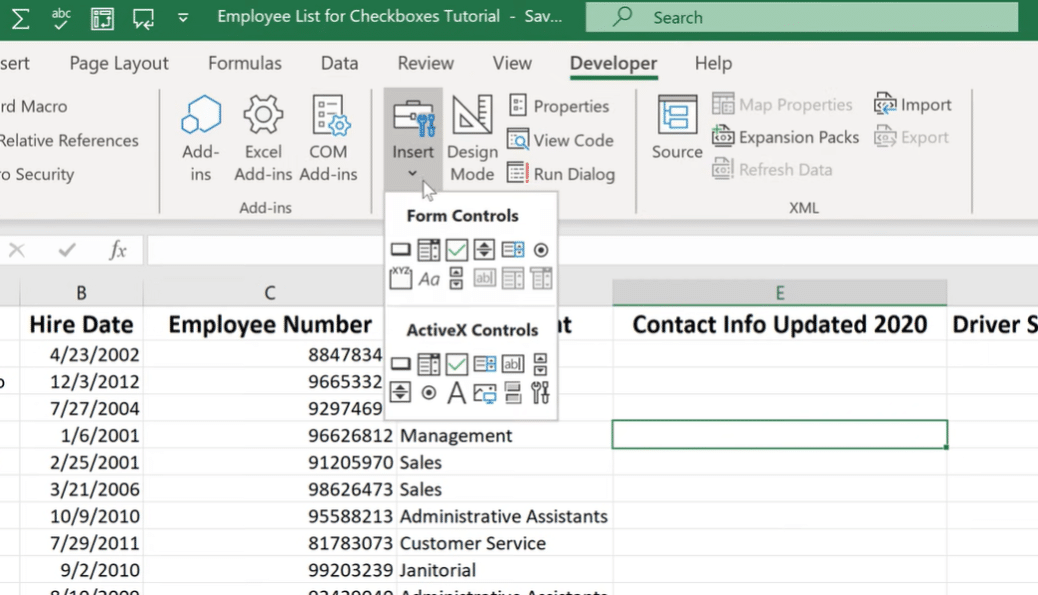
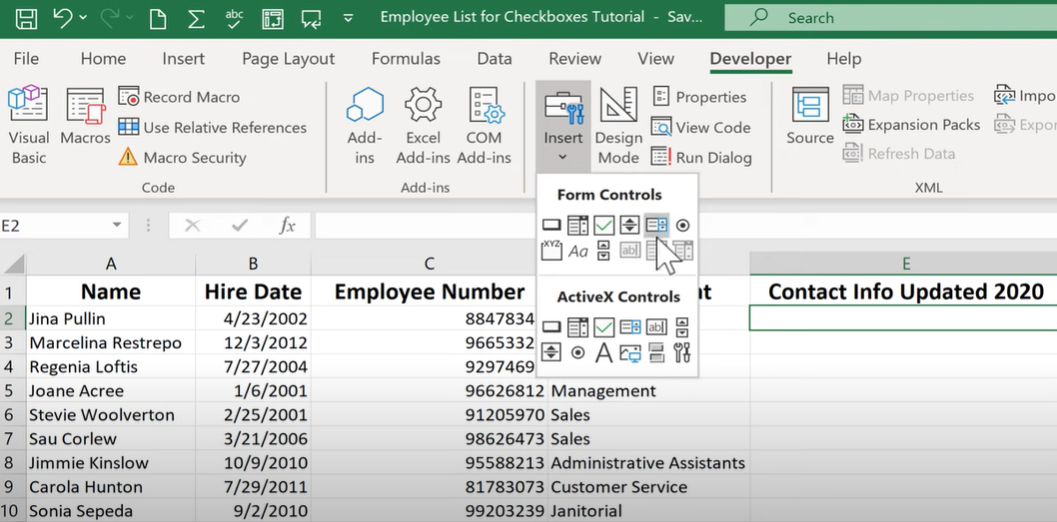
Step 3: Insert a Checkbox Now that the Developer tab has been unveiled, you are poised to introduce checkboxes into your cells. Here’s your blueprint:
- Direct your cursor towards the “Developer” tab gracefully adorning the Excel ribbon.
- Within the Controls group, spot the “Insert” button and give it a gentle click.
- Behold, a menu of controls unfolds before you. Select the checkbox icon, a visual representation of a checkbox.
- Finally, delicately click on the cell a checkbox in Excel where you wish to bestow the checkbox.
Congratulations! You’ve masterfully embedded a checkbox into an Excel cell. You are now prepared to tailor the checkbox’s properties and appearance to harmonize with your needs.
Customizing Checkbox Properties
Excel extends a generous array of options to tailor various facets of your checkboxes to match your specific requirements. Here’s an exploration of key properties ripe for customization:
1. Checkbox Text Enrich your checkbox’s context by incorporating text adjacent to it. Also, simply bestow a right-click upon the checkbox and select “Edit Text” to inscribe your desired textual accompaniment.
2. Checkbox Size Should you desire a resize, perform the ritual of clicking the checkbox to select it, and then, with finesse, drag its corners to orchestrate a seamless adjustment of dimensions.
3. Checkbox Alignment Leverage the alignment options to perfectly position the checkbox within the cell a checkbox in Excel. Opt for left, center, or right alignment to achieve the visual harmony you seek.
4. Checkbox Cell Link Among the most potent features of checkboxes is the ability to link them to specific cells. This enables the checkbox to populate a designated linked cell with a “True” or “False” value. To embark on this journey, initiate a right-click on the checkbox, embark on a quest to select “Format Control,” journey to the “Control” tab, and diligently specify the cell link under the benevolent guidance of “Cell link.
how to make a cell a checkbox in excel
Important Section:
Key Considerations Before you conclude your journey of checkbox integration in Excel, it’s crucial to take note of some key considerations:
- Compatibility: Ensure that the version of Excel you are using supports checkboxes. Also, some older versions might have limited functionality.
- Printing: If you plan to print your Excel worksheet, be mindful of how checkboxes appear on the printed page. Adjust the print settings accordingly to maintain document clarity.
- Data Validation: While checkboxes are helpful, they should not replace proper data validation and error-checking procedures in more complex Excel applications.
how to make a cell a checkbox in excel
Tips for Using Checkboxes Effectively
To extract the utmost utility from checkboxes in Excel, contemplate these invaluable tips:
1. Use Checkboxes in Conjunction with Formulas Unlock the full potential of Excel spreadsheets by weaving intricate formulas that react dynamically to checkbox changes. For instance, you can compute totals based on checked items, orchestrating a symphony of data.
2. Distinguish Checked and Unchecked Boxes To enhance visual clarity, implement distinct formatting for checked and unchecked checkboxes. This intuitive practice aids users in swiftly identifying completed tasks or selected options.
3. Group Kindred Checkboxes If your worksheet harbors a congregation of checkboxes with a shared purpose, unify them harmoniously using the “Group Box” control found within the Developer tab. This fosters structure and orderliness within your spreadsheet, promoting ease of navigation.
4. Thorough Testing and Verification Adhere to the virtue of diligence by subjecting your checkboxes to rigorous testing. Verify that linked cells respond correctly to the ballet of checkboxes being checked or unchecked, ensuring the harmony of your data symphony.
By adhering to these meticulously crafted guidelines and immersing yourself in the vast palette of checkbox customization options, you can orchestrate Excel spreadsheets that not only exude functionality but also radiate visual appeal and user-friendliness, elevating your Excel mastery to new heights.

Thank you dear reader!
Hello, I’m Cansu, a professional dedicated to creating Excel tutorials, specifically catering to the needs of B2B professionals. With a passion for data analysis and a deep understanding of Microsoft Excel, I have built a reputation for providing comprehensive and user-friendly tutorials that empower businesses to harness the full potential of this powerful software.
I have always been fascinated by the intricate world of numbers and the ability of Excel to transform raw data into meaningful insights. Throughout my career, I have honed my data manipulation, visualization, and automation skills, enabling me to streamline complex processes and drive efficiency in various industries.
As a B2B specialist, I recognize the unique challenges that professionals face when managing and analyzing large volumes of data. With this understanding, I create tutorials tailored to businesses’ specific needs, offering practical solutions to enhance productivity, improve decision-making, and optimize workflows.
My tutorials cover various topics, including advanced formulas and functions, data modeling, pivot tables, macros, and data visualization techniques. I strive to explain complex concepts in a clear and accessible manner, ensuring that even those with limited Excel experience can grasp the concepts and apply them effectively in their work.
In addition to my tutorial work, I actively engage with the Excel community through workshops, webinars, and online forums. I believe in the power of knowledge sharing and collaborative learning, and I am committed to helping professionals unlock their full potential by mastering Excel.
With a strong track record of success and a growing community of satisfied learners, I continue to expand my repertoire of Excel tutorials, keeping up with the latest advancements and features in the software. I aim to empower businesses with the skills and tools they need to thrive in today’s data-driven world.
Suppose you are a B2B professional looking to enhance your Excel skills or a business seeking to improve data management practices. In that case, I invite you to join me on this journey of exploration and mastery. Let’s unlock the true potential of Excel together!
https://www.linkedin.com/in/cansuaydinim/

