

What is the “Convert Columns to Rows in Excel” ? What is the TRANSPOSE? Excel, a powerful tool for data management and analysis, often requires us to modify the layout of data for better understanding and analysis. One common task is changing the orientation of data from columns to rows. This process, known as transposing data, is crucial for data reorganization and can significantly impact the way data is analyzed and presented.
Table of Contents
Bonus: Antonio Nieto-Rodriguez!
Important Considerations When Transposing Data in Excel
Before diving into the process of transposing data (convert columns to rows in Excel), there are several key aspects to consider:
- Data Backup: Always ensure you have a backup of your original data before making any changes. This precaution will save you from potential data loss during the transposition process.
- Formula References: Be aware that transposing data can affect cell references in formulas. This might require adjustments in your formulas post-transposition.
- Data Size and Complexity: The size and complexity of your data can dictate the best method for transposition. Larger datasets might benefit from automated methods like VBA scripting.
- Data Consistency: Maintaining data consistency is crucial, especially when dealing with large datasets or multiple data sources.
- Compatibility and Sharing: Consider how transposing data will affect the compatibility and sharing of your Excel files with others who might use different versions of Excel or alternative spreadsheet software.
Understanding the Basics of Excel Transposition
Transposition in Excel (convert columns to rows in Excel) refers to the technique of switching the rows to columns and vice versa. This is not merely about altering the visual representation; it’s about reorganizing the data structure within your spreadsheet. This manipulation allows for a different perspective of data analysis and presentation.
Why Transpose Data in Excel?
There are various scenarios where you might need to transpose data in Excel. Perhaps your data was initially entered in a row format and now requires a columnar display for better comparison. Or, you might need to format your data to comply with specific reporting standards or to facilitate easier data analysis.
The Techniques of Transposing Data
Excel offers several methods to change columns to rows. These include using the ‘Paste Special‘ feature, writing formulas, or employing the Excel TRANSPOSE function. Each method has its unique applications, depending on the complexity and size of your data set.
Step-by-Step Guide to Transpose Columns to Rows
Let’s dive into the practical aspect of transposing data in Excel.
1: Using Paste Special
- Select and Copy Data: Begin by selecting the cells you wish to transpose. Right-click and choose ‘Copy’ or use the keyboard shortcut Ctrl+C.
- Paste Special Transpose: Click on the cell where you want to paste the transposed data. Right-click, select ‘Paste Special,’ and then choose ‘Transpose‘.
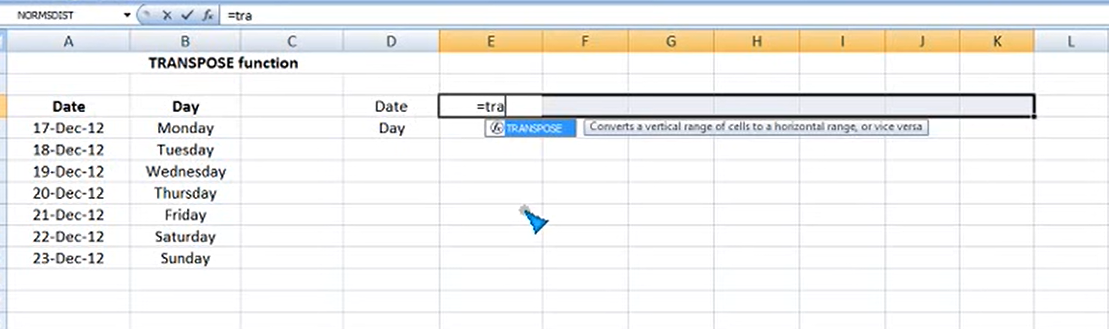
2: Excel TRANSPOSE Function
- Select Destination Range: First, select the range where you want the transposed data to appear.
- Enter TRANSPOSE Formula: Type
=TRANSPOSE(, select the range of data you want to transpose, close the bracket, and press Enter.
3: Writing Formulas for Custom Transposition
- Identify Data Range: Identify the range of data you want to transpose.
- Write Custom Formula: In the destination cell, write a formula that references the corresponding cell in the original data range. This method is more flexible and allows for complex transpositions.
Tips for Efficient Data Transposition in Excel
- Data Integrity: Ensure that your original data is backed up before attempting to transpose it.
- Range Selection: Accurately select the range of data to avoid errors in transposition.
- Formula Copying: If using formulas, ensure they are correctly copied across the range to maintain data consistency.
TRANSPOSE Function

Advanced Transposition Techniques
For advanced users, Excel provides options like using VBA (Visual Basic for Applications) to automate the transposition process. This is particularly useful for large datasets or when transposition needs to be done frequently.
Excel Data Transformation: Beyond Basic Transposition
Beyond the basics, Excel data transformation involves not just rearranging rows and columns but also automating Excel layout change. This involves using advanced functions and macros to ensure that your Excel spreadsheet reformatting is both efficient and error-free.
Automating Excel Layout Change
Automation in Excel can be achieved through VBA scripting, allowing for more dynamic Excel cell rearrangement techniques. This is particularly useful for repeated tasks, complex datasets, or when you need to apply Excel data layout alteration across multiple sheets.
Mastering Excel Column-Row Swap
Excel column-row swap, it’s important to understand the nuances of each method. For instance, using Excel layout switching techniques like the Transpose function can be ideal for static data. However, for data that updates regularly, employing Excel matrix transposition through dynamic formulas or VBA scripts might be more suitable.
Excel Data Orientation Change: Adapting to Different Data Structures
Adapting to different data structures is a key component of Excel data orientation change. This involves understanding how different data formats affect analysis and visualization. For instance, a dataset arranged in rows might be ideal for time series analysis, while a columnar arrangement could be better for comparing different data sets.
Modifying Excel Structures for Enhanced Data Analysis
Modifying Excel structures can dramatically enhance data analysis capabilities. By effectively using the Excel pivot transformation, you can pivot your data for a more in-depth analysis. This helps in uncovering trends and patterns that might not be apparent in the original layout.
Excel Data Organization for Reporting and Presentation
Effective Excel data organization is crucial when preparing data for reporting and presentation. The way data is laid out can significantly impact its interpretability and clarity. Understanding how to alter Excel cell arrangement for various reporting formats is an essential skill for anyone working with data in Excel.
Creating Dynamic Reports with Transposed Data
Creating dynamic reports involves not just modifying Excel structures but also ensuring that the data remains readable and accessible. This might involve using Excel layout modification techniques to ensure that the data aligns with the intended report format.
[vc_message message_box_color=”alert-warning” icon_type=”fontawesome” icon_fontawesome=”fas fa-paste” css=”.vc_custom_1704390974010{background-color: #fffddb !important;}”]
Using TRANSPOSE Function to Convert Columns to Rows
Another method to convert columns to rows is by using the TRANSPOSE function. Here are the steps to do that:
- Select the range of cells that you want to convert.
- In the cell where you want to start the new row, type =TRANSPOSE(A1:E1), where A1:E1 is the range of cells you want to convert.
- Press Ctrl+Shift+Enter instead of Enter to enter the formula as an array formula.
- The columns will be converted into rows.
Using Power Query to Convert Columns to Rows
Power Query is a powerful tool that allows you to manipulate data in Excel. Here are the steps to use Power Query to convert columns to rows:
- Select the range of cells that you want to convert.
- Go to the “Data” tab and click on “From Table/Range” under the “Get & Transform Data” group.
- In the Power Query Editor, select the columns you want to convert.
- Right-click on the selected columns and select “Unpivot Columns.”
- The columns will be converted into rows.

Power Query

Conclusion: Mastering Data Layout Changes in Excel
Transposing data in Excel is a fundamental skill that enhances your ability to manage and interpret data efficiently. By mastering these techniques, you can ensure your data is presented in the most effective way, facilitating better analysis and decision-making.
Remember, whether you’re working on a small project or handling large datasets, the ability to swiftly and accurately transpose data in Excel is an invaluable skill in your data management toolkit.
🚀 Hello everyone! 🌟
Today, I want to tell you about an amazing resource: “projectcubicle.com” 🌐
This website provides fantastic content in the world of project management and business relationships! 📈📊
📚 With free blog articles, you can access valuable information to enhance your project management skills and excel in your business relationships.
Moreover, your support for this website helps in delivering more high-quality content for free. 😊💼
Let’s show some love and visit “projectcubicle.com” today! 💻👍


A dedicated Career Coach, Agile Trainer and certified Senior Portfolio and Project Management Professional and writer holding a bachelor’s degree in Structural Engineering and over 20 years of professional experience in Professional Development / Career Coaching, Portfolio/Program/Project Management, Construction Management, and Business Development. She is the Content Manager of ProjectCubicle.


