
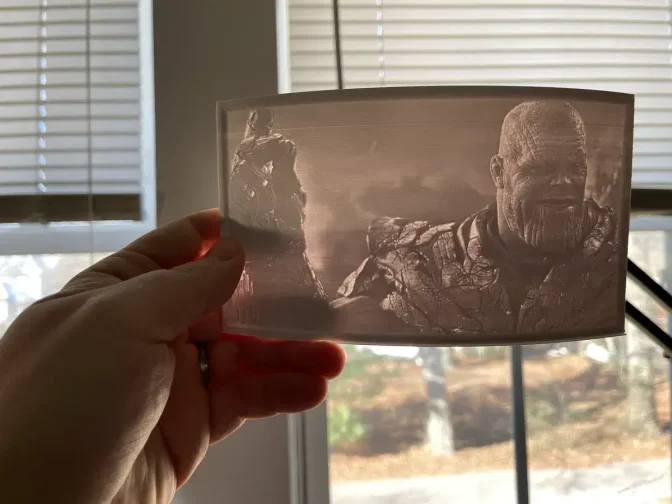
Lithophanes are unique, three-dimensional prints that use variations in thickness to create the illusion of depth and shading in an image. They can be used to create beautiful, personalized designs that are illuminated from behind, making them perfect for use in lamps, night lights, and other light-based decors. In this article, we’ll take a closer look at what 3D print lithophanes are, how they’re made, and how you can create your own.
Table of Contents
Key Takeaways
- Lithophanes are three-dimensional prints that use variations in thickness to create the illusion of depth and shading in an image.
- To create a 3D print lithophane, you need to prepare the image, convert it to a 3D model with varying layer heights, and then print it using a 3D printer.
- Important tips for creating successful 3D print lithophanes include using high-contrast images, choosing the right 3D printing technology, experimenting with layer height, and adding lighting.
- Different types of lithophanes include photo lithophanes, art lithophanes, textured lithophanes, and animated lithophanes.
- 3D print lithophanes have various applications, such as home decor, gifts, promotional items, and art pieces.
- The most commonly used materials for 3D print lithophanes are plastics like ABS and PLA, but metal and ceramics can also be used.
- Post-processing steps like sanding, painting, and polishing can be performed to enhance the final appearance of the lithophane.
What is a 3D Print Lithophane?

A lithophane is a type of three-dimensional print created by manipulating the thickness of the material in different parts of the image.
This is done by adjusting the “layer height” setting in the 3D printing software, which controls the thickness of each layer of material as it is printed.
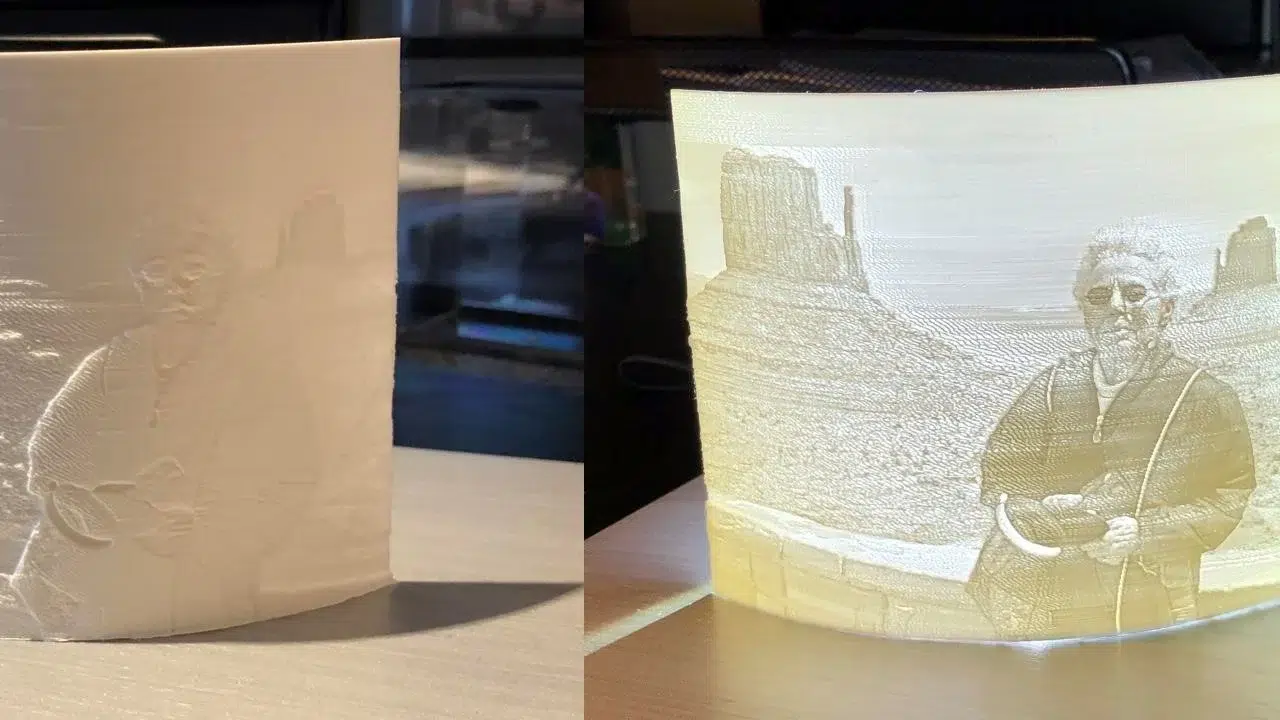
When the finished print is illuminated from behind, the thicker areas of the image will appear darker, while the thinner areas will appear lighter. This creates the illusion of depth and shading, making the image seem more lifelike.
3D print lithophanes are typically made from plastics such as ABS or PLA, but other materials such as metal or ceramics can also be used. They can be created using a variety of 3D printing technologies, including Fused Deposition Modeling (FDM), Stereolithography (SLA), and Selective Laser Sintering (SLS).
How to Create a 3D Print Lithophane
Creating a one is relatively simple, but it requires some knowledge about 3D printing and image editing. The process can be broken down into three main steps:
- Prepare the image. The first step in creating a 3D print lithophane is to prepare the impression that you want to use. This typically involves converting the image to grayscale and adjusting the levels or contrast to create a high-contrast image with clear distinctions between light and dark areas.
- Convert the image to a 3D model. Once the image is ready, the next step is to convert it into a 3D model. This is typically done using software such as Lithophane Generator. This takes the image and generates a 3D model with varying layer heights, creating the illusion of depth and shading when printed.
- Print the model. Once the 3D model is generated, the final step is to print it using a 3D printer. This typically involves loading the model into the 3D printing software and adjusting the settings to ensure that the correct layer height is used.
Tips for Creating a Successful 3D Print Lithophane
-Choose a high-contrast image. The key to a successful 3D print lithophane is a high-contrast image with clear distinctions between light and dark areas. This will ensure that the variations in layer height create a noticeable difference in the final print.
-Use the right 3D printing technology. Not all 3D printing technologies are suitable for creating lithophanes. FDM and SLA are the most common for this purpose. As they can produce fine, detailed prints with high accuracy.
- Experiment with layer height. The layer height is the most crucial setting when creating a 3D print lithophane. Experimenting with different values can help you achieve the desired level of depth and shading in the final print.
- Add lighting. To truly appreciate the beauty of a 3D print lithophane, it should have a light source from behind.
Different Types of 3D Print Lithophanes
Many different types of 3D print lithophanes can be created, each with its own unique look and feel. Some of the most popular styles include:
- Photo lithophanes: These are for using a photograph as the base image. They can create beautiful, lifelike images of people, landscapes, or other subjects.
- Art lithophanes: This is possible by using artwork or illustrations as the base image. They can create abstract or surreal images with a more artistic feel.
- Textured lithophanes: These have a textured surface, which can add an extra dimension of depth and realism to the final print. This can be possible by using a textured filament or adding a texture to the 3D model before printing.
- Animated lithophanes: This new type of lithophane uses a series of images to create an animation effect when illuminated from behind.
This can be possible by using a programmable LED or by creating a series of lithophanes with slight variations in the image and placing them behind each other.
What Is Important When Applying 3D Lithophanes?
When applying 3D lithophanes, several key considerations are important. First, ensure that the lithophane has a suitable light source from behind to enhance its appearance. Second, choose a high-contrast image with clear distinctions between light and dark areas for optimal depth and shading effects. Finally, select a material that is heat-resistant and can withstand exposure to light, depending on the intended use of the lithophane.
Applications
yle=”font-weight: 400;”>3D print lithophanes have a wide range of applications and can be in both personal and commercial settings. Some popular applications include:
- Home decor. 3D print lithophanes make great home decor pieces and can create unique, personalized lamps, night lights, and other light-based sets.
- Gifts. 3D print lithophanes serve as thoughtful gifts. They can be custom for personal photographs or artwork. And you can commemorate special occasions such as weddings, birthdays, and anniversaries.
- Promotional items. 3D print lithophanes can act as promotional items, such as keychains and ornaments, or even as a small night light to promote a brand or product.
- Art pieces. 3D print lithophanes can stand for art pieces and be displayed in galleries, art fairs, or other art-related events.
Materials Used for 3D Print Lithophanes</span>
yle=”font-weight: 400;”>The most commonly used materials for 3D print are plastics such as ABS and PLA. These materials are affordable, easy to print, and available in a wide range of colors.
Additionally, ABS and PLA are relatively durable and can withstand light and heat exposure, making them suitable for use in light-based decor.
Other materials, such as metal and ceramics, can also suitable for 3D print lithophanes. But they are generally more expensive and difficult to print.
When it comes to choosing a material for your 3D print lithophane, it’s essential to consider the intended use of the final product. For example, if the lithophane will be in a lamp or other light-based decor. But it’s crucial to choose a material that is heat-resistant and can withstand exposure to light.
On the other hand, if the lithophane is a piece of art, you may want to choose a more expensive material. Such as metal or ceramic, for a more premium look and feel.
Post-processing and Finishing
Once your printer is ready, you can take a few post-processing steps to improve the final look and feel of the print. These include:
- Sanding. Sanding the surface of the print can help to smooth out any rough edges or bumps. And it can also help to remove any visible layer lines.
- Painting. Painting the surface of the print can help to add color and depth to the image. And they can conceal any imperfections in print.
- Polishing. Polishing the surface of the print can help to create a glossy, reflective finish. These can make the image appear more lifelike.
It’s important to note that post-processing steps such as sanding and polishing can be time-consuming and require specialized equipment and materials. However, they can help to improve the overall quality and appearance of the final print.
Can you 3D print a lithophane?
Yes, lithophanes can be 3D printed. The process involves converting an image into a 3D model with varying layer heights, which creates the illusion of depth and shading when printed. The 3D printed lithophane can then be illuminated from behind to display the image.
What is the best setting for lithophane 3D print?
The best settings for lithophane 3D printing can vary depending on factors such as the specific printer, material, and desired outcome. However, some general considerations include using a high resolution for fine details, adjusting layer height for optimal depth and shading effects, and ensuring proper bed adhesion and cooling settings. Experimentation and fine-tuning may be necessary to achieve the desired results.
Conclusion
3D print lithophanes are a unique and interesting way of creating three-dimensional prints. These can illuminate from behind. They can create beautiful, personalized designs that are perfect for use in lamps, night lights, and other light-based decors.
With the right image, software, and 3D printing technology, anyone can create their own 3D print lithophanes. As technology continues to evolve, the possibilities of applications and types of lithophanes will be endless, making it a fascinating and exciting field to explore.

With more than 20 years of progressive experience as Program Manager and Project Manager had led complex IT projects/programs in a wide variety of industries in America, Latin America & Italia.
Mario Bisson Andini is an advanced Program Manager who is the founder of Bisson Training.


