Unlocking the Potential of AutoSave in Excel: A Comprehensive Guide 🚀
How to Turn On AutoSave in Excel? In today’s digital age, where efficiency and productivity are paramount, Microsoft Excel stands as a powerful tool that can revolutionize the way businesses manage data, create reports, and make informed decisions. One essential feature that often goes underutilized is AutoSave. In this article, we will delve into the depths of AutoSave in Excel, uncovering its hidden gems 💎 and demonstrating how it can boost your workflow. Whether you’re a seasoned Excel wizard 🧙♂️ or a newcomer, this guide will provide you with invaluable insights that can propel your Excel experience to new heights.
Table of Contents
Understanding AutoSave: A Game-Changer in Excel 🕹️
AutoSave, as the name suggests, is a feature designed to automatically save your work at regular intervals, ensuring that your data is secure and up to date. Gone are the days of losing hours of work due to unexpected crashes or power outages. With AutoSave enabled, Excel constantly safeguards your progress, making it an indispensable tool for anyone working with spreadsheets.
The Key Benefits of AutoSave 🛡️
- Continuous Data Protection: AutoSave guarantees that your data is saved automatically, reducing the risk of losing critical information due to unforeseen circumstances.
- Enhanced Efficiency: No longer do you need to interrupt your workflow to manually save your work. AutoSave seamlessly operates in the background, allowing you to focus on your tasks.
- Version History: Excel’s AutoSave feature also maintains a version history of your document, enabling you to access previous iterations of your work effortlessly.
How to Activate AutoSave in Excel 🔄
Enabling AutoSave is a straightforward process that can significantly enhance your Excel experience. Here’s how to do it:
- Open Excel: Launch Excel and open the spreadsheet you want to work on.
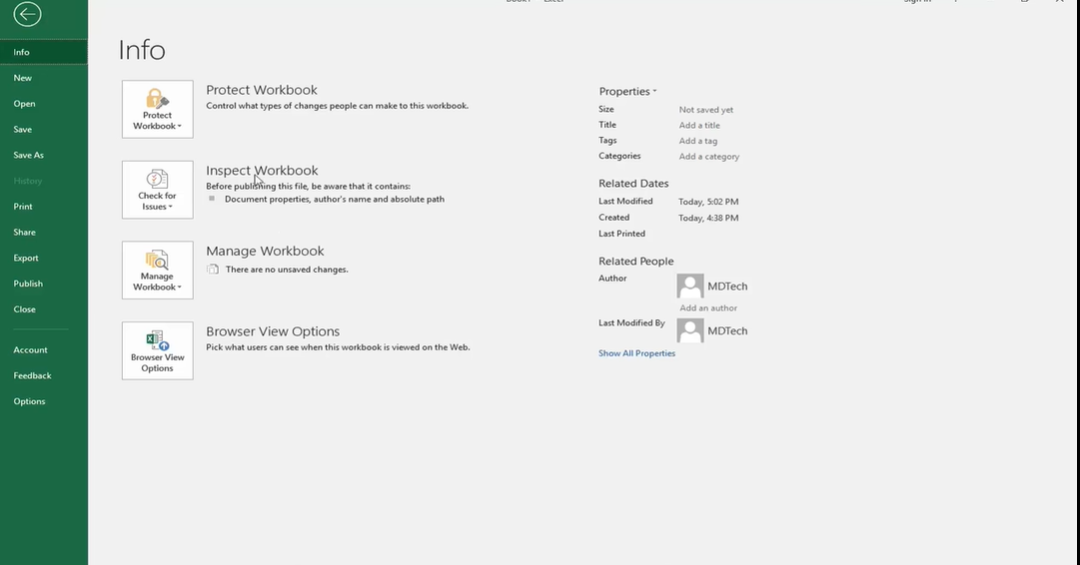
- Click on “File”: Located in the top left corner, click on the “File” tab to access the File menu.
- Select “Options”: In the File menu, select “Options” at the bottom.
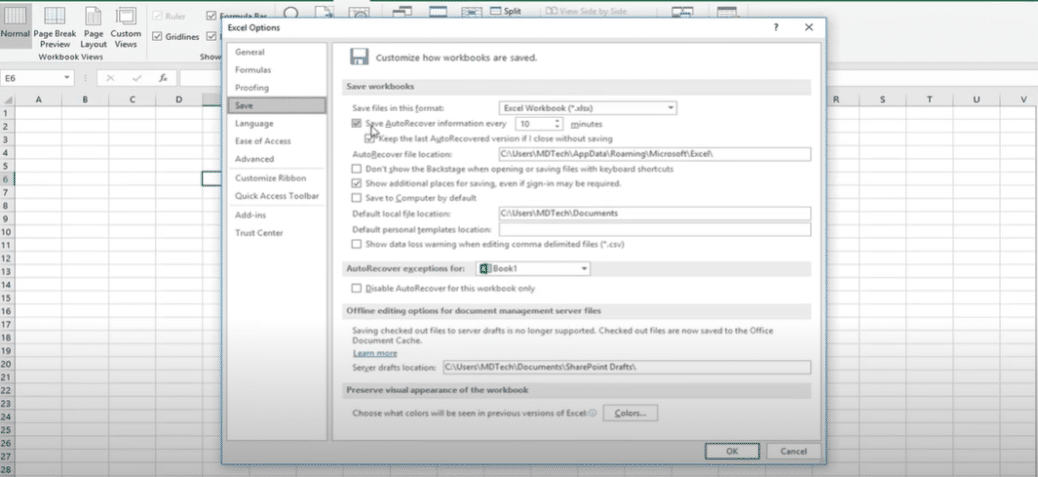
- Navigate to “Save”: In the Excel Options window, click on “Save” on the left-hand side.
- Enable AutoSave: Check the box next to “AutoSave OneDrive and SharePoint Online files by default.”
- Set the AutoSave Interval: You can customize the AutoSave interval by selecting the desired time frame from the dropdown menu.
- Click “OK”: Finally, click “OK” to save your changes and activate AutoSave.
With AutoSave now activated, you can work confidently, knowing that your data is continuously safeguarded.

Exploring AutoSave in Action 🚗
To truly grasp the power of AutoSave, let’s take a practical example. Imagine you’re working on a complex financial report in Excel, and suddenly, your computer crashes. In the past, this would have meant hours of lost work and frustration. However, with AutoSave, you can resume your work right where you left off, as Excel automatically recovers your document upon reopening the program.
But AutoSave’s benefits extend beyond unexpected crashes. Let’s say you make a crucial mistake while editing your spreadsheet. Instead of manually undoing each step, you can simply access the version history, choose the correct version, and revert to it effortlessly. This feature not only saves time but also ensures the accuracy of your data.
Best Practices for Maximizing AutoSave 🌟
To make the most of AutoSave in Excel, consider implementing these best practices:
- Regularly Save Manually: While AutoSave is a reliable feature, it’s still a good habit to save your work manually, especially when making significant changes. This extra layer of protection can prevent any potential data loss.
- Use OneDrive or SharePoint Online: AutoSave is most effective when used with OneDrive or SharePoint Online. Storing your Excel files in these cloud-based platforms ensures real-time synchronization and collaboration with colleagues.
- Set an Appropriate AutoSave Interval: Customize the AutoSave interval to match your work habits. A shorter interval may be suitable for fast-paced tasks, while a longer one can be used for less frequent saving.
6 Factors Influencing Truck Driver Compensation – projectcubicle
People Also Ask:
How do I turn on AutoSave on Excel?
To turn on AutoSave in Microsoft Excel, follow these steps:
- Open Excel and open the spreadsheet you want to work on.
- Click on the “File” tab located in the top left corner to access the File menu.
- Select “Options” at the bottom of the File menu.
- In the Excel Options window, click on “Save” on the left-hand side.
- Check the box next to “AutoSave OneDrive and SharePoint Online files by default.”
- Set the AutoSave interval by selecting the desired time frame from the dropdown menu.
- Click “OK” to save your changes and activate AutoSave.
Where are my Excel AutoSave files?
Excel AutoSave files are typically stored in your OneDrive or SharePoint Online account, depending on where you are saving your Excel documents. You can access these files by going to the corresponding cloud storage platform and navigating to the folder where the Excel file is located. AutoSave files may have a naming convention that includes the word “AutoSave,” followed by a timestamp.
Why is AutoSave not on User in Excel?
If AutoSave is not enabled in Excel, it may be due to several reasons:
- You are not using OneDrive or SharePoint Online to save your files: AutoSave primarily works with cloud-based storage solutions like OneDrive and SharePoint Online. Make sure you are using one of these platforms.
- AutoSave is turned off in Excel settings: Check your Excel settings as described in the first answer to ensure that AutoSave is enabled.
- You are using an older version of Excel: AutoSave may not be available in older versions of Excel. Consider updating to the latest version if possible.
How do I get Excel to AutoSave every 5 minutes?
To set Excel to AutoSave every 5 minutes, follow these steps:
- Go to the Excel Options by clicking on “File” > “Options.”
- In the Excel Options window, click on “Save” on the left-hand side.
- Under the “Save AutoRecover information every” section, set the desired time interval to 5 minutes.
- Click “OK” to save your changes.
How do I turn on AutoSave?
Please refer to the first answer for detailed instructions on how to turn on AutoSave in Excel.
How do I make Excel refresh automatically every day?
To make Excel refresh data automatically every day, you can use Excel’s built-in features like Power Query or Power Pivot to schedule data refresh. Here’s a general outline of the process:
- Import your data into Excel using Power Query or Power Pivot.
- Set up a scheduled refresh for your data source. The exact steps may vary depending on your data source and Excel version, so consult the documentation or help resources for your specific setup.
- Configure the refresh frequency to occur daily.
- Save your Excel workbook with the refresh settings.
- Excel will automatically refresh the data according to your schedule.
Conclusion 🎉
In conclusion, AutoSave in Excel is a powerful tool that can revolutionize the way you work with spreadsheets. Its ability to continuously save your data, provide version history, and recover documents in case of unexpected issues makes it an invaluable asset for professionals across various industries.
ProjectCubicle.com is a resource and blog platform focused on Excel and data analysis. This platform offers a wide range of resources for professionals looking to use Excel more effectively, conduct data analysis, and improve business processes.
Hello, I’m Cansu, a professional dedicated to creating Excel tutorials, specifically catering to the needs of B2B professionals. With a passion for data analysis and a deep understanding of Microsoft Excel, I have built a reputation for providing comprehensive and user-friendly tutorials that empower businesses to harness the full potential of this powerful software.
I have always been fascinated by the intricate world of numbers and the ability of Excel to transform raw data into meaningful insights. Throughout my career, I have honed my data manipulation, visualization, and automation skills, enabling me to streamline complex processes and drive efficiency in various industries.
As a B2B specialist, I recognize the unique challenges that professionals face when managing and analyzing large volumes of data. With this understanding, I create tutorials tailored to businesses’ specific needs, offering practical solutions to enhance productivity, improve decision-making, and optimize workflows.
My tutorials cover various topics, including advanced formulas and functions, data modeling, pivot tables, macros, and data visualization techniques. I strive to explain complex concepts in a clear and accessible manner, ensuring that even those with limited Excel experience can grasp the concepts and apply them effectively in their work.
In addition to my tutorial work, I actively engage with the Excel community through workshops, webinars, and online forums. I believe in the power of knowledge sharing and collaborative learning, and I am committed to helping professionals unlock their full potential by mastering Excel.
With a strong track record of success and a growing community of satisfied learners, I continue to expand my repertoire of Excel tutorials, keeping up with the latest advancements and features in the software. I aim to empower businesses with the skills and tools they need to thrive in today’s data-driven world.
Suppose you are a B2B professional looking to enhance your Excel skills or a business seeking to improve data management practices. In that case, I invite you to join me on this journey of exploration and mastery. Let’s unlock the true potential of Excel together!
https://www.linkedin.com/in/cansuaydinim/


