

If you work with Excel always, you must see dates in Excel. Dates are a common data type. But sometimes formatting them can be tricky. In this article, we will look at date format in Excel. From the basics to advanced techniques.
Table of Contents
Introduction to how to change date format in excel
Excel dates are an essential part of many datasets. Yet, Excel stores dates as numbers. And this makes them difficult to read and interpret. The date format in Excel display dates in a more readable and user-friendly way.
excel date format
In Excel, dates come as serial numbers with January 1, 1900 being the starting date. Each day after that is assigned a unique number. However, if you wanna make the dates more human-readable, you need to format them using the date format in Excel.
in excel how to change a field to date format
- mm/dd/yyyy
- dd/mm/yyyy
- mmm-dd-yy
- mmm dd, yyyy
- yyyy-mm-dd
How to Format Dates in Excel and change format date in excel
Formatting dates in Excel is easy like the below steps.
- You will select the cell or range of cells with dates you want to format.
- Then, you can right-click on the selection and choose Format Cells.
- In the Format Cells box, you will select the Number tab.
- In the Category list, then you select Date.
- Now, you can select the date format you want to use from the Type list.
- Voila, you can click OK.
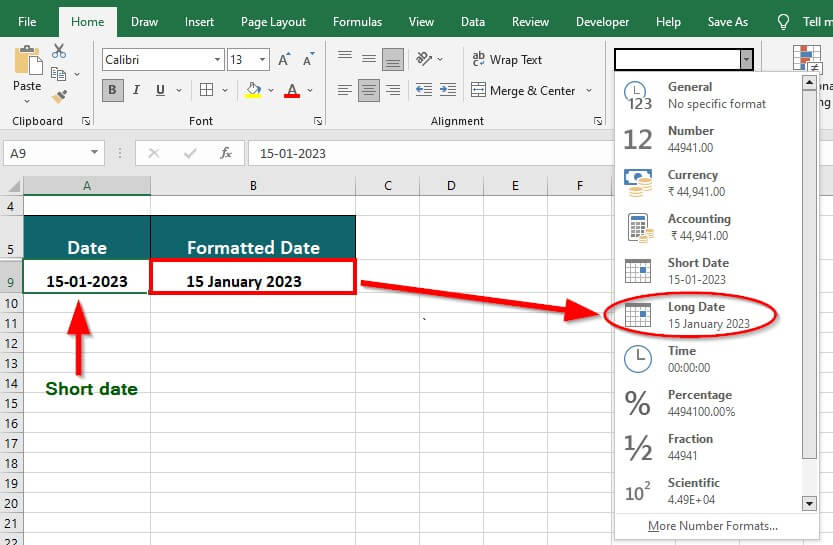
When you format your dates, they will be in your selected format. Excel also provides several pre-defined date formats that you can use. Such as Short Date and Long Date. These formats display dates in a way that is appropriate for your region and language.
Common Date Formats in Excel: how to change date style in excel
1. mm/dd/yyyy
This is the most common date format in the United States. It displays the month, day and year in that order. These are separated by slashes. To use this format, you can select the cell or range of cells with dates you want to format. You can choose the mm/dd/yyyy format from the Type list.
2. dd/mm/yyyy
This is the most common date format in Europe and many other parts of the world. It displays the day, month and year in that order. To use this format, you select the cell or range of cells to format and choose the dd/mm/yyyy format.
3. mmm-dd-yy
This format displays the month abbreviation, day and two-digit year by dashes. For example, January 1, 2023 will be Jan-01-23. To use this format, you select cells with dates you want to format and choose the mmm-dd-yy format.
4. mmm dd, yyyy
You can display the month abbreviation, day and year by spaces. Here, January 1, 2023 will be Jan 01, 2023. To use this format, you can choose the mmm dd, yyyy format.
5. yyyy-mm-dd
This format displays the year, month and day in that order by dashes. This format is in databases and other computer systems. Here you select cells dates and choose the yyyy-mm-dd format.
Custom Date Formats in Excel: What is the Date Format in Excel?
Excel can create your own custom date formats. Hence it is giving you even more control over how your dates are.
- You can select the cell or range containing the dates you want to format.
- Then you right-click on the selection and choose Format Cells
- In the Format Cells, you can select the Number tab.
- In Category list, you will select Custom.
- In the Type box, you enter your custom date format.
Here are some examples of custom date formats below.
- ddd, mmm d, yyyy: displays the date as “Thu, Jan 1, 2023”
- yyyy/mm/dd: displays the date as “2023/01/01”
- mmm d, yyyy: displays the date as “Jan 1, 2023”
When creating custom date formats, you can use different codes to represent different parts. Such as ddd for the day of the week, mmm for the month abbreviation and yyyy for the year.
Dealing with Date Formats in Formulas
When working with dates in Excel formulas, you need to be careful to use the correct format. If you try to perform calculations on a date with wrong format, you may get incorrect results.
If you have a date in the format mm/dd/yyyy and you want to add 30 days to it, you can use the following formula.
=A1+30
what is the short date format in excel
Here A1 is the cell containing the date. However, if the date is in a different format, you may need to use a different formula. For example, if the date is in the format “dd/mm/yyyy”, you would use the following formula:
=DATE(YEAR(A1),MONTH(A1),DAY(A1)+30)
Here this one uses the DATE function to create a new date by adding 30 days to the original date. If you are interested in these posts, you can also read these Excel Tutorials articles.
Working with Dates in Charts
Excel charts can also display dates as labels on the X-axis. By default, Excel will use a date format that matches your computer’s regional settings. However, you can change the date format used on the X-axis like below.
- You can start with selecting the chart you wanna change.
- It is time to right-click on the X-axis and choose Format Axis from the context menu.
- In the Format Axis box, you select the Number tab.
- In Category list, you select Date.
- In the Type box, last thing is to select the date format.
Date Functions in Excel
Excel includes functions for working with dates.
- TODAY(): It returns the current date.
- NOW(): This one brings the current date and time.
- YEAR(): Again it returns the year from a date.
- MONTH(): While this one returns the month from a date.
- DAY(): You may use it to return the day from a date.
- DATE(): It creates a date from year, month, and day values.
Excel provides various options for working with dates. Such as including date formats, custom date formats and date functions. Using these, you can easily display dates in a better way.
Frequently Asked Questions
- How do I change the default date format in Excel? If you wanna change the default date format in Excel, you will go to File > Options > Advanced. And under When calculating this workbook, you choose select the date format you want to use.

A dedicated Career Coach, Agile Trainer and certified Senior Portfolio and Project Management Professional and writer holding a bachelor’s degree in Structural Engineering and over 20 years of professional experience in Professional Development / Career Coaching, Portfolio/Program/Project Management, Construction Management, and Business Development. She is the Content Manager of ProjectCubicle.


