

As a professional or a student who works with Microsoft Excel, you should learn how to adjust column width in excel. Because Excel column width optimization is necessary for neat looking excel lists and sheets.
Table of Contents
Here you can learn several methods to change Excel column width. These are including how to adjust column width and how to optimize your spreadsheet for better data presentation. We will also explore some common mistakes as a precaution.
Why Column Width Matters in Excel? how to adjust column width in excel
As almost everyone knows, Excel is such a great tool for data analysis, financial modeling and other operations. But you need to create clean sheets to share or present to others in meetings or in digital channels.
how to increase width of column in excel
For this, column width is important for neat looking sheets. Because it determines how much space each column takes up in your spreadsheet. The default column width in Excel is 8.43 characters. This is usually too narrow to display most data correctly. If the column width is too narrow, Excel will truncate the data. Or it will show your cell in multiple lines. On the other hand, if the column width is too wide, it can make your spreadsheet look a bit unprofessional.
how to change the width of the column in excel?
Excel makes it easy to adjust the column width in your spreadsheet.
- You select the column(s) that you want to adjust.
- Then you can hover your mouse over the column boundary. It is the vertical line between two columns until the cursor changes to a double-headed arrow.
- Now you will click and drag the column boundary to the left or right.
- And you can release the mouse button when you are ok with the width.
change width of column in excel
You can also adjust the column width using the Format Cells dialog box.
- For this, again you select the column(s) for adjusting.
- Then you right-click on the selection and choose Format Cells from menu pop up.
- In the Format Cells menu box, you will click on the Alignment tab.
- Under Text Control section, you can now adjust the Column Width setting to your preference.
- And you click OK to apply the changes.
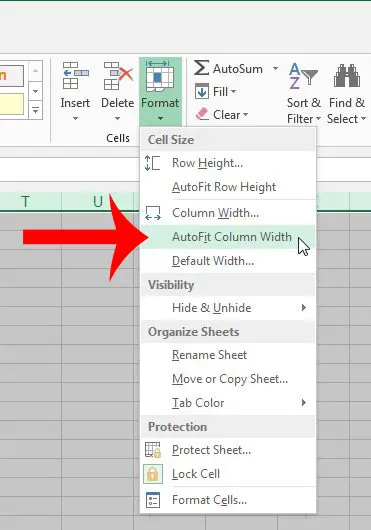
Excel also provides an option to autofit the column width. So, thi is automatically adjusting the width of the selected column(s) to fit the widest cell basically.
- This time you select the column to autofit.
- Again you double-click on the boundary between the column headers.
- Alternatively, you can go to Home > Cells > Format > Autofit Column Width.
The Importance of Excel Column Width
When it comes to organizing data in Excel, column width plays a crucial role to see everything easily. If the column is too narrow, it can be difficult to read the information within it. But if the column is too wide, it can make it harder to see all the data at one screen.
Optimizing Excel Column Width: autofit column width excel
Optimizing the column width in Excel can be a bit more complicated than just adjusting it to fit your data.
Wrap Text to set column width excel
One of the most common reasons for needing this is when the text within the cell is too long. If this is the case, you can wrap the text to make it fit your cell.
To wrap text in Excel, you will do below steps.
- You will select the cell or cells you want to wrap.
- And you right-click and select Format Cells.
- Now you go and click on the Alignment tab.
- And basically you will check the box next to Wrap text and click ok.
Use AutoFit: automatic column width excel
If you have multiple columns with lots of data, you can use the AutoFit feature to adjust the column width. It will select the widest cell as reference.
- So, you will select the column or columns for adjusting.
- And you double-click on the line between the column headers so this will adjust the column width.
Adjust Multiple Columns at Once
If you have a large spreadsheet with multiple columns for adjusting, you can do them all at once by selecting them before dragging the column header.
- You click on the first column header you want to adjust.
- Then you hold down the Ctrl key and click on the additional column headers for operation.
- You will hover your mouse over the line between any selected column headers until you see a double-headed arrow.
- Now it is time to click and drag the column header for preferred width.
- And you just Release the mouse button for new width.
Optimizing Your Spreadsheet for Better Data Presentation
Adjusting the column width is only the first step towards optimizing your data presentation. But you can do even more things for better looking sheets.
- You can use formatting tools such as bold, italics and font size to emphasize important data.
- So here, conditional formatting can really work wonders to highlight data for certain criteria.
- You can insert charts and graphs to visualize boring tables or lists.
- And you can speed up your searches with filters and sorting options.
- For more summary and analysis, you can create pivot tables.
- Also, it is a good practice to use descriptive titles and labels on your tables and charts.
Common Mistakes to Avoid in Excel Column Width
- Here first mistake is setting the column width to an arbitrary value and different for each cell.
- And not adjusting the column width for all the columns will make it look inconsistent.
- Another one is setting the column width too narrow or too wide.
- Sometimes people may be forgetting to check hidden cells or columns that may affect the layout.
- Not using autofit or manual adjustment when necessary, resulting in truncated data or unnecessarily wide columns.
Conclusion: automatic column width excel
Excel column width is an essential aspect of data presentation in Microsoft Excel. Adjusting the column width in your spreadsheet can make a huge difference in the readability.
In addition to adjusting the column width, you can also use formatting tools, charts and graphs, filters and sorting options. Also, pivot tables can really enhance the readability of Excel sheets. If you like this article, you can also read our Excel Column to Number: Understanding the Conversion Process article.

A dedicated Career Coach, Agile Trainer and certified Senior Portfolio and Project Management Professional and writer holding a bachelor’s degree in Structural Engineering and over 20 years of professional experience in Professional Development / Career Coaching, Portfolio/Program/Project Management, Construction Management, and Business Development. She is the Content Manager of ProjectCubicle.


