

If you are tired of constantly typing data into your Excel, you should now learn how to create a drop down list in Excel. In case you are looking for a way to make your data entry faster, now we will look at the drop-down list in Excel!
Table of Contents
Introduction: how to create a drop down list in excel
Excel can work for various tasks from simple data entry to complex calculations. One of many features of Excel is the drop-down list. In this way, we can choose from a list of pre-defined options instead of typing in data as selections. With this, we can save you time and reduce errors.
create drop down list in excel: how to add drop down list in excel
Considering how it will help us for a big time, creating a drop down list in Excel is easy and you can do it in just a few steps.
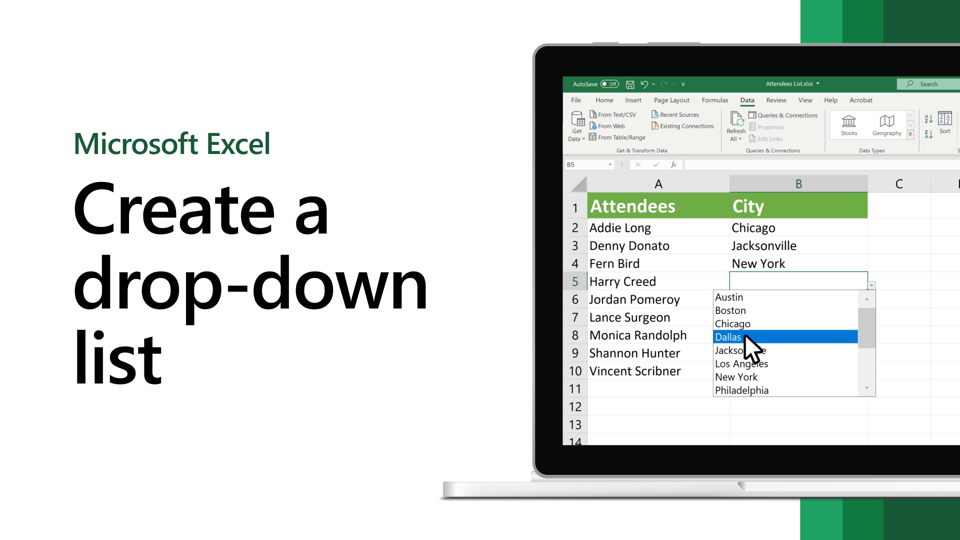
- You select the cell or cells to make your drop-down list.
- Then we click on the Data tab in the Excel ribbon.
- Now, you click on the Data Validation button in the Data Tools group.
- In the Data Validation dialog box, you select List from the Allow drop-down menu.
- In Source field, we enter the options you want to appear in the drop-down list. It is separated by commas.
- Now we click OK to save your settings.
So; when you click on the cell with the drop-down list, you will see a small arrow appear to the right of the cell. Because clicking on the arrow will display the options you defined in Source field.
Using a Drop down List in Excel: how to add drop down in excel
Once we have our drop-down list in Excel, using it is simple. You will just click on the cell with the drop down list and select the option you want from the list. The selected option will pop up in the cell.
Here are some tips for using drop-down lists in Excel and you can get better at it.
- You can use the same drop-down list in multiple cells by selecting all the cells. And they we can be entering the cell address (e.g. A1) in the Source field when you are creating the list.
- You may want to allow users to enter their own data in addition to the options in the drop-down list. Here we select List from Allow drop-down menu and Ignore blank from Error Alert tab in Data Validation box.
- You can use conditional formatting to highlight cells if they match with an item in drop-down list.
Customizing a Drop-down List in Excel:What are drop-down menus in Excel?
Good news is, we can customize your drop-down list in a variety of ways.
- You can add or remove options from the list by editing Source in Data Validation dialog box.
- We can change the drop-down list’s width by dragging the cell’s border.
- It is also possible to change the options’ font, color or style in the drop-down list. Here you will be selecting the cells with the list and formatting them as you prefer.
- You can add a message or warning to the drop-down list by entering text in Input Message or Error Alert tabs again in Data Validation.
Additional Tips and Tricks: data validation excel
Before we wrap up, you can read below additional tips and tricks for a way smoother usage.
- If you are using a large data set for your drop-down list, we can consider creating a named range to make it easier to reference.
- You can use data validation to limit the user’s input to only what’s available in the drop-down list. Hence, here we are ensuring all data is accurate and consistent.
- If the user tries to enter data not available in the drop-down list, you can use data validation to display an error message.
- You can use keyboard shortcuts to quickly select options in the drop-down list. We can simply press Alt+Down Arrow to open the list. And then we can use the arrow keys to navigate and Enter to select.
- Also, you can use conditional formatting to highlight cells for standing out some data.
FAQson How to make drop down list in excel
- How to create a drop-down list referencing data from another sheet in the same workbook? You can do it by using the INDIRECT function in Source field. So if your data is in a sheet named Data and the list is in a sheet named Main. Here your formua to use =INDIRECT(‘Data’!A1:A10) in Source field.
- Can I create a drop-down list having data from a different workbook? Yes, you can. But here we will be using VLOOKUP or INDEX-MATCH functions in Source.
- How to change order of the options ? Yes, you can rearrange them in the Source field.
- How can we make a drop-down list with multiple columns? Here using a table as the data source and selecting the table columns you want to include as Source will help you.
Conclusion
So as we can see, drop down list in Excel is a good way to enter and store data in a organized look. You can use it for simple lists or complex data sets. When you look at the steps outlined in this guide and explore available customization options, you can create drop-down lists. And at the end, you can meet your specific needs and enhance your Excel experience.
Now you can create new lists for Excel spreadsheets today and see the difference.

A dedicated Career Coach, Agile Trainer and certified Senior Portfolio and Project Management Professional and writer holding a bachelor’s degree in Structural Engineering and over 20 years of professional experience in Professional Development / Career Coaching, Portfolio/Program/Project Management, Construction Management, and Business Development. She is the Content Manager of ProjectCubicle.


