
What is the Auto Filter in Excel? In Excel, you can filter your data to view only the information that meets certain criteria. This is a great tool for quickly narrowing down your data and finding what you need. There are two ways to filter your data: the Auto Filter feature or the Advanced Filter feature. In this post, we’ll show you how to use both filters and explain their differences. Let’s get started!
Table of Contents
Step by Step! Auto Filter In Excel
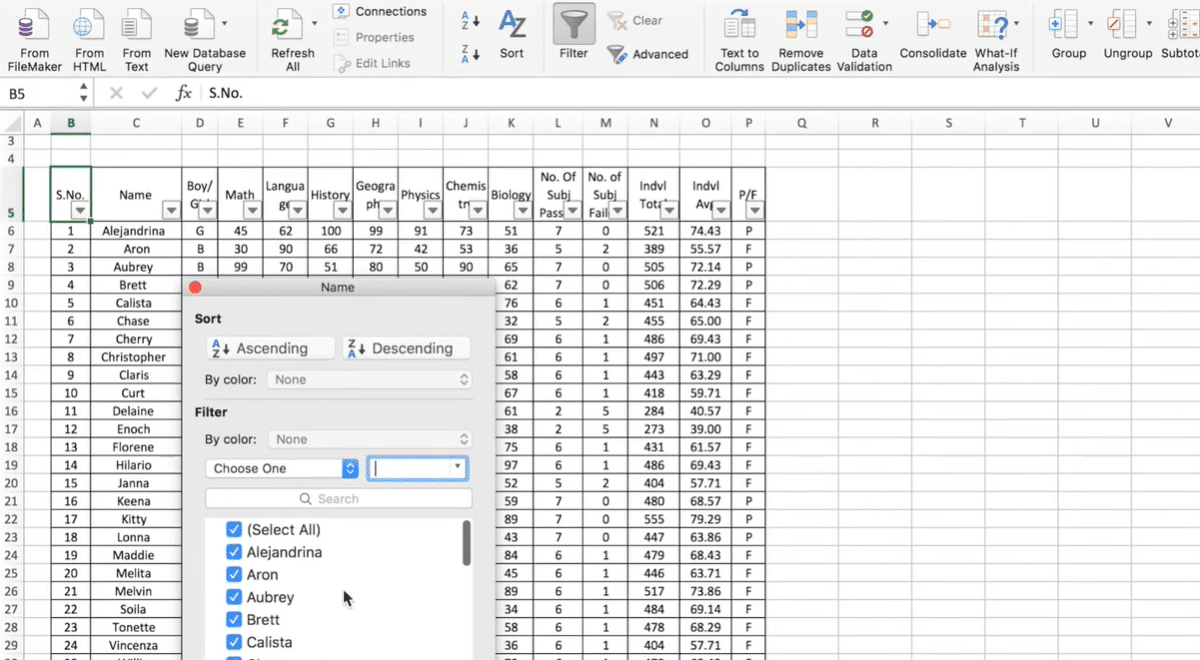
Excel makes it easy to filter your data so you can view only the information you need. To do this, you can use the Auto Filter feature. This feature allows you to quickly and easily filter your data by hiding the rows that do not meet your criteria.
To use the Auto Filter feature, simply click on the small arrow in the column header that you want to filter. A drop-down menu will appear with a list of the unique values in that column. You can select which values you want to see, and Excel will hide all other rows.
One advantage of using the Auto Filter feature is that it is quick and easy to use. However, one downside is that it can only be used to filter one column at a time.
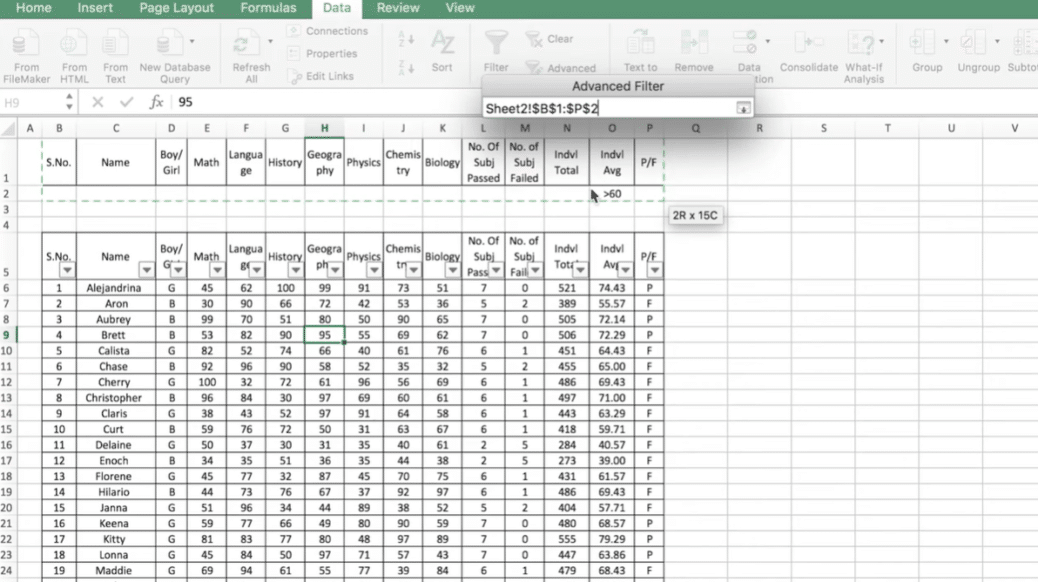
Advanced Filter In Excel
If you want to filter your data on multiple columns, you can use the Advanced Filter feature. This feature allows you to specify multiple criteria for filtering your data. Excel will then hide all the rows that do not meet the criteria.
To use the Advanced Filter feature, click on the Data tab and then click on the Advanced button in the Sort & Filter group. This will open the Advanced Filter dialog box.
In the dialog box, you can select which column you want to filter and what criteria you want to use. You can also specify whether you want Excel to search for your criteria in the entire data set or just in the column you are filtering.
Once you have specified your criteria, click on the OK button, and Excel will filter your data.
One advantage of using the Advanced Filter feature is that it allows you to filter on multiple columns at the same time. However, one downside is that it can be more time-consuming than the Auto Filter feature.
So, which filter should you use? It depends on your needs. The Auto Filter feature will probably be the quickest and easiest option if you only need to filter on one column. However, the Advanced Filter feature will give you more flexibility if you need to filter on multiple columns.
What is an auto filter in Excel, and how do you use it?
An auto filter in Excel is a quick and easy way to filter your data. To use the auto filter, simply click on the arrow next to the column you want to filter. This will open a drop-down menu with all of the unique values in that column. From there, you can select which values you want to include or exclude from your data set.
An auto filter is a great tool for quickly narrowing down your data. However, it does have some limitations. For example, you can only use the auto filter on one column at a time. Additionally, the auto filter may not always return accurate results if your data set is large or complex.
You can use Excel’s advanced filter feature if you need more control over your filters. This allows you to filter your data by multiple criteria, including dates, numbers, and text. Excel’s advanced filter is a great tool for more complex data sets.
To use Excel’s advanced filter, click the Data tab and then click Advanced in the Sort & Filter group. This will open the Advanced Filter dialog box. From here, you can select the range of cells you want to filter and the criteria you want to use. Excel’s advanced filter gives you a lot of flexibility in how you filter your data.
Excel’s auto and advanced filters are great tools for filtering your data. The best option for you will depend on the size and complexity of your data set. The auto filter may be all you need if you have a small data set. For more complex data sets, Excel’s advanced filter can give you the flexibility you need to find the information you’re looking for.
How to quickly and easily filter data in Excel using the auto filter?
Excel has a built-in Auto Filter feature that makes it easy to filter data. To use the Auto Filter, simply select the column you want to filter and click on the down arrow. A drop-down menu will appear with a list of all the unique values in that column. You can select the value you want to filter for, and Excel will only show rows containing that value.
The Auto Filter is a great tool for quickly filtering data, but it has its limitations. For example, you can only filter on one column at a time, and you can only use simple criteria such as an equals or does not equal condition. You can use Excel’s Advanced Filter feature if you need more powerful filtering capabilities.
The benefits of using the filter
are that it is quick and easy to use, you can filter on multiple columns at once, and you can use more complex criteria. An Advanced Filter is a great tool for more complex filtering tasks.
To filter for cells that contain a specific value:
1. Select the column you want to filter.
2. Click the down arrow next to the column name.
3. Click “Does not equal” from the drop-down menu.
4. Enter the value you want to exclude and click OK.
Hello, I’m Cansu, a professional dedicated to creating Excel tutorials, specifically catering to the needs of B2B professionals. With a passion for data analysis and a deep understanding of Microsoft Excel, I have built a reputation for providing comprehensive and user-friendly tutorials that empower businesses to harness the full potential of this powerful software.
I have always been fascinated by the intricate world of numbers and the ability of Excel to transform raw data into meaningful insights. Throughout my career, I have honed my data manipulation, visualization, and automation skills, enabling me to streamline complex processes and drive efficiency in various industries.
As a B2B specialist, I recognize the unique challenges that professionals face when managing and analyzing large volumes of data. With this understanding, I create tutorials tailored to businesses’ specific needs, offering practical solutions to enhance productivity, improve decision-making, and optimize workflows.
My tutorials cover various topics, including advanced formulas and functions, data modeling, pivot tables, macros, and data visualization techniques. I strive to explain complex concepts in a clear and accessible manner, ensuring that even those with limited Excel experience can grasp the concepts and apply them effectively in their work.
In addition to my tutorial work, I actively engage with the Excel community through workshops, webinars, and online forums. I believe in the power of knowledge sharing and collaborative learning, and I am committed to helping professionals unlock their full potential by mastering Excel.
With a strong track record of success and a growing community of satisfied learners, I continue to expand my repertoire of Excel tutorials, keeping up with the latest advancements and features in the software. I aim to empower businesses with the skills and tools they need to thrive in today’s data-driven world.
Suppose you are a B2B professional looking to enhance your Excel skills or a business seeking to improve data management practices. In that case, I invite you to join me on this journey of exploration and mastery. Let’s unlock the true potential of Excel together!
https://www.linkedin.com/in/cansuaydinim/


